Do you want to make your own VPN to protect your traffic on any untrusted network and block unwanted ads and trackers? With Oracle Cloud’s Always Free compute instances, you can set up your own VPN server with Pi-hole DNS resolver to achieve exactly that. The network speed of a virtual machine in one of Oracle’s datacenters is much faster than if one set up Pi-hole on a Raspberry Pi at home.
Configuring a DNS server on the cloud server achieves two purposes. First, the traffic is encrypted using AES-256-CBC or ChaCha20 over any untrusted networks, which could be a public Wi-Fi hotspot, or an ISP recording your activities. Second, it avoids exposing the DNS resolver to the Internet, preventing it from being used in DNS reflection attacks by limiting the access to clients connected to the VPN.
OpenVPN and WireGuard are the two most popular protocols for setting up an open source VPN. WireGuard is a newer, more efficient protocol with much higher throughput (up to 4X higher speed) and lower latency (up to 75% lower ping) than OpenVPN, so we recommend using it for setting up a personal or small office access server.
Another aspect where WireGuard is far superior to OpenVPN is roaming between networks such as between Wi-Fi and mobile data, or between different access points – with a barely noticeable delay to reconnect.
Once it is set up, you can use this WireGuard VPN server in Oracle Cloud as a bastion host to SSH into other servers running in OCI in other subnets, or even to remotely access devices on your home or office LAN provided there is WireGuard installed on the router there as well.
First, we began by provisioning an Always Free compute instance on the AMD EPYC 7551 platform with 1 GB RAM in a public subnet of Oracle Cloud Infrastructure, making sure to assign it a public IP. If you want to make sure than the external IP address of your VPN server does not change even if the instance is recreated, you can reserve an IP for the instance’s VNIC from the Networking portion of the Oracle Cloud console. Note: Non-upgraded free accounts have a max of 1 public reserved IP.
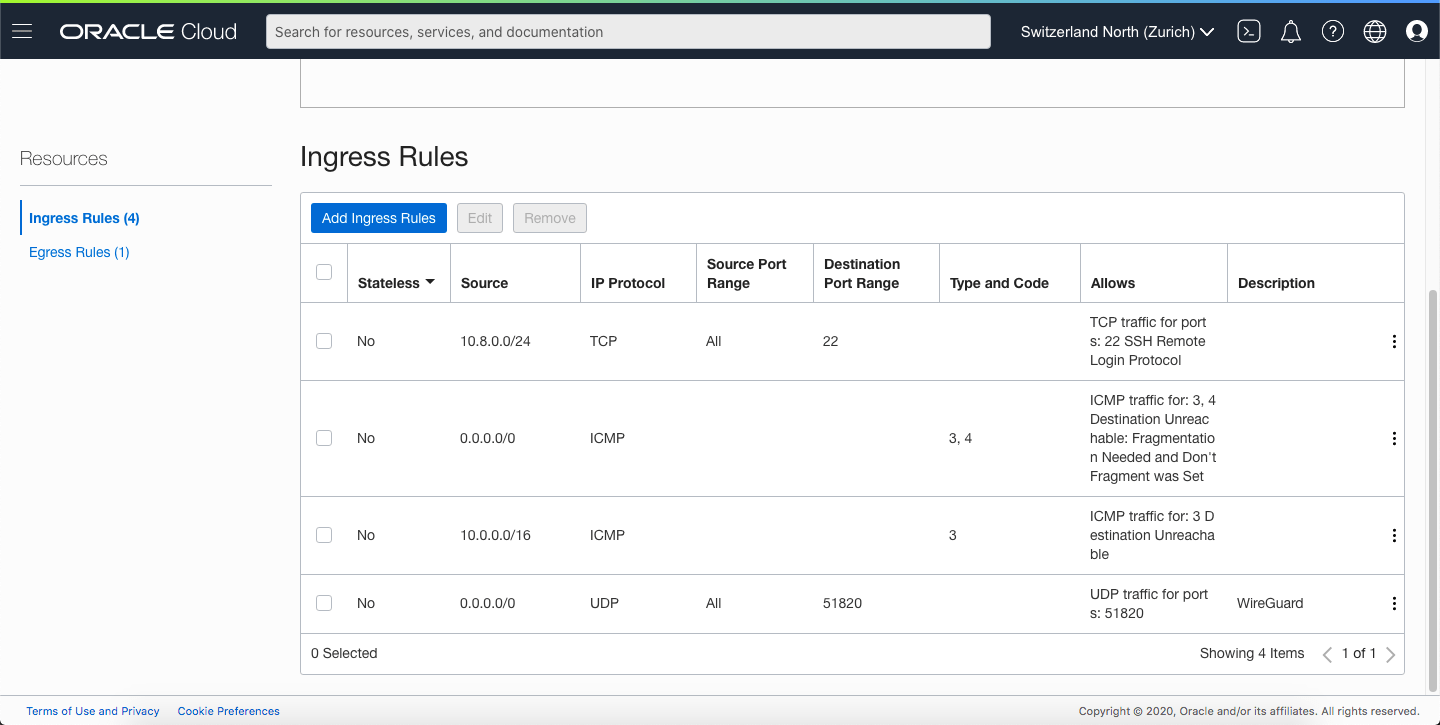
We used CentOS 7 as the platform image for the instance, with a 50GB boot volume. The default public (regional) subnet in Oracle’s default VCN has a security list that permits inbound SSH traffic (22/tcp) from all IPs, and outbound traffic on all ports to all IPs. In addition to the ports that area opened by default, you should also create a stateful ingress rule for the port you plan to use for WireGuard (default is 51820/udp). Also, make sure “disable source/destination check” for the primary VNIC is checked in the Oracle Cloud Console.
The user name to SSH into an Oracle Linux or CentOS instance on OCI is opc, and this user account also has sudo privileges.
Although Pi-hole does have an admin console running on a Lighttpd server listening on port 80 on the localhost interface, it is not necessary (nor recommended) to open up HTTP port 80 through the Security List. This way, the Pi-hole admin console will only be accessible on the WireGuard server’s internal IP (either 10.0.0.2 on the ens3 adapter – if using the default CIDR ranges, or 10.8.0.1 on the wg0 adapter) when connected to the VPN server in Oracle Cloud.
There is already an article published on our website about installing WireGuard on a brand new CentOS server, so with some small modifications to that config file, we set up the same on the Oracle Cloud server.
First, make sure you’ve enabled IP forwarding by creating a custom config file under /etc/sysctl.d/. You can name it anything such as ip-forward.conf.
net.ipv4.ip_forward = 1

net.ipv6.conf.all.forwarding = 1
To set the above values without restarting, invoke the following commands.
sysctl -w net.ipv4.ip_forward=1

sysctl -w net.ipv6.conf.all.forwarding=1
WireGuard server configuration (on Oracle Cloud)
Then, copy and paste the following in /etc/wireguard/wg0.conf with your own private key for the server, and the public keys for the clients. The PostUp and PostDown commands add and remove firewall rules from Firewalld to allow WireGuard traffic in the public zone (traffic on the ens3 interface) and Pi-hole traffic in the internal zone (traffic on the wg0 interface).
You should have one [Peer] block for each device you wish to connect to WireGuard – each with their own keypair. Only the public key for the peers should be listed in the config file. The corresponding private key is listed in the config file residing on the client.
[Interface]
Address = 10.8.0.1/24
PostUp = firewall-cmd --zone=public --add-port 51820/udp && firewall-cmd --zone=internal --add-interface=wg0 && firewall-cmd --zone=internal --add-service=dns && firewall-cmd --zone=internal --add-service=http && firewall-cmd --zone=public --add-masquerade
PostDown = firewall-cmd --zone=public --remove-port 51820/udp && firewall-cmd --zone=internal --remove-interface=wg0 && firewall-cmd --zone=internal --remove-service=dns && firewall-cmd --zone=internal --remove-service=http && firewall-cmd --zone=public --remove-masquerade
ListenPort = 51820
PrivateKey = REDACTED

[Peer]
PublicKey = REDACTED
AllowedIPs = 10.8.0.2/32
PersistentKeepalive = 10

[Peer]
PublicKey = REDACTED
AllowedIPs = 10.8.0.3/32
PersistentKeepalive = 10
WireGuard client configuration (on laptop, mobile device, etc.)
This client configuration is for the peer with the static IP address of 10.8.0.2. The AllowedIPs set to 0.0.0.0/0, ::/0 routes all IPV4 and IPV6 traffic through the VPN when it is connected. Be sure to replace Oracle_Cloud_IP below with the actual public IPV4 of your Oracle Cloud instance.
[Interface]
PrivateKey = REDACTED
Address = 10.8.0.2/32
DNS = 10.8.0.1

[Peer]
PublicKey = REDACTED
AllowedIPs = 0.0.0.0/0, ::/0
Endpoint = Oracle_Cloud_IP:51820
PersistentKeepalive = 10
Set up Pi-hole
Before connecting your client device(s) to the VPN server, be sure to set up Pi-hole using the one-line installer from the SSH console of your Oracle Cloud instance. By installing a DNS service on the server, all name lookup traffic can be routed through the VPN without any DNS leaks that could compromise your privacy – with the added benefit of ad and tracker blocking blacklists.
curl -sSL https://install.pi-hole.net | bash
When installing Pi-hole, select the default ens3 adapter, and use the defaults of 10.0.0.1 as the gateway and 10.0.0.2 as the interface address (if this was the first compute instance created in this OCI subnet). Then, select an upstream DNS resolver (we used Quad9) and select the block lists to enable. Then, you’ll be asked the level you want to log DNS queries, depending whether you prefer more extensive stats (full logging), or more privacy (no logging).
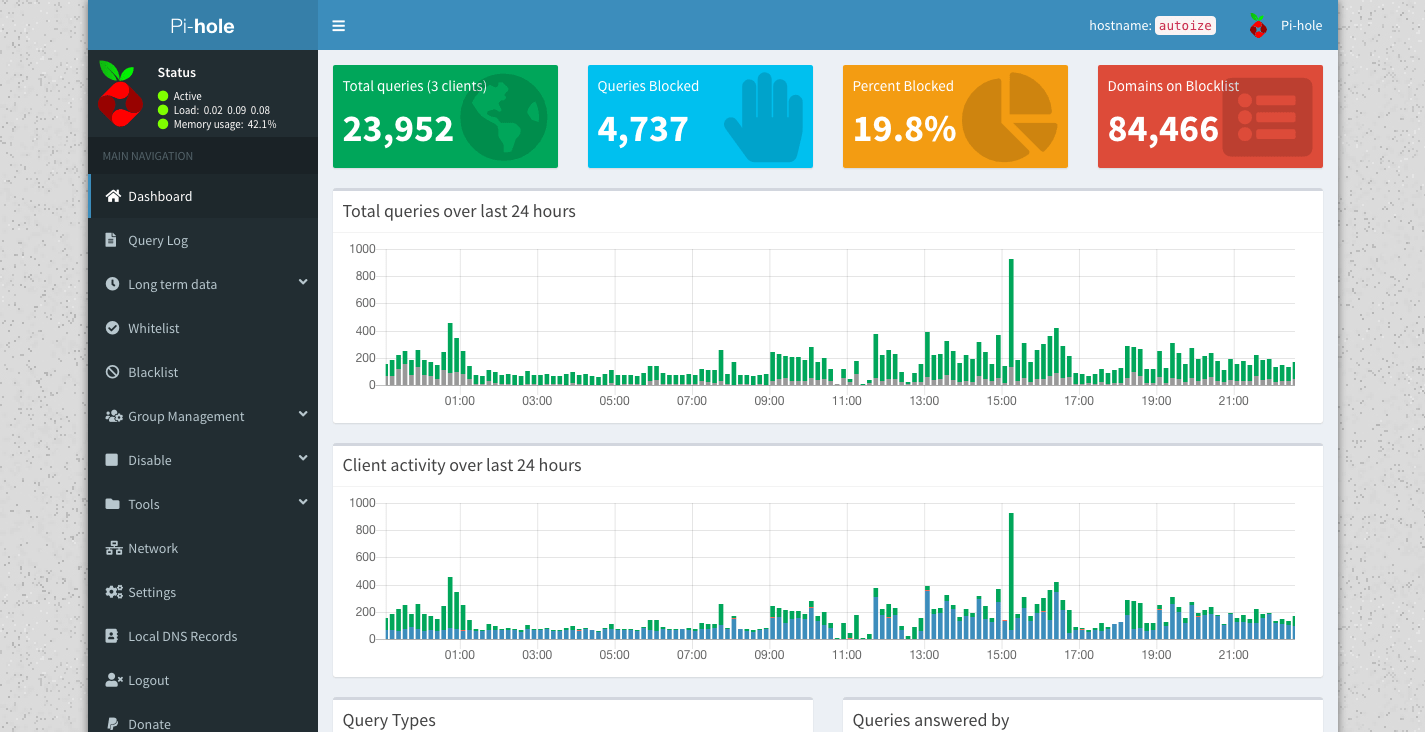
Once Pi-hole is finished installing with the automated script, a message will appear in the console with a randomly generated admin password you’ll need to access the Pi-hole admin console at http://10.0.0.2/ or http://10.8.0.1/ when connected to the VPN.
Configure your devices to use the Pi-hole as their DNS server
using:

IPv4:        10.0.0.2
IPv6:        Not Configured

If you set a new IP address, you should restart the Pi.

The install log is in /etc/pihole.

View the web interface at http://pi.hole/admin or
http://10.0.0.2/admin

Your Admin Webpage login password is REDACTED
Conclusion
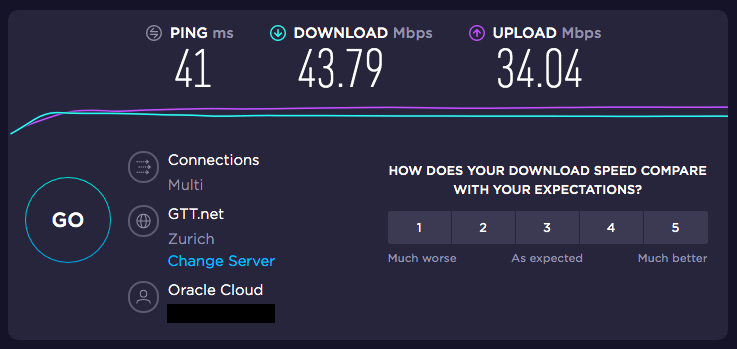
Once connected to the WireGuard VPN server in Oracle Cloud with 10.8.0.1 configured as the DNS server, all traffic should be tunneled through Oracle Cloud Infrastructure with Pi-hole as the DNS resolver. The performance overhead on the throughput and ping will be relatively small compared to an OpenVPN-based service.