

WireGuard is an open-source VPN protocol comparable to OpenVPN, IKEv2, or IPSec with some key differences which have led the creator and lead maintainer of Linux, Linus Torvalds, to praise the technology as a “work of art.” That’s high praise from Torvalds, who is known to have a blunt streak when it comes to assessing open-source code proposed to be merged with the Linux kernel.
On desktop & server distributions of Linux, WireGuard is built into the heart of the operating system as a kernel module, meaning it has a much lower memory overhead compared to conventional VPN protocols like OpenVPN, which run in user space. WireGuard also boasts other desirable security & performance characteristics. The protocol can maintain a connection even as a user roams between Wi-Fi access points and cellular networks – preventing irritating and security-compromising disconnects.
WireGuard servers are stealthy by design; they do not respond to unsolicited packets unless the client presents the server’s public key. This makes it more difficult for adversaries to probe an endpoint to determine if it is running WireGuard. Furthermore, WireGuard is a “quiet” protocol that aims to minimize the bandwidth overhead (e.g. keep-alive packets, symmetric key rotation) required to maintain a secure state when the tunnel is not transmitting data.
At just 3,900 lines of code, WireGuard leverages much more modern cryptographic ciphers compared to old-guard protocols like OpenVPN, which weighs in at 30 times the number of lines of code. This simplicity makes WireGuard much quicker for a cryptographic expert to audit, as well as for the open-source community to identify & correct security weaknesses.
The benefits stemming from the design of WireGuard are not just theoretical. Have you ever been tempted to use a public Wi-Fi network without a VPN to conserve your battery life or avoid slowing down a sluggish connection further? With WireGuard, you will no longer have to make these compromises so you can protect your privacy & security every time.
Setting up a new WireGuard connection is similar to generating & authorizing an SSH key to connect to a Linux server, a routine activity any sysadmin is accustomed to. The WireGuard command, wg, is used to generate a base64-encoded 256-bit public and private key pair for each peer connected to a WireGuard tunnel. The public keys identifying each peer, as well as the connection parameters are exchanged out-of-band prior to establishing a VPN session.
Like any new technology, there are of course, drawbacks that don’t make WireGuard the right tool for every situation. The WireGuard protocol does not have the capability to assign unique IPs to each peer through DHCP. Therefore, address allocations must be managed manually to avoid any IP conflicts. Also, WireGuard supports UDP only, not TCP — Although UDP is usually recommended for VPNs based on performance considerations, TCP VPNs may facilitate more reliable data transfers over slow or unstable connections.
Also, another problem that is particularly troubling for commercial VPN operators is how WireGuard must keep a record of each peer’s connection IP address to negotiate a connection. Many users turn to paid VPN services for enhanced privacy & anonymity, so logging their unmasked IP address is a non-starter for all the companies swearing by their “no logging” policies.
AzireVPN, a Swedish VPN provider among the first to provide a paid VPN service incorporating WireGuard, asked the creator of WireGuard himself to develop them a rootkit module that makes it non-trivial for the operators to observe the client’s’ unprotected IP addresses. This protects the operator from being coerced by any authority to give up server logs that may correlate a VPN user with their real-life identity (through their payment method). If other VPN companies wish to adopt WireGuard, they will likely have to adopt similar mitigations to prevent compromising their users’ privacy.
For site-to-site VPNs and road warriors accessing their corporate network though, WireGuard might be exactly what the doctor ordered. With these applications, anonymity is not the goal, but securing the data travelling through the tunnel using encryption is. Although WireGuard is still pending a security audit and considered experimental for mission-critical applications, it has already been formally verified by some cryptographers.
No security software is guaranteed to be “bug free”, as evidenced by the “replay attack” vulnerability recently revealed in the Cisco AnyConnect, F5 Edge Client, and Palo Alto Networks GlobalProtect VPN clients by the US Department of Homeland Security CERT. Gaping security holes can go unnoticed for a long time in proprietary software, or worse, deliberately introduced by governments & intelligence agencies to eavesdrop on their users. The WireGuard protocol is 100% open source, as are the Linux, Mac OS, Android, and iOS clients. Currently, the Windows client TUNSafe is developed by a third-party developer and parts of it remain closed source, so users download it at their own risk.
If you want to try WireGuard before it is more broadly deployed, you can create your own WireGuard VPN for surfing, using an inexpensive virtual server with a cloud provider such as Linode. The plan starting from $5/mo with 1 CPU and 1GB RAM is sufficient for several connected devices. Any other cloud provider supporting full/paravirtualization, IPv4 forwarding, and custom kernel modules is supported, but going with Linode is significantly less expensive than using AWS for anything more than an experiment. Even Linode’s most inexpensive plan includes at least 1TB outbound bandwidth, whereas AWS charges $0.10/GB after the first 15GB (for the first year, on the free tier).
For this tutorial, we use a CentOS 7 image to install and configure a WireGuard server, then connect a Linux, Mac, Android, and iOS client (Windows coming soon).
- Spin up a virtual server on Linode.
Use this link to sign up for an account on Linode if you would like to support us. It costs you nothing additional. To establish your account on Linode, click the link in the verification email and link your payment information.
Then, click “Linodes” on the left sidebar of the Linde Manager to begin deploying your WireGuard instance.
- Choose a Distribution: CentOS 7
- Region: Choose the data center closest to your physical location.
- Linode Plan: Nanode tab > Nanode 1GB
- Linode Label: wireguard
- SSH Keys: Add your SSH RSA public key.
If you skip this step, you can set a root password to administer the server (less secure).
- Add the WireGuard YUM repo.
Connect to the server by SSH as root and do an initial yum update.
yum update
Next, add the WireGuard YUM repo to the server and install the packages.
sudo curl -Lo /etc/yum.repos.d/wireguard.repo https://copr.fedorainfracloud.org/coprs/jdoss/wireguard/repo/epel-7/jdoss-wireguard-epel-7.repo
yum install epel-release
yum install wireguard-dkms wireguard-tools
- Enable IPv4 forwarding in
/etc/sysctl.conf
The first command enables IPv4 forwarding for the session, and the second command enables it permanently.
sysctl -w net.ipv4.ip_forward=1
net.ipv4.ip_forward = 1 >> /etc/sysctl.conf
- Generate the public & private key pair for the WireGuard server. The keys will be outputted to the current directory. You can run this command from your home directory if you would like them to be placed there.
umask 077
wg genkey | tee privatekey | wg pubkey > publickey
Make a note of the server public key as you will require it to set up the WireGuard clients later. All WireGuard public and private key strings end with an equals “=” sign.
cat publickey
eqXxXxXxXxXxXxXxXxXxXxXxXxXxXxXxXxXxXxXxXQ4=
- Generate the key pair for the WireGuard client. If a Linux client, use the same command as above in the terminal. For Mac, Android, or iOS, install the GUI apps from the following links:
- Mac client: https://itunes.apple.com/us/app/wireguard/id1451685025
- Android client: https://play.google.com/store/apps/details?id=com.wireguard.android
- iOS client: https://itunes.apple.com/us/app/wireguard/id1441195209
In the graphical clients, you can generate a public & private key pair with one click (or tap). Record the public key string and email it to yourself, to copy and paste it into the [Peer] block of the server configuration file.
Mac: From the WireGuard icon in the system tray, select “Manage tunnels.” Click the “+” button from the list and “Create empty tunnel.” The public key will appear in a dialog. Keep this window open to finish the client configuration once the server is up.
Android: Launch the WireGuard app and click the “+” button, then choose “Create from scratch.” Click “Generate” beside “Private key” and the public key will appear in the line below. Keep the app open to finish the client configuration once the server is up.
iOS: Launch the WireGuard app and click “Add a tunnel” then choose “Create from scratch.” In the configuration screen, click “Generate keypair” and the generated public key will appear in the line marked “Public key.” Keep the app open to finish the client configuration once the server is up.
WireGuard Server Configuration
- Edit and configure
/etc/wireguard/wg0.confon the WireGuard server. You may add multiple[Peer]blocks, one for each device you plan to connect with its own public key and static IP address defined byAllowedIPs.
It is imperative that each peer is assigned its own unique IP address within the tunnel. A /24 subnet can support a maximum of 255 clients, and each /32 address represents a single IP address.
For example, if the server Address is 10.8.0.1/24, you could increment the AllowedIPs by 1 for each client, 10.8.0.2/32, 10.8.0.3/32, and so on so forth.
Save and close the file once done. For further changes to wg0.conf in the future, ensure you bring the wg0 interface down with wg-quick down wg0 first; otherwise your changes can be overwritten automatically by the configuration script.
nano /etc/wireguard/wg0.conf
[Interface]

Address = 10.8.0.1/24

SaveConfig = true

PostUp = iptables -A FORWARD -i wg0 -j ACCEPT; iptables -t nat -A POSTROUTING -o eth0 -j MASQUERADE; ip6tables -A FORWARD -i wg0 -j ACCEPT; ip6tables -t nat -A POSTROUTING -o eth0 -j MASQUERADE

PostDown = iptables -D FORWARD -i wg0 -j ACCEPT; iptables -t nat -D POSTROUTING -o eth0 -j MASQUERADE; ip6tables -D FORWARD -i wg0 -j ACCEPT; ip6tables -t nat -D POSTROUTING -o eth0 -j MASQUERADE

ListenPort = 51820

PrivateKey = <server private key>
[Peer]

PublicKey = <client public key>

AllowedIPs = 10.8.0.2/32
[Peer]

PublicKey = <client2 public key>

AllowedIPs = 10.8.0.3/32
- Start the
wg0interface on the WireGuard server and enable on boot.
wg-quick up wg0
systemctl enable wg-quick@wg0
- Setup and configure
unboundas a DNS server on the WireGuard VPN server. Credit to CKN.io for the recommended configuration, which we adapted for our example.
yum install unbound unbound-host
curl -o /var/lib/unbound/root.hints https://www.internic.net/domain/named.cache
nano /etc/unbound/unbound.conf
server:

num-threads: 4

#Enable logs

verbosity: 1

#list of Root DNS Server

root-hints: "/var/lib/unbound/root.hints"

#Use the root servers key for DNSSEC

auto-trust-anchor-file: "/var/lib/unbound/root.key"

#Respond to DNS requests on all interfaces

interface: 0.0.0.0

max-udp-size: 3072

#Authorized IPs to access the DNS Server

access-control: 0.0.0.0/0                 refuse

access-control: 127.0.0.1                 allow

access-control: 10.8.0.1/24         allow

#not allowed to be returned for public internet  names

private-address: 10.8.0.1/24

# Hide DNS Server info

hide-identity: yes

hide-version: yes

#Limit DNS Fraud and use DNSSEC

harden-glue: yes

harden-dnssec-stripped: yes

harden-referral-path: yes

#Add an unwanted reply threshold to clean the cache and avoid when possible a DNS Poisoning

unwanted-reply-threshold: 10000000

#Have the validator print validation failures to the log.

val-log-level: 1

#Minimum lifetime of cache entries in seconds

cache-min-ttl: 300

#Maximum lifetime of cached entries

cache-max-ttl: 14400

prefetch: yes

prefetch-key: yes
systemctl enable unbound
systemctl start unbound
WireGuard Client Configuration for Linux or Mac
- Edit and configure
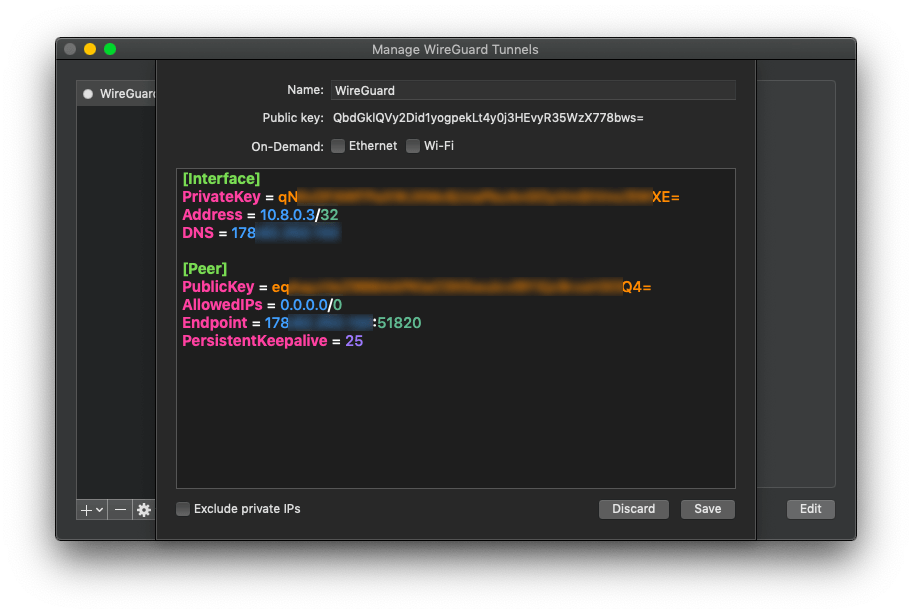
/etc/wireguard/wg0.confon a Linux client, or copy & paste the following configuration blocks into the tunnel configuration window in the graphical interface for Mac.
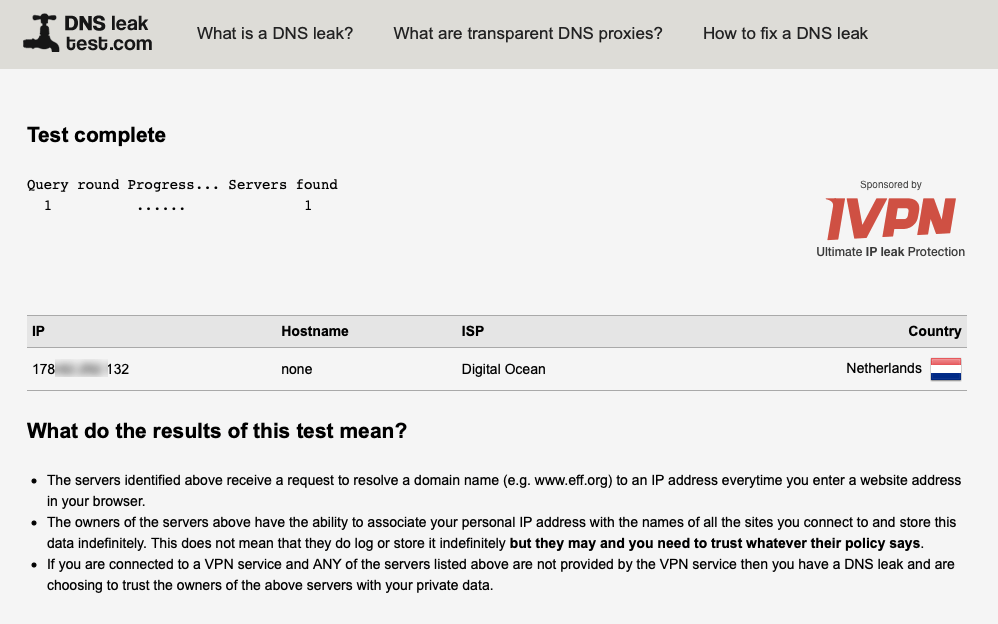
Setting DNS to the public IP address of the WireGuard server is very important to prevent DNS leaks. Otherwise, DNS queries will be handled locally by the client’s local ISP (a breach of privacy) instead of forwarded to the WireGuard server to perform lookups on its behalf.
You can check that DNS is not leaking by connecting to your WireGuard VPN and using a tool such as DNS leak test. If configured correctly, the results should show the IP address and provider of your VPN server, not your ISP nor a third-party DNS service (e.g. Google, CloudFlare, OpenDNS).

In the client configuration, AllowedIPs has a different meaning from AllowedIPs in the server configuration. The static IP for the client [assigned in the server configuration] is defined by Address under the [Interface] block [of the client configuration].
Here, AllowedIPs = 0.0.0.0/0 means you wish to forward all network traffic from the client through the WireGuard tunnel – a typical configuration for a VPN used to encrypt your Internet activity and mask your IP from prying eyes.
PersistentKeepalive = 25 means the client will perform a handshake with the WireGuard server every 25 seconds to keep the connection alive when it itself is behind a NAT (such as a home router).
Linux
nano /etc/wireguard/wg0.conf
[Interface]

PrivateKey = <client private key>

Address = 10.8.0.2/32

DNS = <server public ip>
[Peer]

PublicKey = <server public key>

Endpoint = <server public ip>:51820

AllowedIPs = 0.0.0.0/0

PersistentKeepalive = 25
wg-quick up wg0
systemctl enable wg-quick@wg0
Mac OS

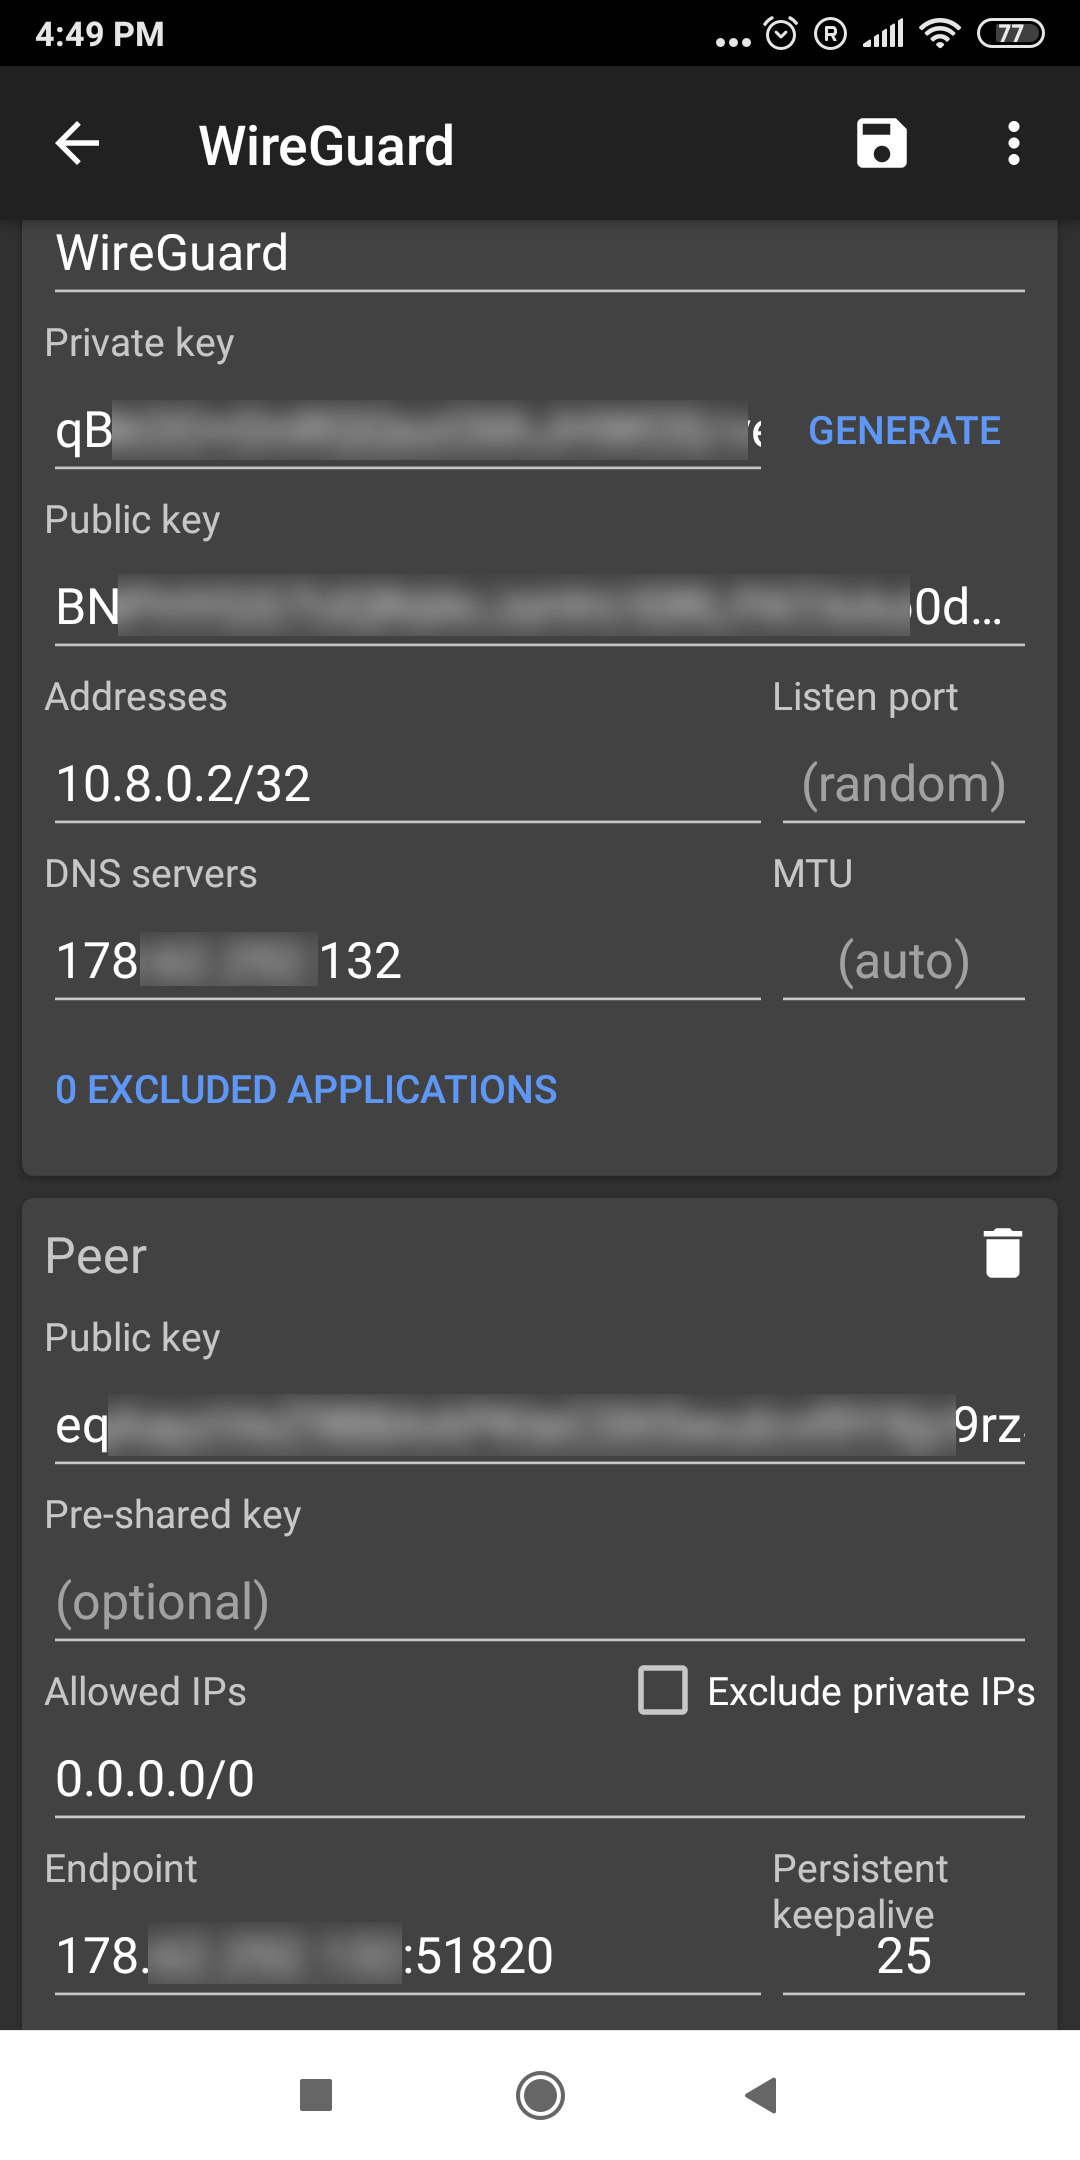
WireGuard Client Configuration for Android or iOS
- Connect using the Android or iOS apps. The interface for both mobile operating systems are almost identical, so for brevity, we just show a screenshot of the Android configuration.
Android or iOS

In the future, we will publish articles exploring how to use WireGuard within your cloud infrastructure to set up a point-to-point or site-to-site VPN. Like other VPN protocols, the use cases for WireGuard are not simply limited to secure Internet surfing. It is a versatile tool that can be used to encrypt traffic internally between your servers, or act as a link between two networks (over an untrusted network such as the Internet).


3 Comments.
Good evening,
first of all, thank you for this article ! I’ve been trying to resolve the problem of the DNS leak for my own VPN, and tried to follow all your instructions. I also went to see the post on ckn.io but I can’t resolve my problem and any DNS leak test fails …
I don’t think that the unbound is the problem, since I get results with the nslookup command. Would you be kind and try to help me ?
Hi Simon,
Can you try stopping and starting the unbound service to see if there is any error message?
You can view the status of the service in detail by using “systemctl status unbound”, and using “journalctl -xe” to display error messages in full (if any). If you can post the details of any errors, we might be able to help you further.
Regards,
The Autoize Team
Hi, I have wireguard server in openwrt. It works perfectly, I can access several lan network devices, except in a raspberry with nextcloud and docker with home assistant. Nor does it ping. Any solution? Thank you