
See How Containers Help Deploy Web Applications
Multiple WordPress Sites on Docker
 Moving from a hosting account to a virtual or dedicated server? With add-on domains in cPanel, you could host a virtually unlimited number of sites on your account. A cloud compute instance, such as one from AWS, provides you with a single IP address. As you might know, only one web server can bind to port 80 at a time – so how do you host multiple websites on your own Linux box?
The amount of CPU and RAM on your own server is more than the shared pool of resources normally on a hosting account. If your websites are not extremely high traffic (less than 5,000 visitors/month), why let the excess resources go to waste? An instance with 2 to 4 GB of RAM could easily host multiple WordPress sites.
You can run multiple WordPress websites using a single MySQL database server and virtual hosts configuration in Apache, but nowadays, there’s an easier, more “cloud native” way to achieve the same result: Docker. Docker is a container runtime that gives each application its own user space, complete with process tree and file system, on a single Linux machine.
Reasons to Use Docker to Containerize Traditional Apps
- Easy to deploy – With Docker, you pull app images directly from a repository with all the dependencies they need built in. In general, each container is responsible for a single service, hence the saying “micro-services architecture.” In the past, a single “monolithic” app would have many components that you would individually need to download the runtimes for.
- Portable – If any of your containers outgrow the physical infrastructure it lives on, you can use the commands docker commit (create a new image of the container with your additions to the layered file system), docker export (download a tar archive of the container) and docker save (download a tar archive of the attached volumes) to back it up. With a scheduling and orchestration tool such as Docker Swarm or Kubernetes, you can even scale up a service across a Docker cluster with a single command.
- Secure – Docker containers are isolated from one another, making it difficult for an attacker to gain access to other services from a single compromised application. Unless you are running a container with the –privileged flag, a container has very limited permissions on the host system, protecting the kernel from a malicious attack.
Docker Recipe: Host Multiple WordPress Sites behind Nginx Proxy
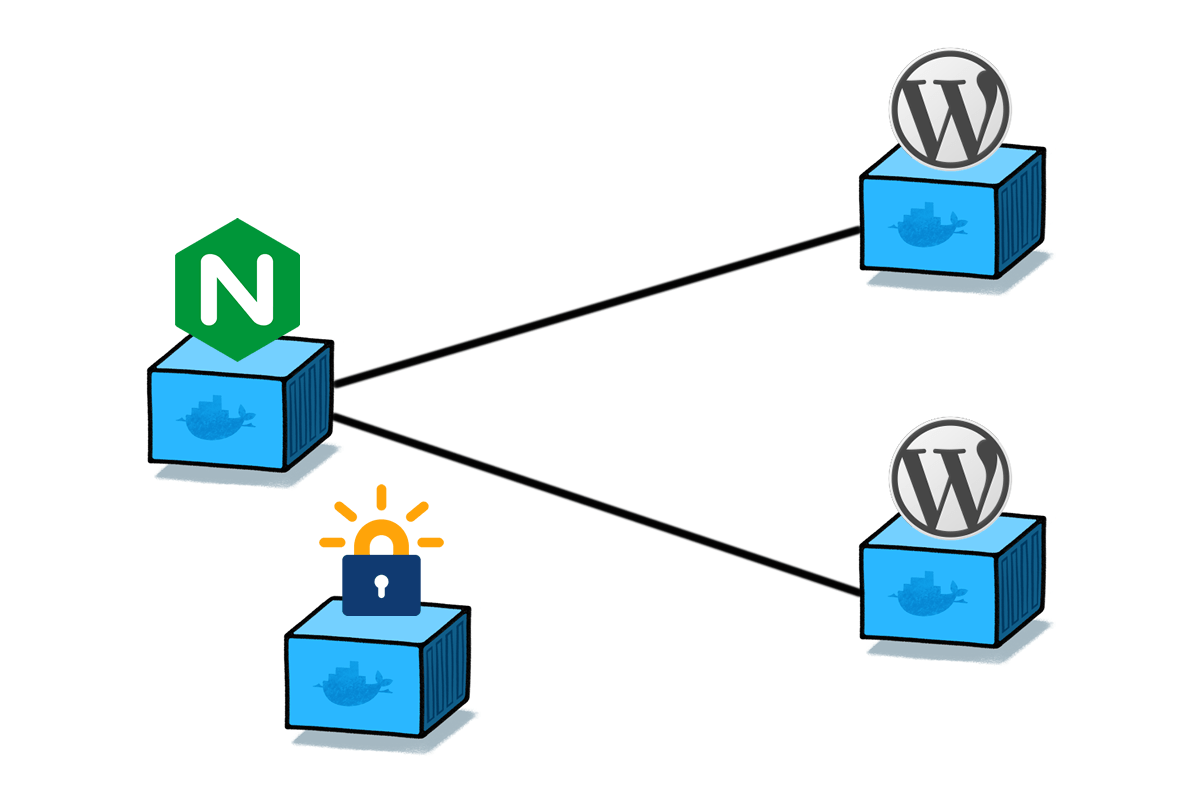
With the following “Docker recipe”, you will set up a Docker node running separate WordPress installation on two domains or subdomains. This setup is pretty much production ready, with:
- nginx reverse proxy by Jason Wilder that automatically routes traffic to new containers that are created with the
VIRTUAL_HOST=sub.domain.comenvironment variable. This nifty container performs a similar function to Traefik or HAProxy, but it is amazingly simple to use. - letsencrypt-nginx-proxy-companion by Yves Blusseau that obtains an SSL certificate from Let’s Encrypt, the free Certificate Authority, when you specify the
LETSENCRYPT_HOSTandLETS_ENCRYPT_EMAILenvironment variables on any application container (i.e. WordPress) that needs to be served over HTTPS. The companion even pings Let’s Encrypt every 90 days to automatically renew your certificates! - Official MariaDB and WordPress containers from the docker-library, approved by the Docker Store.
Many thanks to the maintainers of these containers, who have open sourced the Dockerfiles on GitHub and are well reputed in the community. The only things you really need to change for the recipe below to be ready to go are the parameters highlighted in blue.
Create DNS Records
From your DNS provider, which may be your domain registrar or a third-party service such as CloudFlare, create A records for the domains and/or subdomains where you want to install WordPress, towards the outward facing IP address of your Docker host. Use a short time to live (TTL), such as 3,600 seconds or less to reduce the time that the DNS records will take to propagate.
Install Docker
Find out how to set up your Docker environment on Linux here. You need SSH access to your server, which should run Ubuntu, Debian, Fedora or CentOS in order to use the community edition of Docker. If your VPS provider, such as DigitalOcean provides a “one click install”, it’s okay to use that as well.
Create swapfile
Create a swap file to prevent your MariaDB or WordPress containers from running out of memory under load.
sudo fallocate -l 1G /swapfile

sudo chmod 600 /swapfile

sudo mkswap /swapfile

sudo swapon /swapfile

sudo cp /etc/fstab /etc/fstab.bak

echo '/swapfile none swap sw 0 0' | sudo tee -a /etc/fstab
Create non-root user account for Docker (recommended)
You can execute docker commands as root, but it’s recommended to create a normal user account and add that user to the docker group. For security reasons, you shouldn’t generally be performing tasks on your Linux box as root. Instead, add a regular user account to the sudo (Ubuntu) or wheel (CentOS) group so you can execute commands as sudo.
sudo useradd dockeruser

sudo usermod -aG docker dockeruser

sudo usermod -aG sudo dockeruser

login dockeruser
Run the Nginx-Proxy, MariaDB, WordPress containers
1. First, create a Docker network. This enables container DNS, which allows containers to communicate with one another by name.
docker network create dockerwp
2. Start the Nginx proxy.
docker run --name nginx-proxy --net dockerwp -p 80:80 -p 443:443 -v ~/certs:/etc/nginx/certs -v /etc/nginx/vhost.d -v /usr/share/nginx/html -v /var/run/docker.sock:/tmp/docker.sock:ro --label com.github.jrcs.letsencrypt_nginx_proxy_companion.nginx_proxy -d --restart always jwilder/nginx-proxy
3. Start the Let’s Encrypt Nginx Proxy Companion.
docker run --name letsencrypt-nginx-proxy-companion --net dockerwp -v ~/certs:/etc/nginx/certs:rw -v /var/run/docker.sock:/var/run/docker.sock:ro --volumes-from nginx-proxy -d --restart always jrcs/letsencrypt-nginx-proxy-companion
4. Start the MariaDB containers.
docker run --name mariadb1 --net dockerwp -v mariadb1:/var/lib/mysql -e MYSQL_ROOT_PASSWORD=supersecret -e MYSQL_DATABASE=db1 -e MYSQL_USER=db1user -e MYSQL_PASSWORD=secret -d --restart always mariadb
docker run --name mariadb2 --net dockerwp -v mariadb2:/var/lib/mysql -e MYSQL_ROOT_PASSWORD=supersecret -e MYSQL_DATABASE=db2 -e MYSQL_USER=db2user -e MYSQL_PASSWORD=secret -d --restart always mariadb
5. Enable large file uploads in WordPress (> 2 MB).
printf "file_uploads = On\nmemory_limit = 64M\nupload_max_filesize = 64M\npost_max_size = 64M\nmax_execution_time = 600" > ~/uploads.ini
6. Start the WordPress containers.
docker run --name wordpress1 --net dockerwp -v wordpress1:/var/www/html -v ~/uploads.ini:/usr/local/etc/php/conf.d/uploads.ini -e WORDPRESS_DB_HOST=mariadb1:3306 -e WORDPRESS_DB_NAME=db1 -e WORDPRESS_DB_USER=db1user -e WORDPRESS_DB_PASSWORD=secret -e VIRTUAL_HOST=sub.domain1.com -e LETSENCRYPT_HOST=sub.domain1.com -e LETSENCRYPT_EMAIL=admin@domain1.com -d --restart always wordpress
docker run --name wordpress2 --net dockerwp -v wordpress2:/var/www/html -v ~/uploads.ini:/usr/local/etc/php/conf.d/uploads.ini -e WORDPRESS_DB_HOST=mariadb2:3306 -e WORDPRESS_DB_NAME=db2 -e WORDPRESS_DB_USER=db2user -e WORDPRESS_DB_PASSWORD=secret -e VIRTUAL_HOST=sub.domain2.com -e LETSENCRYPT_HOST=sub.domain2.com -e LETSENCRYPT_EMAIL=admin@domain2.com -d --restart always wordpress
Explore More
Now that you have two secure, containerized WordPress installations, you have the capability to add a third, forth or more. For further exploration, why not try hosting other applications besides WordPress behind the Nginx proxy? Any software that is available as a Docker image and listens on port 80 is possible. This simple, yet powerful architecture is useful for hosting multiple containerized applications with a single IP, allowing you to do even more with fewer cloud instances.