

HAProxy is one of the most popular open source load balancers available in the market today. Although many sysadmins have turned to managed load balancers such as Amazon ALB (Application Load Balancer) or DigitalOcean Load Balancers to horizontally scale their web applications, there are still reasons why you might want to run your own HAProxy load balancer. Managed load balancers can be easily configured from your cloud provider’s dashboard, and take the pain out of scaling, since the load balancing layer doesn’t need to be manually scaled up if your website or web application receives a sudden influx of requests. Because of their managed nature, load balancing services benefit from the entire pool of resources dedicated towards them at the respective cloud providers. The downside of course, if you’re not using a cloud provider with a load balancer that’s available for a flat monthly fee, is that you’ll be billed accordingly for the Load Balancing Capacity Units (LCU) and outgoing bandwidth for the traffic incurred. In general though, as long as your backend can withstand the traffic, your application will remain available to its users.
Despite their convenience and ease of use, managed load balancers have their limitations when it comes to configurability. For example, both Amazon ALB and DigitalOcean Load Balancers timeout HTTP requests that do not receive a response from the backend server within 60 seconds. With AWS, the backend timeout can be raised up to 15 minutes through the EC2 dashboard, but with DigitalOcean, the limit is hardcoded (it cannot be modified even by Support). If your application (such as involving large file uploads) requires long-running scripts that would take a longer time for the server to provide an HTTP response, you would either need to rewrite the application to handle request processing asynchronously (not always possible), or set up your own load balancer using HAProxy or Nginx. With a load balancer that you manage by yourself, you have complete control to set the request timeout as high as your application requires.
This tutorial adapts the instructions of How To Set Up Highly Available HAProxy Servers with Keepalived and Floating IPs on Ubuntu 14.04 published in the DigitalOcean Community in October 2015, for Ubuntu 18.04 “Bionic Beaver” and highlights the modifications needed for the automatic failover using Keepalived and a DigitalOcean Floating IP. The Floating IP is a public IPv4 address which can be detached, and reattached to a different DigitalOcean droplet through an API command.
In addition (as an extension to the original tutorial), we will illustrate how to enable SSL termination on the HAProxy frontend using the Let’s Encrypt ACME client. After the certificate is auto-renewed on the primary load balancer instance, it will be copied over to the secondary load balancer instance using a shell script.
This highly available (HA) architecture has the following components:
- A domain name (example.com) using DigitalOcean DNS’s authoritative name servers
- A DigitalOcean API Personal Access Token with Read and Write scopes
- 2 DigitalOcean Droplets for the HAProxy primary and secondary servers (frontend)
- For production use, we recommend a minimum of 2GB RAM for each droplet and up, depending on the expected number of client connections
- 2 DigitalOcean Droplets acting as application servers (backend)
All of the DigitalOcean droplets should reside within the same datacenter so they can communicate over private networking.

Set up the backend application servers
Provision two droplets and install Nginx on them.
HAProxy supports proxying HTTP as well as TCP requests, so the app servers can practically represent any service listening on a TCP port (e.g. Galera Cluster). In this example, we are assuming the application is a typical HTTP application listening on a web server over port 8080.
Image: Ubuntu 18.04 (LTS) x64
Additional options: Private Networking, Monitoring
Number of Droplets: 2
Hostnames: web and web-02
Note down the private IP addresses of the Nginx droplets from the DigitalOcean dashboard, in our case the IP addresses were 10.133.252.236 and 10.133.244.249.
SSH into both servers and run the following commands on both web and web-02.
sudo apt update && sudo apt upgrade -y

sudo apt install nginx
Edit these lines, so the default_server listens over port 8080 instead of 80, and comment out the IPv6 line as we will not be using the protocol.
sudo nano /etc/nginx/sites-enabled/default
listen web_server_private_IP:8080 default_server;

# listen [::]:8080 default_server;
sudo systemctl enable nginx

sudo service nginx restart
Configure DigitalOcean DNS as the authoritative nameserver for your domain
From your current domain registrar, point your second level domain (e.g. example.com) at DigitalOcean’s nameservers.
ns1.digitalocean.com

ns2.digitalocean.com

ns3.digitalocean.com
Then add the domain in the Networking > Domains section of the DigitalOcean control panel.
Next you will return to this section to create an A record to the Floating IP.
Set up the HAProxy servers
Provision two droplets, which will be set up in an active/passive HAProxy configuration.
Image: Ubuntu 18.04 (LTS) x64
Additional options: Private Networking, Monitoring
Number of Droplets: 2
Hostnames: haproxy and haproxy-02
Note down the private IP addresses the HAProxy droplets from the DigitalOcean dashboard, in our case the IP addresses were 10.133.240.138 and 10.133.240.50.
—- Assign Elastic IP and Create DNS Records
Assign an Elastic IP to the haproxy droplet from the Networking > Floating IPs section of the DigitalOcean control panel. As long as the Floating IP is attached to a droplet, there is no additional cost.
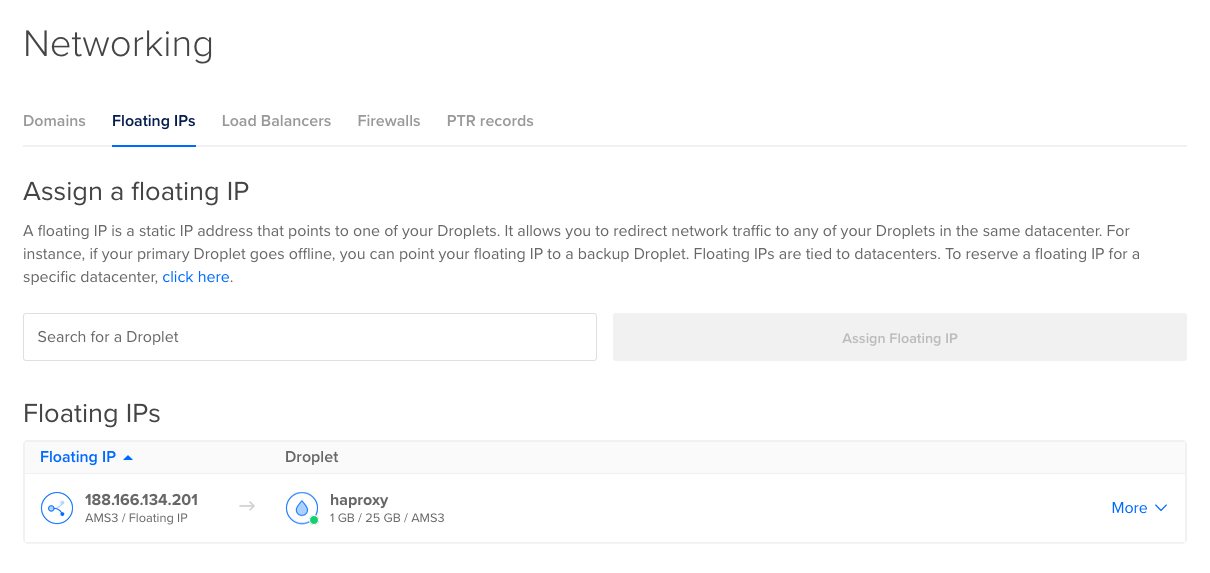
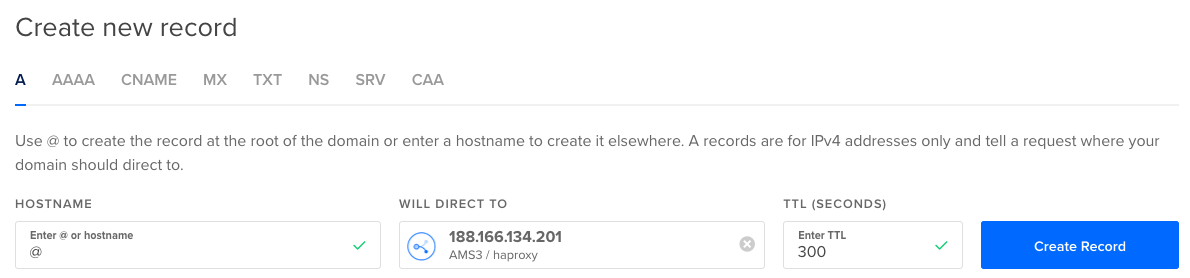
Create an A record to the floating IP in your DNS zone created earlier at Networking > Domains.
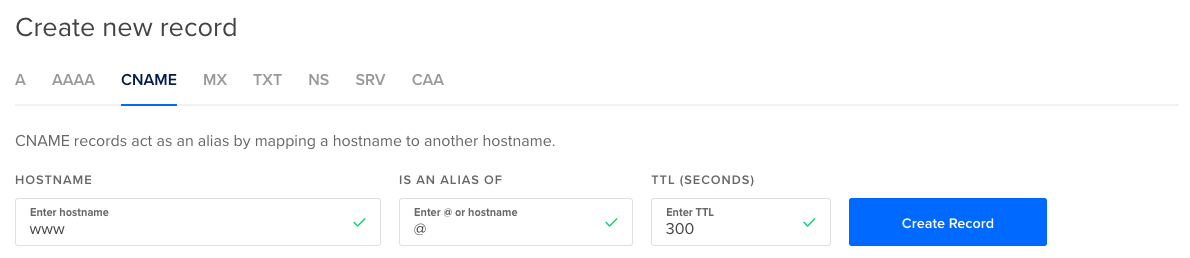
Create a CNAME record from the www to non-www version of your domain.
—- Create a DigitalOcean API token
Browse to API in the left sidebar of the DigitalOcean control panel and click “Generate New Token” to create a new Personal Access Token. The Token Name can be anything to help you remember what the purpose of the token is – we used “HAProxy.”
Ensure that both “Read (default)” and “Write (optional)” are checked off to allow full access to the DigitalOcean account. Record the token in a safe place. The token will not be shown again, so if you lose it, you will need to regenerate it.
Install dependencies and configure the primary HAProxy server
SSH into the primary server haproxy and run the following commands:
sudo apt update && sudo apt upgrade -y

sudo apt install python-pip python3-pip

sudo pip install requests && sudo pip3 install requests

sudo pip3 install certbot

sudo pip3 install certbot-dns-digitalocean

sudo useradd -m loadbalancer

sudo apt install haproxy -y

sudo systemctl enable haproxy

sudo mkdir -p ~/.secrets/certbot/
Paste your DigitalOcean API token into the digitalocean.ini file, as follows.
sudo nano ~/.secrets/certbot/digitalocean.ini
# DigitalOcean API credentials used by Certbot

dns_digitalocean_token = 0000111122223333444455556666777788889999aaaabbbbccccddddeeeeffff
Lock down the permissions to protect the API token from unauthorized access.
sudo chmod 0600 ~/.secrets/certbot/digitalocean.ini
Run certbot to get the Let’s Encrypt certification using the DigitalOcean DNS plugin.
certbot certonly \

--dns-digitalocean \

--dns-digitalocean-credentials ~/.secrets/certbot/digitalocean.ini \

-d example.com \

-d www.example.com
If obtaining the certificate succeeded, the output will be similar to the following:
Plugins selected: Authenticator dns-digitalocean, Installer None

Obtaining a new certificate

Performing the following challenges:

dns-01 challenge for www.example.com

dns-01 challenge for example.com

Waiting 10 seconds for DNS changes to propagate

Waiting for verification...

Cleaning up challenges

IMPORTANT NOTES:

- Congratulations! Your certificate and chain have been saved at:

/etc/letsencrypt/live/example.com/fullchain.pem

Your key file has been saved at:

/etc/letsencrypt/live/example.com/privkey.pem
Concatenate the certificate into a single file that HAProxy can read.
It needs to contain the certificate block, followed by the private key.
cd /etc/letsencrypt/live/example.com/

cat fullchain.pem privkey.pem > example.com.pem
Get the Droplet’s anchor IP address assigned to it by the hypervisor. Note that this is different than the private IP address – it cannot be accessed except through the floating IP. For our haproxy server, it was 10.18.0.8.
curl 169.254.169.254/metadata/v1/interfaces/public/0/anchor_ipv4/address && echo
Paste in the following HAProxy config on haproxy.
sudo nano /etc/haproxy/haproxy.cfg
global

log /dev/log local0

log /dev/log local1 notice

chroot /var/lib/haproxy

stats socket /run/haproxy/admin.sock mode 660 level admin expose-fd listeners

stats timeout 30s

user haproxy

group haproxy

daemon

# Default SSL material locations

ca-base /etc/ssl/certs

crt-base /etc/ssl/private

ssl-default-bind-options no-sslv3 no-tls-tickets force-tlsv12

ssl-default-bind-ciphers EECDH+AESGCM:EDH+AESGCM

tune.ssl.default-dh-param 2048

defaults

log global

mode http

option httplog

option dontlognull

timeout connect 30s

timeout client 2h

timeout server 2h

errorfile 400 /etc/haproxy/errors/400.http

errorfile 403 /etc/haproxy/errors/403.http

errorfile 408 /etc/haproxy/errors/408.http

errorfile 500 /etc/haproxy/errors/500.http

errorfile 502 /etc/haproxy/errors/502.http

errorfile 503 /etc/haproxy/errors/503.http

errorfile 504 /etc/haproxy/errors/504.http

frontend www-http

Bind load_balancer_1_anchor_IP:80

reqadd X-Forwarded-Proto:\ http

default_backend nginx_pool

frontend www-https

bind load_balancer_1_anchor_IP:443 ssl crt /etc/letsencrypt/live/example.com/example.com.pem

reqadd X-Forwarded-Proto:\ https

# rspadd Strict-Transport-Security:\ max-age=31536000;\ includeSubDomains;\ preload

default_backend nginx_pool

backend nginx_pool

balance roundrobin

redirect scheme https if !{ ssl_fc }

server web1 web_server_1_private_IP:8080 check

server web2 web_server_2_private_IP:8080 check
Start the HAProxy service. If the service started without errors, proceed to the next step.
sudo service haproxy start
Install dependencies and configure the secondary HAProxy server
SSH into the secondary server haproxy-02 and run the following commands:
sudo apt update && sudo apt upgrade -y

sudo apt install python-pip python3-pip

sudo pip install requests && sudo pip3 install requests

sudo useradd -m loadbalancer

sudo apt install haproxy -y

sudo systemctl enable haproxy
Get the Droplet’s anchor IP address assigned to it by the hypervisor. For our haproxy-02 server, it was 10.18.0.9.
curl 169.254.169.254/metadata/v1/interfaces/public/0/anchor_ipv4/address && echo
Create the SSL certificate directory and scp the example.com.pem certificate file from haproxy to haproxy-02 (Generate an SSH keypair on haproxy in /root/.ssh/id_rsa and append the contents of /root/.ssh/id_rsa.pub to a new line on /root/.ssh/authorized_keys on haproxy-02.)
root@haproxy-02:~# sudo mkdir -p /etc/letsencrypt/live/example.com/

root@haproxy:~# ssh-keygen
Copy and paste the public key string from haproxy to haproxy-02
root@haproxy:~# cat /root/.ssh/id_rsa.pub

root@haproxy-02:~# sudo nano /root/.ssh/authorized_keys
Using scp, Transfer the concatenated Let’s Encrypt certificate from haproxy to haproxy-02
root@haproxy:~# scp /etc/letsencrypt/live/example.com/example.com.pem root@load_balancer_2_private_IP:/etc/letsencrypt/live/example.com/example.com.pem
Paste in the following HAProxy config on haproxy-02.
sudo nano /etc/haproxy/haproxy.cfg
global

log /dev/log local0

log /dev/log local1 notice

chroot /var/lib/haproxy

stats socket /run/haproxy/admin.sock mode 660 level admin expose-fd listeners

stats timeout 30s

user haproxy

group haproxy

daemon

# Default SSL material locations

ca-base /etc/ssl/certs

crt-base /etc/ssl/private

ssl-default-bind-options no-sslv3 no-tls-tickets force-tlsv12

ssl-default-bind-ciphers EECDH+AESGCM:EDH+AESGCM

tune.ssl.default-dh-param 2048

defaults

log global

mode http

option httplog

option dontlognull

timeout connect 30s

timeout client 2h

timeout server 2h

errorfile 400 /etc/haproxy/errors/400.http

errorfile 403 /etc/haproxy/errors/403.http

errorfile 408 /etc/haproxy/errors/408.http

errorfile 500 /etc/haproxy/errors/500.http

errorfile 502 /etc/haproxy/errors/502.http

errorfile 503 /etc/haproxy/errors/503.http

errorfile 504 /etc/haproxy/errors/504.http

frontend www-http

bind load_balancer_2_anchor_IP:80

reqadd X-Forwarded-Proto:\ http

default_backend nginx_pool

frontend www-https

bind load_balancer_2_anchor_IP:443 ssl crt /etc/letsencrypt/live/example.com/example.com.pem

reqadd X-Forwarded-Proto:\ https

# rspadd Strict-Transport-Security:\ max-age=31536000;\ includeSubDomains;\ preload

default_backend nginx_pool

backend nginx_pool

balance roundrobin

redirect scheme https if !{ ssl_fc }

server web1 web_server_1_private_IP:8080 check

server web2 web_server_2_private_IP:8080 check
Start the HAProxy service. If the service started without errors, proceed to the next step.
sudo service haproxy start
Install build tools and configure Keepalived on both HAProxy servers.
Both – SSH into both haproxy and haproxy-02 and run the following commands:
sudo apt-get install build-essential libssl-dev

cd ~

wget http://www.keepalived.org/software/keepalived-2.0.18.tar.gz

tar xzvf keepalived*

cd keepalived-2.0.18

./configure

make

sudo make install
Both – Paste in the following systemd service definition for Keepalived.
sudo nano /etc/systemd/system/keepalived.service
#

# keepalived control files for systemd

#

# Incorporates fixes from RedHat bug #769726.

[Unit]

Description=LVS and VRRP High Availability monitor

After=network.target

ConditionFileNotEmpty=/etc/keepalived/keepalived.conf

[Service]

Type=simple

# Ubuntu/Debian convention:

EnvironmentFile=-/etc/default/keepalived

ExecStart=/usr/local/sbin/keepalived --dont-fork

ExecReload=/bin/kill -s HUP $MAINPID

# keepalived needs to be in charge of killing its own children.

KillMode=process

[Install]

WantedBy=multi-user.target
sudo systemctl enable keepalived

sudo mkdir -p /etc/keepalived
Primary (haproxy) – Create the Keepalived configuration file. The auth_pass is any 8 character pre-shared, alphanumeric string of your choice to allow the Keepalived peers to identify that they are authorized to communicate with each other.
root@haproxy:~# sudo nano /etc/keepalived/keepalived.conf
global_defs {

script_user loadbalancer

enable_script_security

}

vrrp_script chk_haproxy {

script "pgrep haproxy"

interval 2

}

vrrp_instance VI_1 {

interface eth1

state MASTER

priority 200

virtual_router_id 33

unicast_src_ip load_balancer_1_private_IP

unicast_peer {

load_balancer_2_private_IP

}

authentication {

auth_type PASS

auth_pass auth_pass

}

track_script {

chk_haproxy

}

notify_master /etc/keepalived/master.sh

}
Secondary (haproxy-02) – Create the Keepalived configuration file.
root@haproxy-02:~# sudo nano /etc/keepalived/keepalived.conf
global_defs {

script_user loadbalancer

enable_script_security

}

vrrp_script chk_haproxy {

script "pgrep haproxy"

interval 2

}

vrrp_instance VI_1 {

interface eth1

state BACKUP

priority 100

virtual_router_id 33

unicast_src_ip load_balancer_2_private_IP

unicast_peer {

load_balancer_1_private_IP

}

authentication {

auth_type PASS

auth_pass auth_pass

}

track_script {

chk_haproxy

}

notify_master /etc/keepalived/master.sh

}
Both – Create the floating IP transition script and start the Keepalived service.
cd /usr/local/bin

sudo curl -LO http://do.co/assign-ip
sudo nano /etc/keepalived/master.sh
#!/bin/bash

export DO_TOKEN='digitalocean_api_token'

IP='floating_ip_addr'

ID=$(curl -s http://169.254.169.254/metadata/v1/id)

HAS_FLOATING_IP=$(curl -s http://169.254.169.254/metadata/v1/floating_ip/ipv4/active)

if [ $HAS_FLOATING_IP = "false" ]; then

n=0

while [ $n -lt 10 ]

do

python /usr/local/bin/assign-ip $IP $ID && break

n=$((n+1))

sleep 3

done

fi
sudo chmod +x /etc/keepalived/master.sh

sudo chown loadbalancer:loadbalancer /etc/keepalived/master.sh

sudo service keepalived start
Set up automatic Let’s Encrypt certificate renewal on primary HAProxy server
Create a deploy hook script that will automatically be triggered each time the Let’s Encrypt certificate is renewed by the Certbot ACME client on the primary HAProxy server (haproxy).
sudo nano /etc/letsencrypt/renewal-hooks/deploy/deploy.sh
#!/bin/bash

cat /etc/letsencrypt/live/example.com/fullchain.pem /etc/letsencrypt/live/example.com/privkey.pem > /etc/letsencrypt/live/example.com/example.com.pem

sudo service haproxy reload

scp /etc/letsencrypt/live/example.com/example.com.pem root@load_balancer_2_private_IP:/etc/letsencrypt/live/example.com/example.com.pem

ssh -tt root@load_balancer_2_private_IP sudo service haproxy reload
sudo chmod +x /etc/letsencrypt/renewal-hooks/deploy/deploy.sh
Add the following line to the system-wide crontab.
sudo nano /etc/crontab
0 2 * * * root certbot renew --deploy-hook "/etc/letsencrypt/renewal-hooks/deploy/deploy.sh"