
 REX-Ray is an open source storage driver developed with the support of Dell EMC, enabling cloud-native workloads to read & write from flexible, block storage. It has two main components, the
 libstorage framework, which serves as a local server and client for communicating with a cloud provider’s block storage service. REX-Ray supports the top 3 container schedulers including Docker/Docker Swarm, Kubernetes, and Mesos and these storage providers. This article addresses using the REX-Ray plugin for Docker to provide persistent storage for deploying stacks on Docker Swarm.
REX-Ray is an older project by software container industry standards, with project maintenance by Dell EMC ended in March 2018 and taken over by VMware in June 2018, but it remains a viable option for using pluggable volumes with containers in AWS and Google Cloud, provided that you understand some of its limitations.
- REX-Ray volumes can only be mounted to one container host at a given time. This is an inherent limitation of block storage volumes, which must be detached before being reattached to a different virtual server.
- Containers that mount a REX-Ray volume can take up to 30 seconds to 1 minute to start up, compared to a container with local storage.
- The Azure plugin is not stable, perhaps attributable to changes in the API by the cloud provider. We encountered EOF errors setting up Azure Unmanaged Disks when creating Docker volumes with REX-Ray. If you want to attempt installing the Azure Unmanaged Disks plugin, Julien Maitrehenry, a Docker Community Leader, has a tutorial here written in January 2018.
If you’re looking for a way to share volume data between multiple Docker hosts simultaneously, REX-Ray is not the right solution – instead you should consider using Docker’s local volume driver which supports NFS, or a paid solution such as Portworx.
What REX-Ray in conjunction with Docker Swarm can do is facilitate failover of services from one Swarm node to another, in addition to other interesting use cases. When a container is rescheduled from one Swarm node to another, none of the persistent data would be trapped on a single node like when using local, named volumes. REX-Ray would simply reattach the EBS (or equivalent) volume to the new Swarm node that the service comes up on.
Another example of when REX-Ray volumes are useful is when the underlying Docker host’s local storage is running out of space for persistent volumes. You could create an EBS volume and mount it to /var/lib/docker/volumes to work around this, but the volume would not be portable between Swarm nodes as it has a one-to-one relationship with the host, not per-container. REX-Ray allows pre-allocating a fixed amount of storage space for each volume, making quota management easier.
What is a persistent volume?
Anybody familiar with containers will know that containers are ephemeral by default. Unless a volume is described in the Dockerfile (at build time) or Docker Compose file (at run time), the data inside the container is removed when the container reaches the end of its life-cycle.
A persistent volume allows storing container data after a container is stopped and removed. By default, the data for both Docker anonymous and named volumes are stored in /var/lib/docker/volumes on the host where the container runs. You can also bind mount any directory on the host into a container but this is not supported for services deployed using docker stack deploy, as its assumed the target is a distributed cluster of Swarm nodes.
If you are writing a Compose file to deploy as a Docker stack, you should use named volumes instead of bind mounts. For a single-node Swarm, defining a named volume along with a volume mount for the relevant service(s) will be sufficient. But as soon as you want to scale your swarm to multiple nodes, this implementation will break. When a service is rescheduled to a different Swarm node, a blank volume will be created on the new host (if it does not already exist). Your volume data will not automatically replicate itself between the nodes.
Installing the REX-Ray volume plugin for Docker CE
Installing the REX-Ray Docker volume plugin for an external storage provider overcomes this. When a service is rescheduled to a different node, the orchestrator will automatically handle detaching the EBS volume from the original node, attaching it to the new node, and mounting the existing data into the container.
Running Swarm mode is not a requirement for using the REX-Ray plugins, but Swarm users will see the most benefit from using REX-Ray to persist their volumes outside each individual Docker host/Swarm node. Even if you only have a single node, there aren’t any downsides to running docker swarm init to put the Docker Engine into Swarm mode. You get access to commands like docker stack deploy — only available in Swarm mode. The REX-Ray plugin must be installed on all Swarm nodes, otherwise you will encounter “no suitable node (scheduling constraints not satisfied”… and “plugin not found” errors when deploying services.
The REX-Ray volume plugins for EBS (rexray/ebs) and for Google Cloud Persistent Disks (rexray/gcepd) are the ones we can recommend based on our experience. In our testing as of July 2019, they proved reliable when creating volumes, attaching/detaching volumes, and removing volumes. As mentioned earlier, we cannot say the same for the Azure (rexray/azureud) and DigitalOcean (rexray/dobs) plugins.
REX-Ray volume plugin for Docker CE on AWS
Option 1: Using REX-Ray with EBS requires assigning an IAM role, such as the default AmazonEC2FullAccess policy, to the EC2 instances where the Docker hosts/Swarm nodes are running. This role grants a virtual machine the permission to programmatically access EC2 resources, including EBS, through the AWS API. It eliminates the need to specify an API key.
- Visit the IAM roles dashboard and click “Create Role” to create a new IAM role.
- Select “AWS service” for the type of trusted entity and “EC2” as the type of service that will use this role. Click “Next: Permissions”
- Filter for “
AmazonEC2FullAccess” from the list of permissions policies and select the checkbox beside it. Click “Next: Tags” and “Next: Review” - Give the IAM role a name such as “
ManageEBSVolumes” and click “Create role.” - Go to the EC2 dashboard and right click/two finger click the relevant EC2 instance to open the context menu. From the “Instance Settings” sub-menu choose “Attach/Replace IAM Role.”
- Select your newly created IAM role “
ManageEBSVolumes” from the dropdown and click “Apply” to save.
Option 2: Instead of granting full access to EC2 resources through an IAM role with a default policy, you can use an EBS access key and secret key with a custom IAM policy instead (more secure).
- Visit the IAM roles > Users dashboard and click “Add User” to create a new IAM user.
- Specify a username such as “
ebs” and check “Programmatic Access” then click “Next: Permissions.” - Select “Attach existing policies directly” then click “Create policy.”
- A new window/tab will popup with a visual editor to generate a new IAM policy with only the necessary permissions. If you prefer, you can copy & paste this JSON file into the JSON tab. Otherwise, proceed with the instructions for the visual editor below.
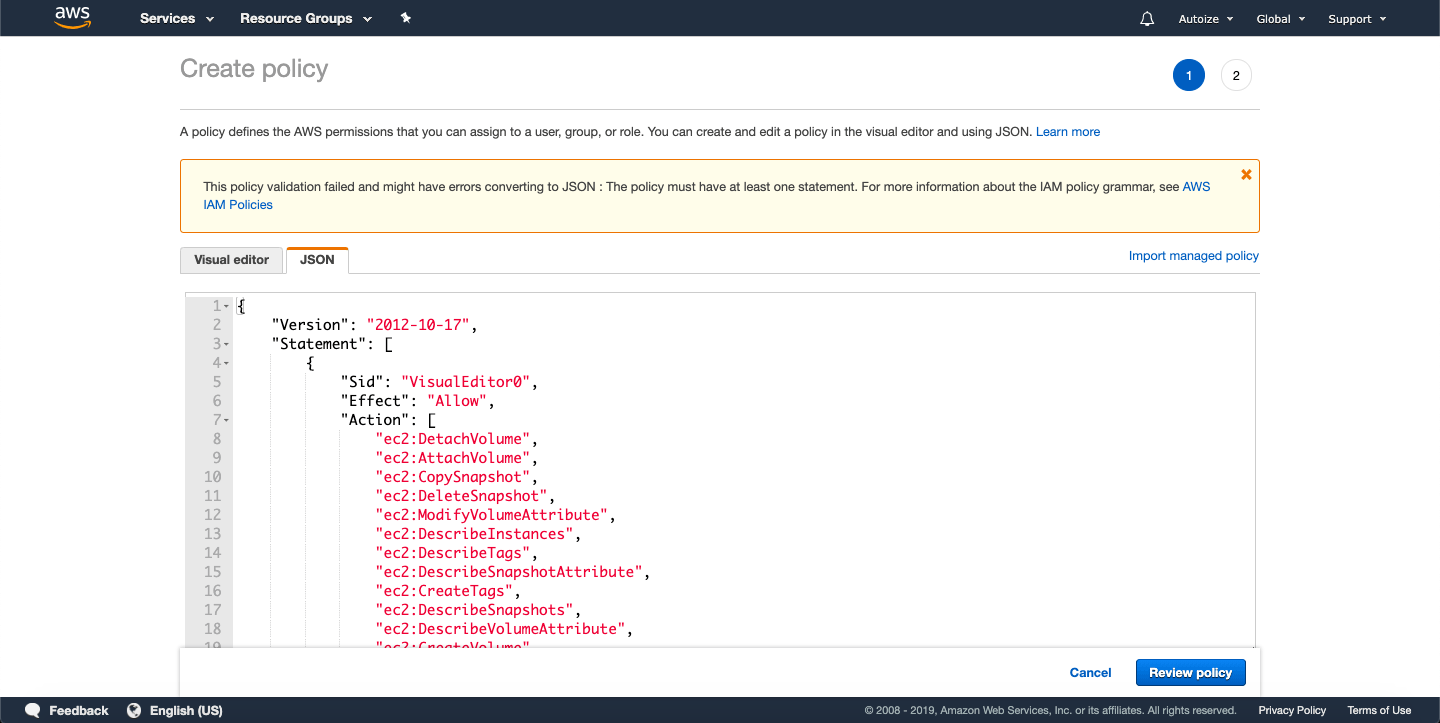
- For Service, select “EC2”
- For Actions, add the following required permissions using the visual editor.
- ec2:AttachVolume,
- ec2:CreateVolume,
- ec2:CreateSnapshot,
- ec2:CreateTags,
- ec2:DeleteVolume,
- ec2:DeleteSnapshot,
- ec2:DescribeAvailabilityZones,
- ec2:DescribeInstances,
- ec2:DescribeVolumes,
- ec2:DescribeVolumeAttribute,
- ec2:DescribeVolumeStatus,
- ec2:DescribeSnapshots,
- ec2:CopySnapshot,
- ec2:DescribeSnapshotAttribute,
- ec2:DetachVolume,
- ec2:ModifySnapshotAttribute,
- ec2:ModifyVolumeAttribute,
- ec2:DescribeTags
- Then expand the Resources section and select the “All resources” radio button.
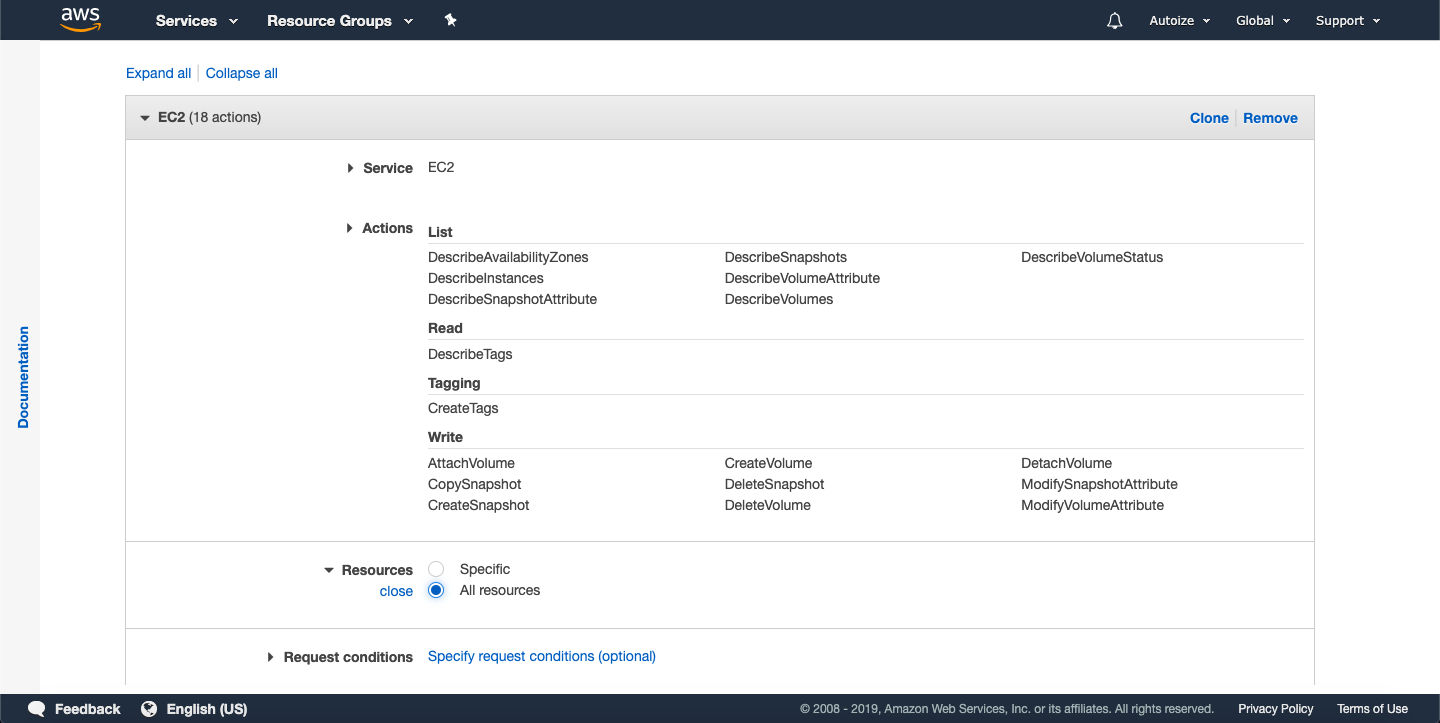
- Click “Review Policy.”
- Give the policy a name such as “
AmazonEBSVolumes” and click “Create Policy.” - Go back to the original window/tab where you were creating an IAM user. Using the search box, find the policy you just created, “
AmazonEBSVolumes” and check it. It should say the Type is “Customer managed.” Click “Next: Tags” and “Next: Review” to continue.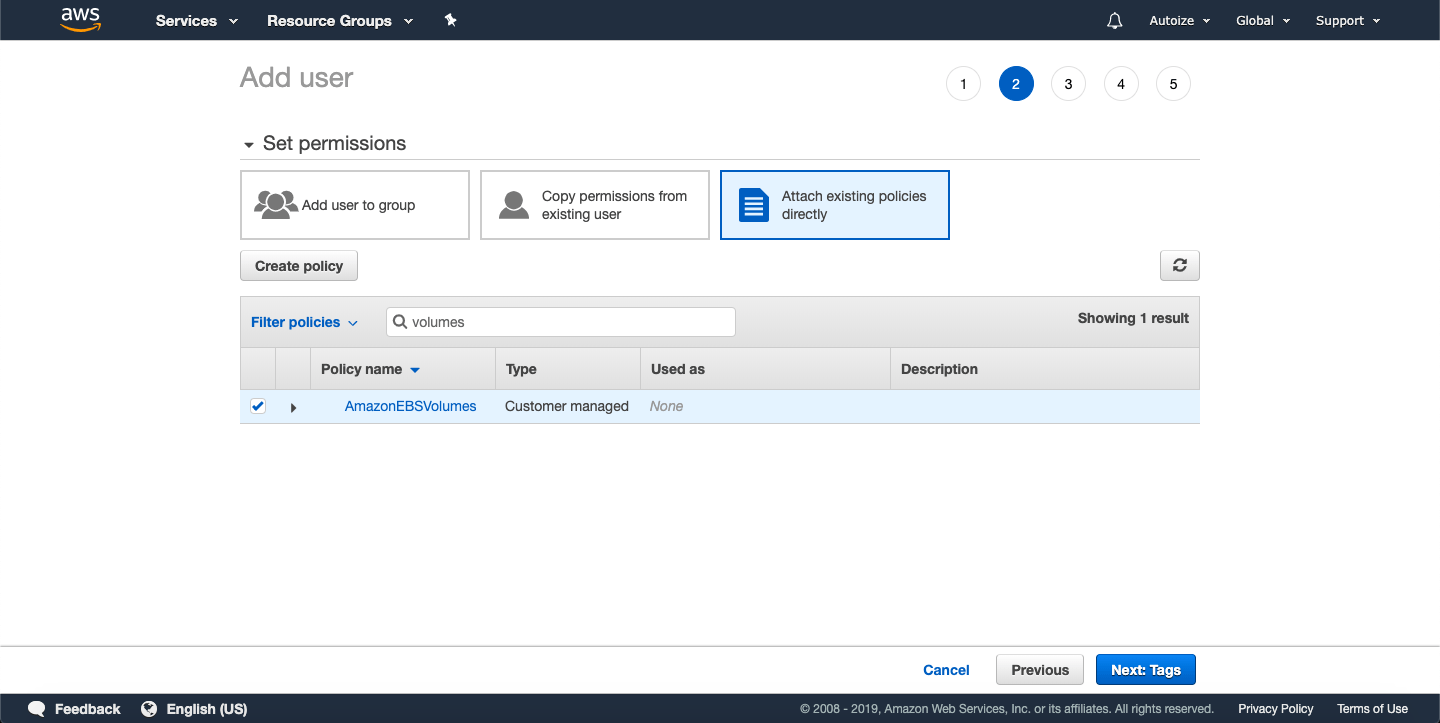
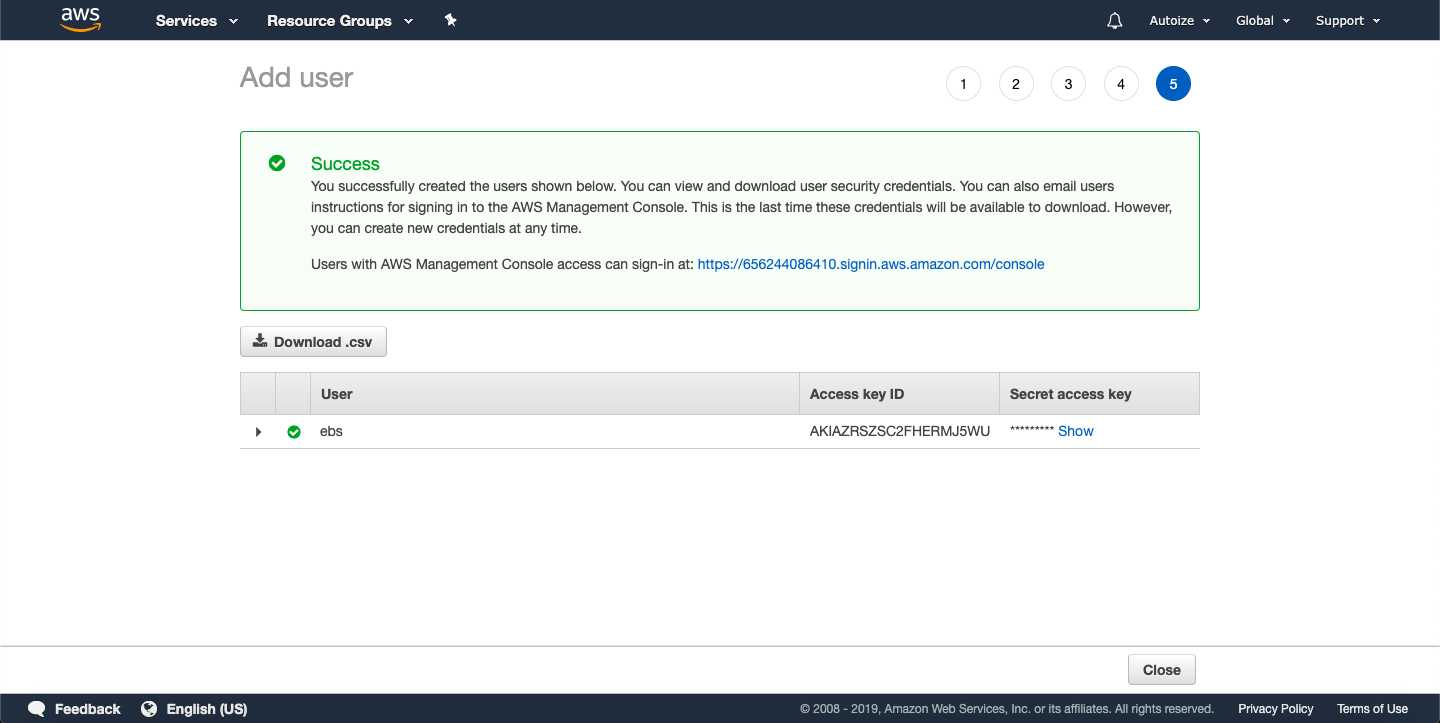
- Click “Create user” to finish creating the IAM role.
- In the final step, note down the Access Key ID and Secret access key which is displayed only on this screen. If you lose it, you would have to create a new access key for the IAM user under IAM dashboard > Users > ebs > Security Credentials > Access Keys.
SSH into the EC2 instance with the Docker Engine running and run the following command to install the rexray/ebs plugin.
docker plugin install rexray/ebs

EBS_ACCESSKEY=abc

EBS_SECRETKEY=123

EBS_REGION=us-east-2
The EBS_REGION variable should be the same as where you deployed your EC2.
EBS_ACCESSKEY and EBS_SECRETKEY variables can be omitted if you granted permission through an IAM role (instead of by creating an IAM access key).
When prompted to grant the privileges required by the plugin, type “y” and press enter.
Note that AWS does not officially support attaching more than 40 EBS volumes to an instance.
REX-Ray volume plugin for Docker CE on Google Cloud
Using REX-Ray with Persistent Disks requires assigning a service account with storage.objectAdmin and editor roles to the VM instances where the Docker hosts/Swarm nodes are running. This role grants a VM instance the privilege to list, create, view, and delete Persistent Disks through the Google Cloud API.
- Visit the IAM & admin > Service accounts dashboard and click “+ Create Service Account.”
- Give the service account a name such as “Persistent Disks” and add a brief description, for example “Can manage persistent disks.” Click “Create.”
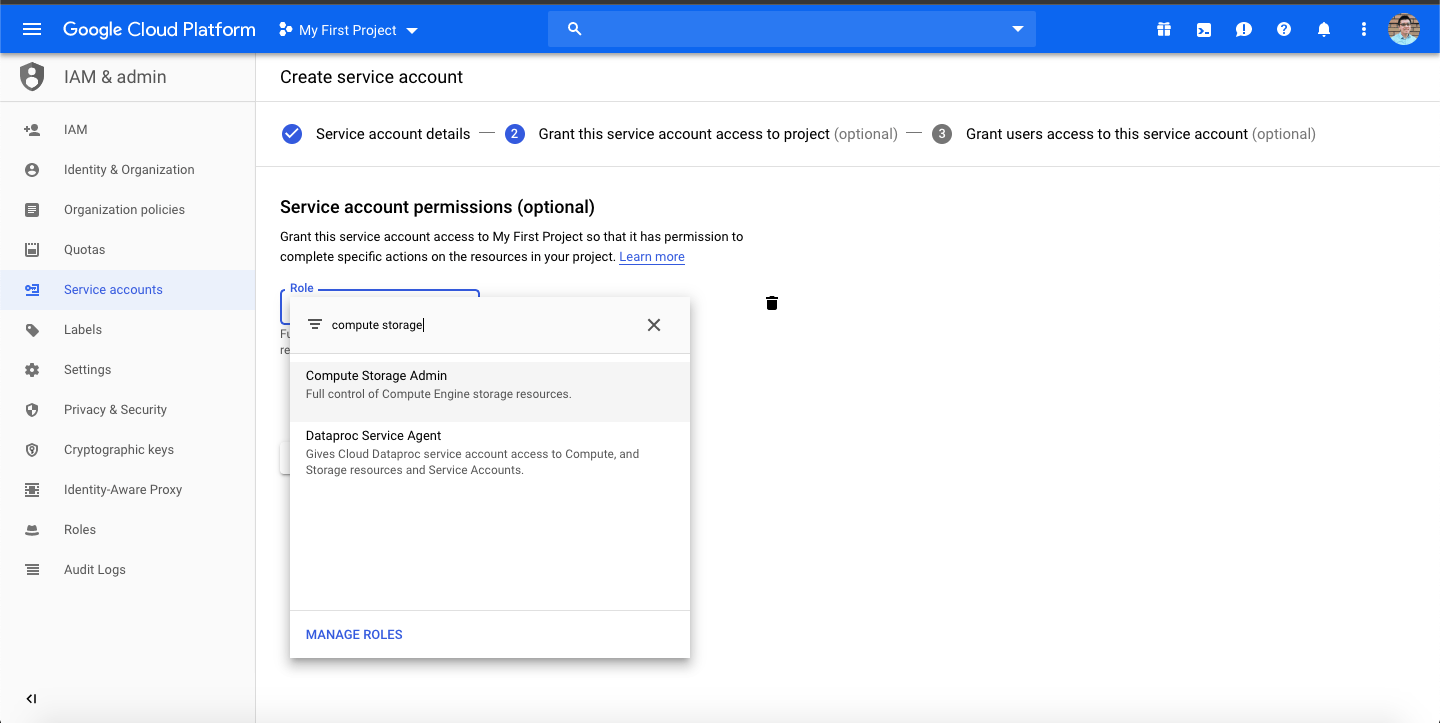
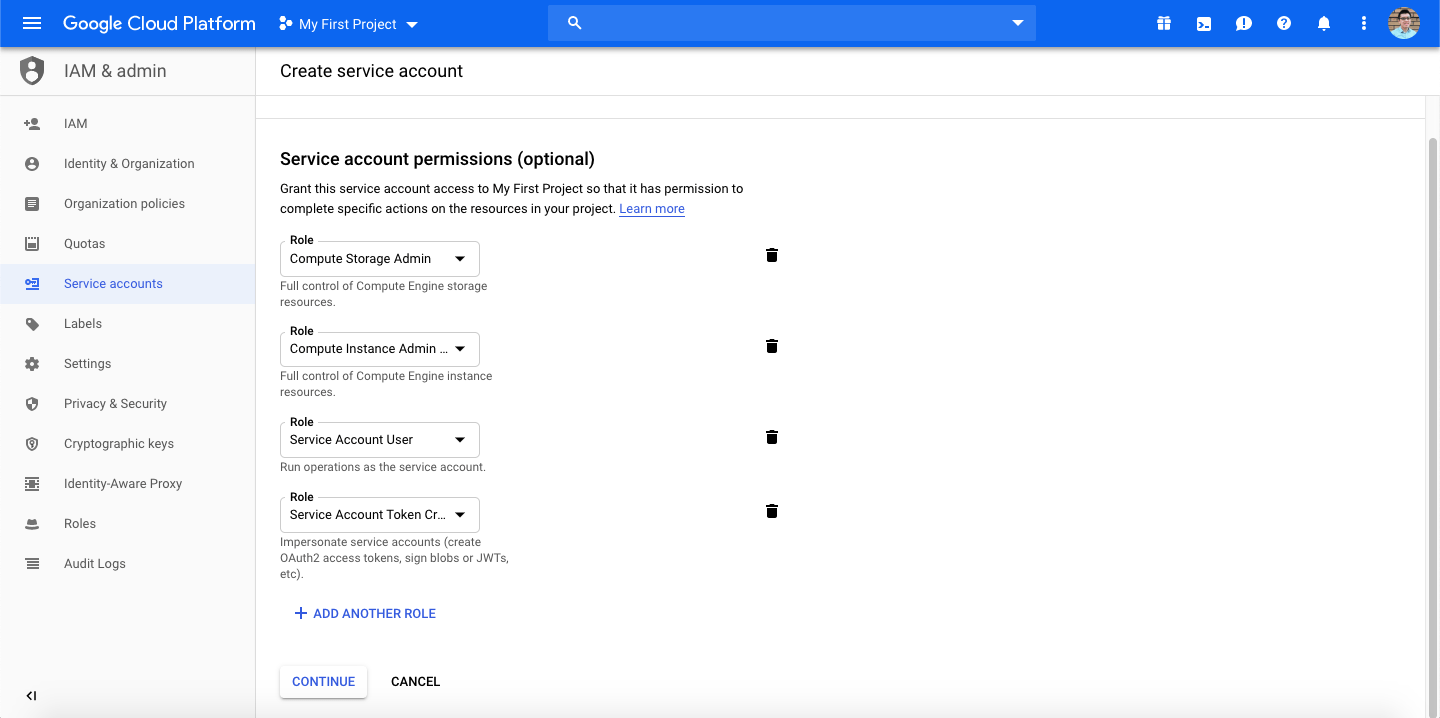
- For the service account permissions, in “Select a role”, filter for the “Compute Storage Admin” role and select it from the dropdown menu. Click “+ Add Another Role” and also add the “Compute Instance Admin (beta)”, “Service Account User”, and “Service Account Token Creator” (equivalent to deprecated “Service Account Actor”). Click “Continue.”
- On the next screen, click “Done” without granting additional users access to the service account or generating a key.
Now when provisioning a virtual machine in Google Cloud, you can assign this service account to the machine so it inherits all the roles associated with the service account. If you’ve already created your Docker hosts/Swarm nodes, then you will first need to stop the virtual machine to assign it a new Service Account from the Compute Engine > VM instances dashboard. 
SSH into the VM instance with the Docker Engine running and run the following command to install the rexray/gcepd plugin.
docker plugin install rexray/gcepd

GCEPD_TAG=rexray

GCEPD_CONVERTUNDERSCORES=true
The GCEPD_TAG variable refers to the tag that persistent disks created & managed by REX-Ray should be tagged with. REX-Ray will only consume Google Cloud persistent disks tagged with this tag, preventing you from accidentally mounting or deleting other disks not intended for Docker.
The GCEPD_CONVERTUSERSCORES variable is set to true so when Docker deploys a stack, the underscores generated in the volume names (in the format of stackname_volumename) are converted into dashes before being passed to the Google Cloud API. The REX-Ray plugin automatically maps the Docker volume name (underscores) with the Google persistent disk name (dashes), so when referring to the volume using a Docker CLI command, you should use the underscored version.
When prompted to grant the privileges required by the plugin, type “y” and press enter.
Note that Google Cloud’s limitations on how many persistent disks can be attached to an instance depends on the instance type. For example a shared core machine, such as g1-small, can only attach up to 16 persistent disks. Other machine types, starting from n1-standard-1, can attach up to 128 persistent disks.
Usage of the REX-Ray volume plugin for Docker CE
Creating volumes using the REX-Ray volume plugin and mounting them onto containers is simple, as the Docker CLI and Docker-Compose YAML syntax is the same as for any managed volume plugin.
To create a test volume with REX-Ray and check that the plugin installed correctly:
AWS
docker volume create -d rexray/ebs --name testvol --opt=size=1
Google Cloud
docker volume create -d rexray/gcepd --name testvol --opt=size=10
Note that Persistent Disks on GCE have a minimum size of 10GB. If you try to create a disk < 10GB you will receive an error message similar to “Error response from daemon: create testvol: VolumeDriver.Create: docker-legacy: Create: testvol: failed: volume size too small”
To create a test container, for example MySQL, and mount the test volume:
AWS
docker container run -d --name mysql -e MYSQL_ROOT_PASSWORD=pa$$w0rd --volume-driver rexray/ebs -v testvol:/var/lib/mysql mysql
Google Cloud
docker container run -d --name mysql -e MYSQL_ROOT_PASSWORD=pa$$w0rd --volume-driver rexray/gcepd -v testvol:/var/lib/mysql mysql
To delete the test container and remove the test volume (important: until you remove the REX-Ray volume you will continue to be billed for the provisioned space of the EBS or persistent disk):
AWS/Google Cloud
docker container stop mysql

docker container rm mysql

docker volume rm testvol