

 LXC/LXD containers are a lightweight virtualization technology that allows running multiple operating systems on a single Linux system simultaneously. Much like Docker, the host machine’s kernel is shared between the containers with namespaces and cgroups. In the early days of Docker, Docker managed LXC containers until they switched to the RunC runtime, which is a part of containerd today. Although LXC containers are much less talked about than Docker, LXC is actually a better fit for many container use cases.
Why LXC is still relevant in the age of Docker
Docker containers are narrower in purpose than a LXC container. LXC images are complete operating systems with a service manager, such as systemd. Although you can also run multiple processes in a Docker container, a Docker container dies as soon as the process in the CMD instruction of its Dockerfile finishes running. By design, Docker containers are designed to be ephemeral, with persistent storage handled exclusively by external volumes. In many cases, updating a Docker container involves removing the container, pulling a more recent container image, then redeploying the container. Any persistent volumes are mounted into the new container.
In contrast, LXC containers are expected to be long-running, and patched over their lifecycle, akin to a traditional virtual machine. LXC/LXD involves a much easier learning curve than Docker for a sysadmin who is familiar with traditional virtualization. Compared to a VM however, LXC has negligable resource overhead as each container does not need to run its own instance of the kernel. This results in near-native performance.
LXD is a container manager daemon for LXC containers. LXC and LXD are intended to be deployed together as the lxc commands talk to the REST API exposed by the LXD server, hence Linux containers as a whole are often referred to as LXC/LXD containers. This is very similar to how the Docker CLI communicates with the Docker daemon, which in turn manages the lifecycle of containers on a Docker host.
One of the major contributors to the Linux Containers project is Canonical, the commercial organization behind the Ubuntu family of Linux operating systems. It isn’t a surprise that Ubuntu is one of the easiest distros to use LXC/LXD containers with. LXD (including LXC) can be installed as a snap package, an alternative to the traditional apt package manager used by Debian-based distros.
![]() In this article, we will go through how to install LXC/LXD as a snap on Ubuntu 18.04 Bionic Beaver with LXD 3.18 or above. Once LXD is installed, we’ll spin up three containers, one HAProxy container and two web containers. We’ll also show you to configure HAProxy with two different backends, serving up content on different domains – as a reverse proxy.
In this article, we will go through how to install LXC/LXD as a snap on Ubuntu 18.04 Bionic Beaver with LXD 3.18 or above. Once LXD is installed, we’ll spin up three containers, one HAProxy container and two web containers. We’ll also show you to configure HAProxy with two different backends, serving up content on different domains – as a reverse proxy.
Containers are an ideal way to consolidate multiple VMs or physical servers, into a single server. This is particularly helpful for reducing the physical footprint of your servers (particularly power and cooling) in an on-premise environment, or if you’re using the cloud, reduce the number of VMs and public IPs that you have to provision. LXC/LXD can also be a fantastic way to try out a new operating system or software package, and wipe it all away without affecting the host system.
A practical use case of LXC/LXD might be where separate web applications require a different PHP version or configuration. You could create a LXC container for each app, and install the needed version of PHP within each container. Although you could also achieve this by editing the virtual hosts and setting up separate PHP-FPM pools in a conventional shared hosting environment, LXC has the added benefit of security. By default all LXC containers run as unprivileged containers, meaning that if they were to be compromised, the attacker would not be able to gain root privileges on the host machine. LXC isolates the processes in each container using Linux namespaces, providing an additional layer of security. You could configure an iptables firewall on each LXC container to define which ports should be exposed to which hosts, which can include the host machine itself, or other containers on the LXD bridge.
Step 1 – Install the LXD Snap and configure LXD.
On a fresh virtual machine with Ubuntu 18.04 installed, install the LXD snap package. This machine should have a publicly accessible IPv4 address and a route to the Internet.
Update the apt repository data, and upgrade the system to the latest packages.
root@lxclxd:~# apt update && apt upgrade
Enable the ufw firewall to restrict incoming traffic to the container host.
root@lxclxd:~# ufw enable

root@lxclxd:~# ufw allow 22/tcp

root@lxclxd:~# ufw allow 80/tcp

root@lxclxd:~# ufw allow 443/tcp
Install the LXD snap package.
root@lxclxd:~# snap install lxd
Create a non-root user account, and add it to the lxd user group. This will give the user the privileges to execute lxc commands without sudo.
root@lxclxd:~# useradd -m user1 -s /bin/bash

root@lxclxd:~# passwd user1

root@lxclxd:~# usermod -aG lxd user1

root@lxclxd:~# usermod -aG sudo user1

root@lxclxd:~# mkdir -p /home/user1/.ssh

root@lxclxd:~# nano /home/user1/.ssh/authorized_keys
Paste your SSH public key string in the authorized_keys file, and save changes.
root@lxclxd:~# chown -R user1:user1 /home/user1/.ssh
Now, reconnect to SSH with the non-root user, user1.
Run the initial configuration for LXD and accept the defaults. You may wish to increase the size of the loop device beyond the default of 15GB (the total storage available for all containers), making sure to leave adequate remaining disk space for the host machine.
For an expandable LXC host, it is recommended to attach & format a separate block storage device to create the btrfs storage pool, instead of a loop device and sparse file located at /var/lib/lxd/storage-pools/default and /var/lib/lxd/disks/default.img. If a loop device is used, the capacity of the btrfs filesystem managed by the LXD snap can’t be expanded without moving the containers to a new storage pool on the same host.
user1@lxclxd:~$ sudo lxd init
Would you like to use LXD clustering? (yes/no) [default=no]:

Do you want to configure a new storage pool? (yes/no) [default=yes]:

Name of the new storage pool [default=default]:

Name of the storage backend to use (btrfs, dir, lvm) [default=btrfs]:

Create a new BTRFS pool? (yes/no) [default=yes]:

Would you like to use an existing block device? (yes/no) [default=no]:

Size in GB of the new loop device (1GB minimum) [default=15GB]:

Would you like to connect to a MAAS server? (yes/no) [default=no]:

Would you like to create a new local network bridge? (yes/no) [default=yes]:

What should the new bridge be called? [default=lxdbr0]:

What IPv4 address should be used? (CIDR subnet notation, “auto” or “none”) [default=auto]:

What IPv6 address should be used? (CIDR subnet notation, “auto” or “none”) [default=auto]:

Would you like LXD to be available over the network? (yes/no) [default=no]:

Would you like stale cached images to be updated automatically? (yes/no) [default=yes]

Would you like a YAML "lxd init" preseed to be printed? (yes/no) [default=no]:
Step 2 – Create the web server containers, and set DNS records.
Now that LXC/LXD are set up you will create the web server containers, web1 and web2 where web1 will host web1.example.com and web2 will host web2.example.com.
From the DNS provider that hosts your authoritative DNS zone (this article relies on using a DNS provider supported by Certbot), point the fully qualified domain names web1.example.com and web2.example.com at the public IP address of the LXC host with an A record.
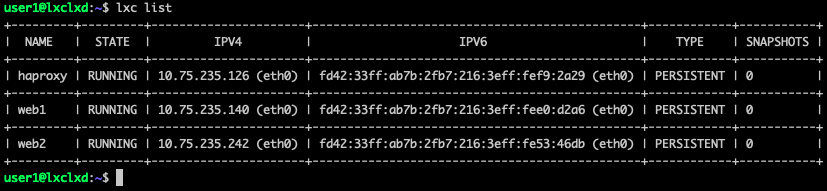
user1@lxclxd:~$ lxc launch ubuntu:18.04 web1

user1@lxclxd:~$ lxc launch ubuntu:18.04 web2
Drop into the shell for the first container, web1.
user1@lxclxd:~$ lxc exec web1 /bin/bash
root@web1:~# apt update && apt upgrade

root@web1:~# apt install apache2

root@web1:~# systemctl enable apache2

root@web1:~# systemctl start apache2

root@web1:~# nano /var/www/html/index.html
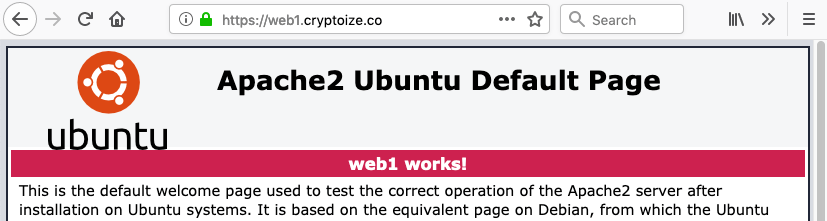
Edit line 224 and update It works! to web1 works! Save and exit the text editor, then type exit at the prompt to return to the host machine.
Repeat the same for the web2 container, with the exception of editing line 224 to web2 works!
The web containers are now listening for HTTP connections on port 80 from lxdbr0, the internal bridge network created for LXD, and from the LXC host as well.
user1@lxclxd:~$ curl web1.lxd

user1@lxclxd:~$ curl web2.lxd
should output the contents of the index.html file in the respective container.
Step 3 – Create the HAProxy container and install Certbot (Let’s Encrypt).
In this step you will create the HAProxy container which will act as a reverse proxy directing HTTP and HTTPS traffic from the Internet into the appropriate web container, based on the Host HTTP header.
user1@lxclxd:~$ lxc launch ubuntu:18.04 haproxy
Forward port 80 and port 443 from the host into the haproxy container.
user1@lxclxd:~$ lxc config device add haproxy http proxy listen=tcp:0.0.0.0:80 connect=tcp:127.0.0.1:80

user1@lxclxd:~$ lxc config device add haproxy https proxy listen=tcp:0.0.0.0:443 connect=tcp:127.0.0.1:443
user1@lxclxd:~$ lxc exec haproxy /bin/bash
root@haproxy:~# apt update && apt upgrade

root@haproxy:~# apt install haproxy

root@haproxy:~# systemctl enable haproxy

root@haproxy:~# systemctl start haproxy

root@haproxy:~# apt install python-pip python3-pip

root@haproxy:~# pip install requests && pip3 install requests

root@haproxy:~# pip3 install certbot
Install the DNS plugin for Certbot challenges corresponding to your DNS provider.
root@haproxy:~# pip3 install certbot-dns-digitalocean
Create the secrets file with the API credentials for your DNS provider, then save and close.
root@haproxy:~# mkdir -p ~/.secrets/certbot/

root@haproxy:~# nano ~/.secrets/certbot/digitalocean.ini
# DigitalOcean API credentials used by Certbot

dns_digitalocean_token = 0000111122223333444455556666777788889999aaaabbbbccccddddeeeeffff
Lock down the permissions to protect the API token from unauthorized access.
root@haproxy:~# chmod 0600 ~/.secrets/certbot/digitalocean.ini
Run Certbot to get a wildcard Let’s Encrypt certificate for *.example.com using the DNS plugin
root@haproxy:~# certbot certonly --dns-digitalocean --dns-digitalocean-credentials ~/.secrets/certbot/digitalocean.ini --server https://acme-v02.api.letsencrypt.org/directory -d "*.example.com" -d example.com
Concatenate the wildcard certificate into a format that HAProxy can read.
root@haproxy:~# cd /etc/letsencrypt/live/example.com

root@haproxy:~# cat fullchain.pem privkey.pem > example.com.pem
Now configure the HAProxy configuration file with the hostnames and SSL certificates.
root@haproxy:~# nano /etc/haproxy/haproxy.cfg
global

log /dev/log local0

log /dev/log local1 notice

chroot /var/lib/haproxy

stats socket /run/haproxy/admin.sock mode 660 level admin expose-fd listeners

stats timeout 30s

user haproxy

group haproxy

daemon
ssl-default-bind-options no-sslv3 no-tlsv10 no-tlsv11 no-tls-tickets
ssl-default-bind-ciphers EECDH+AESGCM:EDH+AESGCM
tune.ssl.default-dh-param 2048
defaults
log global
mode http
option httplog
option dontlognull
option forwardfor
option http-server-close
timeout connect 5000
timeout client 50000
timeout server 50000
errorfile 400 /etc/haproxy/errors/400.http
errorfile 403 /etc/haproxy/errors/403.http
errorfile 408 /etc/haproxy/errors/408.http
errorfile 500 /etc/haproxy/errors/500.http
errorfile 502 /etc/haproxy/errors/502.http
errorfile 503 /etc/haproxy/errors/503.http
errorfile 504 /etc/haproxy/errors/504.http
frontend www-https
bind *:443 ssl crt /etc/letsencrypt/live/example.com/example.com.pem
reqadd X-Forwarded-Proto:\ https
acl host_web1 hdr(host) -i web1.example.com
acl host_web2 hdr(host) -i web2.example.com
use_backend subdomain1 if host_web1
use_backend subdomain2 if host_web2
frontend http_frontend
bind *:80
acl web_host1 hdr(host) -i web1.example.com
acl web_host2 hdr(host) -i web2.example.com
use_backend subdomain1 if web_host1
use_backend subdomain2 if web_host2
backend subdomain1
balance leastconn
http-request set-header X-Client-IP %[src]
redirect scheme https if !{ ssl_fc }
server web1 web1.lxd:80 check
backend subdomain2
balance leastconn
http-request set-header X-Client-IP %[src]
redirect scheme https if !{ ssl_fc }
server web2 web2.lxd:80 check
Save and close the HAProxy configuration file, then restart HAProxy.
root@haproxy:~# service reload haproxy
If you configured everything correctly up to this point, you should be able to visit
- http://web1.example.com/ and be redirected to https://web1.example.com/
- http://web2.example.com/ and be redirected to https://web2.example.com/

Step 4 – Configuring SSL certificate renewal by cron job.
A deploy (post-renewal) hook must be added so that updated certificates obtained from Let’s Encrypt are concatenated for HAProxy’s use. Create a Bash script for this purpose.
root@haproxy:~# nano /etc/letsencrypt/renewal-hooks/deploy/deploy.sh
#!/bin/bash

cat /etc/letsencrypt/live/example.com/fullchain.pem /etc/letsencrypt/live/example.com/privkey.pem > /etc/letsencrypt/live/example.com/example.com.pem

sudo service haproxy reload
Save and close the Bash script, then make it executable.
root@haproxy:~# chmod +x /etc/letsencrypt/renewal-hooks/deploy/deploy.sh
Create the cron job for automatic certificate renewal by adding the following line.
root@haproxy:~# nano /etc/crontab
0 2 * * * root certbot renew --non-interactive >/dev/null 2>&1
Test the automatic certificate renewal process with the following command.
root@haproxy:~# certbot renew --force-renewal
2 Comments.
;I follow you tutorial however when i use the domain name: example.com
i get an error
Error finding domain using the DigitalOcean API: Unable to authenticate you. (Did you provide a valid API token?)
You need to substitute example.com with the domain name that you are actually using.