Azure App Service is a Platform as a Service (PaaS) on Microsoft’s cloud platform that allows one to easily provision a managed environment with the dependencies you need to easily deploy a web application from a Git repository or Docker image.
The main benefit of a PaaS like Azure App Service is that you are freed from the responsibility of managing OS and package updates, and it is quicker for developers to get started with deploying their web app as the dependencies for their programming language will already be installed. It is also more easily scalable than a virtual machine, as App Service can automatically “scale out” & load balance your app’s traffic when it receives a high amount of traffic.
Microsoft has made great strides in making Linux a “first class” part of the Azure ecosystem in the Satya Nadella era, and the App Service (formerly known as Azure Web Apps) is no exception. In fact, deploying apps in certain programing languages, such as PHP, in Azure App Service is now only available on Linux (PHP dropped support for Windows in version PHP 8.0).
As a flat file content management system (flat file CMS), Grav CMS is particularly suited to deployment on a PaaS, such as Azure App Service. Unlike other CMS like WordPress, Drupal, or Joomla, Grav does not rely on a database backend such as MySQL. Everything from the website template, its content, to user accounts and configurations are stored in regular files. This simplifies life for developers, as all the data for a Grav website can be easily backed up to a Git repository. Also, a flat file CMS like Grav tends to be more secure than a conventional CMS, give that they are not vulnerable to security breaches such as SQL injection attacks.
Like virtually any other PHP application, a Grav CMS based website can be deployed to an Azure App Service resource, with the advantages that we discussed above. All you need to do is commit and push your Grav website’s code to a Git repository, such as a private repository on GitHub. Azure App Service can securely authenticate with your GitHub account over OAuth, and pull your repo for deployment. It will even automatically issue a SSL certificate, so long as you create the appropriate DNS records (CNAME and TXT) to point your custom domain to App Service.
For businesses without the technical know-how to constantly patch their web server, and busy webmasters who manage multiple websites for many clients, it doesn’t get much better than the simplicity of a flat file CMS combined with a PaaS like Azure App Service.
In this article, we will outline the process for deploying a Grav CMS website to Azure App Service, with the following steps:
- Select a Grav Skeleton (theme) from getgrav.org.
- Create a GitHub repository, commit, and push the skeleton to it.
- Create an Azure App Service resource for a PHP web application on Linux.
- Install Composer and update dependencies for Grav CMS.
- Customize nginx.conf and php.ini, and make persistent with a startup script (startup.sh)
- Point a custom domain, and add an SSL certificate.
- Create account in Grav CMS admin backend, and edit the website.
Select a Grav Skeleton (theme) from getgrav.org.
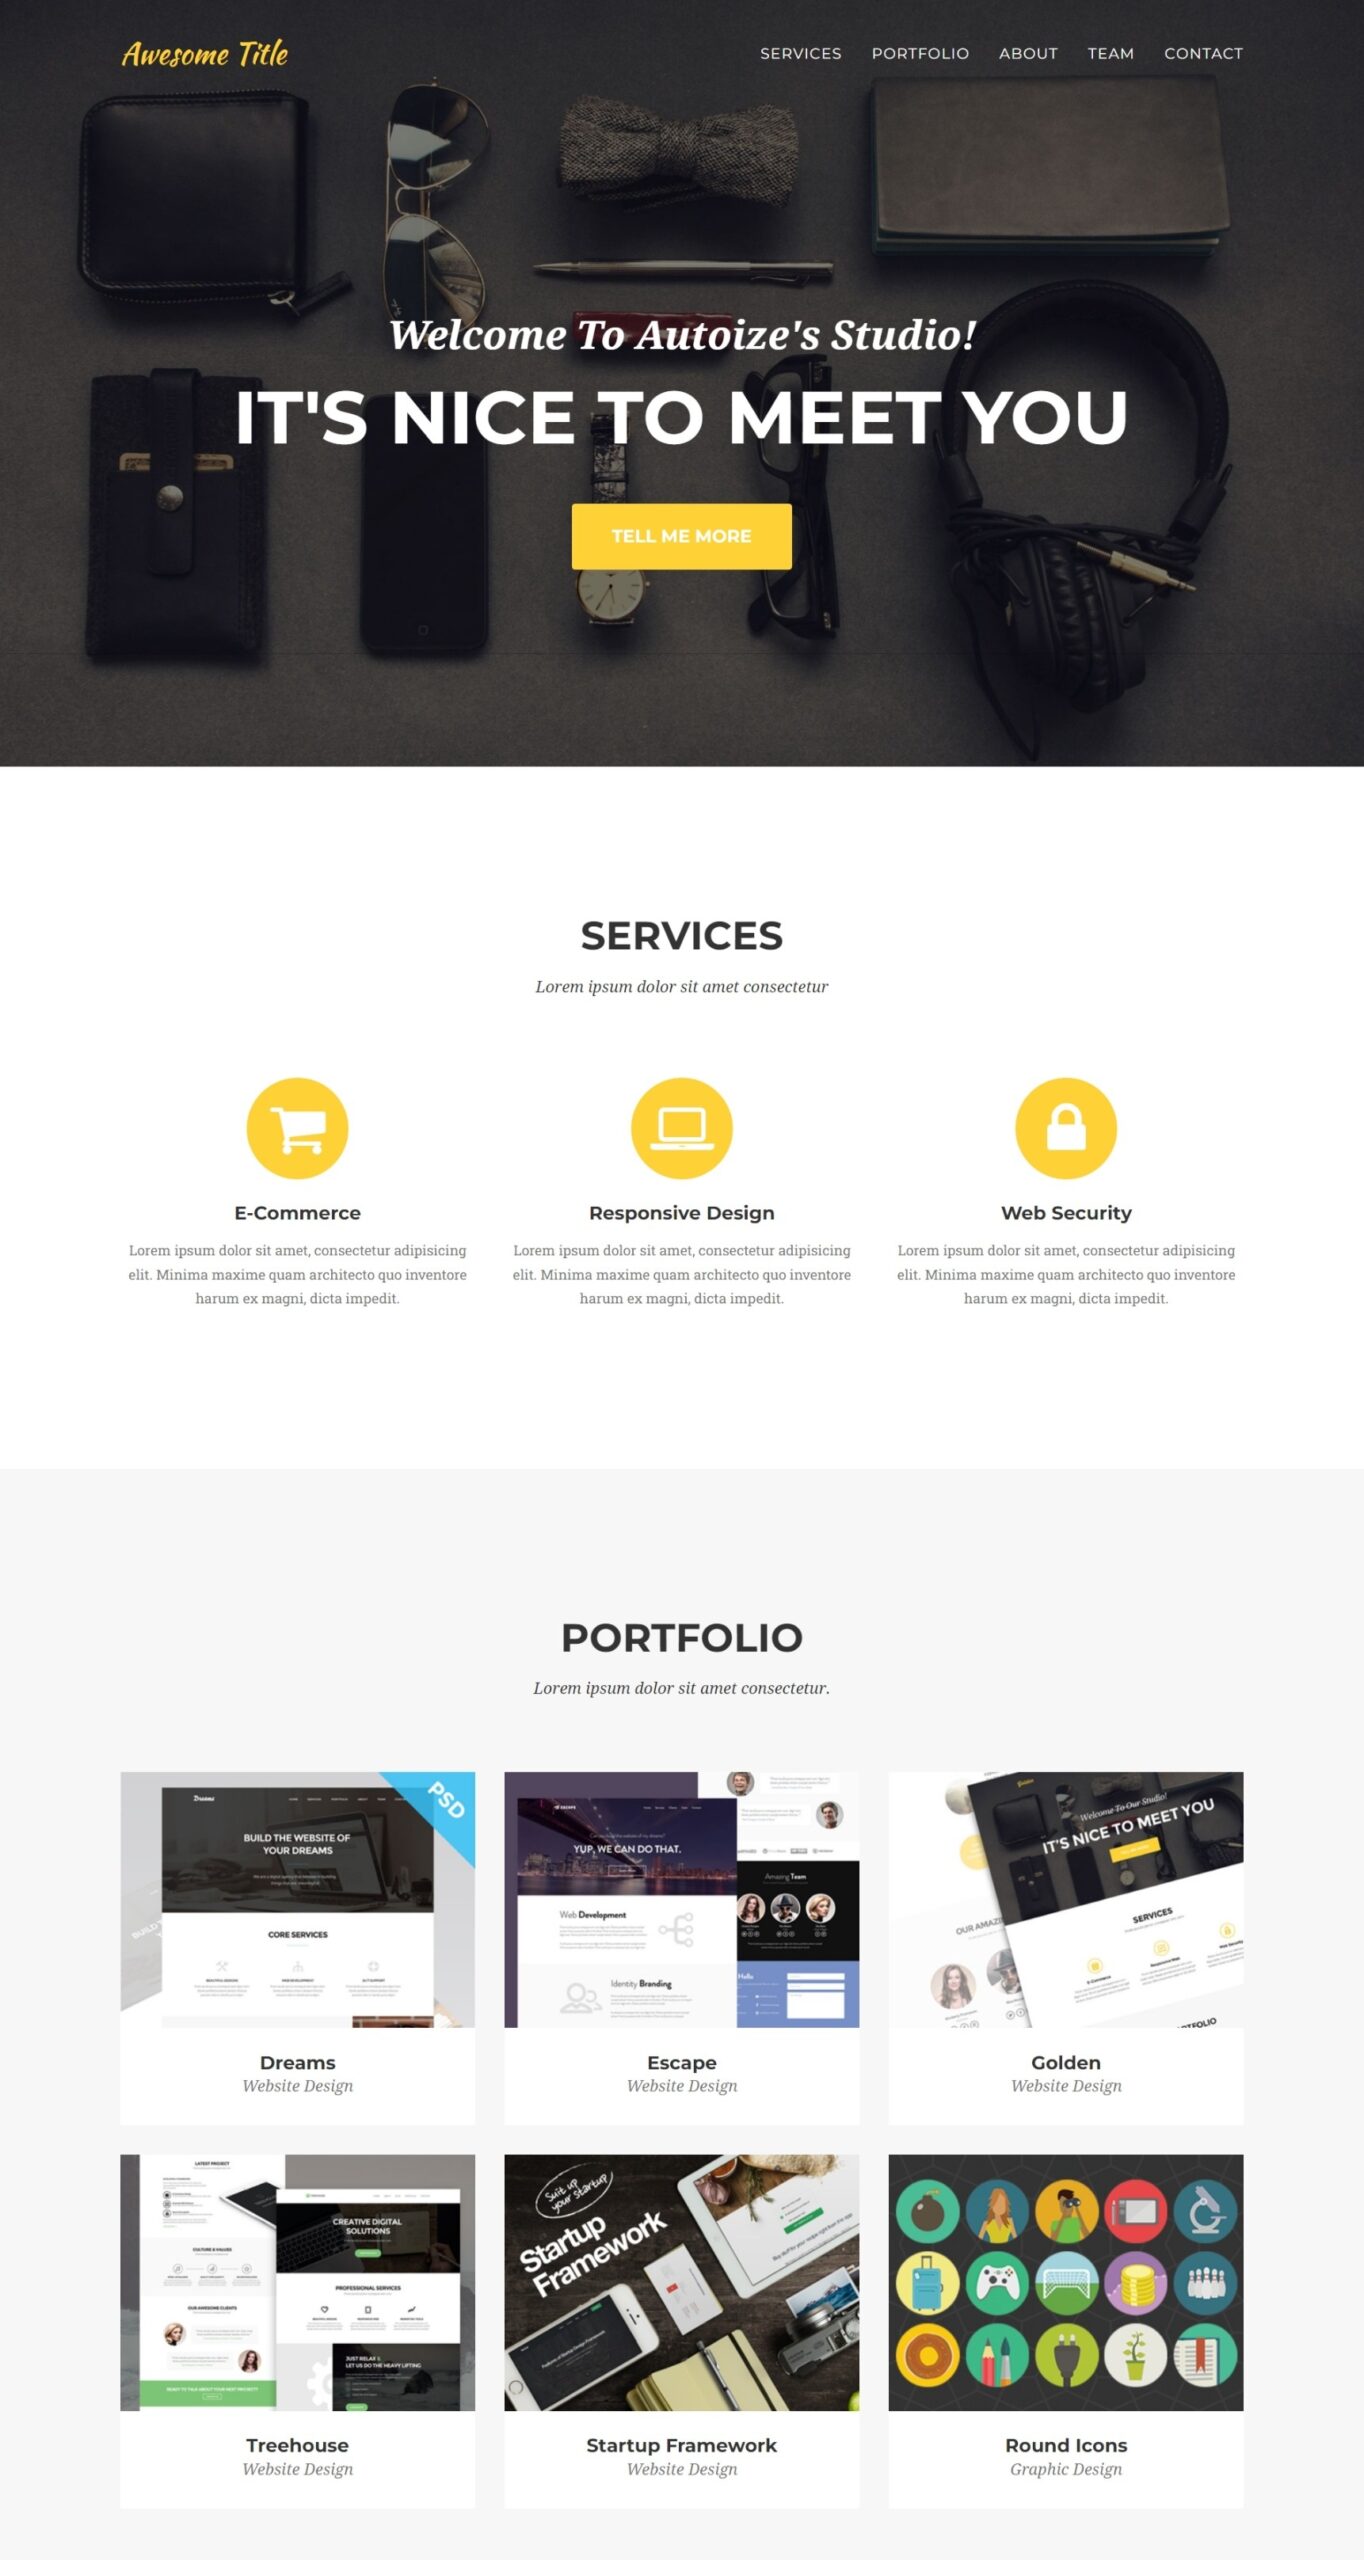
A Grav skeleton includes the Grav core, the admin plugin (optional), and a theme which gives the Grav site a distinguishable look-and-feel.
You can switch to a new theme after the initial install using a skeleton, or install only the Grav CMS core with the default theme, Quark. The benefit of using a Grav skeleton, though, is that it also includes some sample web content (text and images) that are tailored to the theme corresponding to that skeleton. This makes it easier to see where the editable areas of the theme are and to understand how the theme developer intended their layout to be used.
A list of open source, free-to-use Grav skeletons are available at https://getgrav.org/downloads/skeletons. This is a small subset of the themes available overall on the Grav CMS official project website at https://getgrav.org/downloads/themes. If you wish to use a theme which is not packaged as a skeleton, then you need to install Grav with the default theme first, then switch to the theme of your choice.
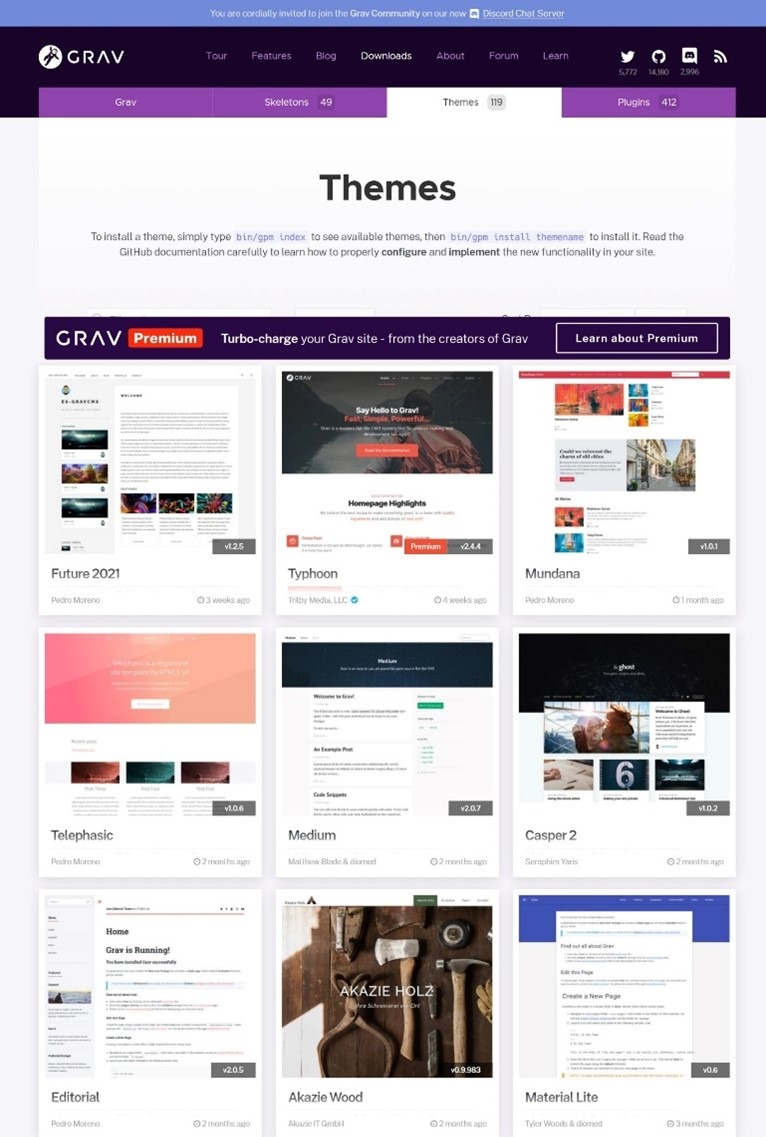
Hover over the skeleton that you wish to use and download the .ZIP file to your local machine with the “Download (with Admin)” option, if available. Some skeletons are not bundled with the admin plugin, so for those themes, you would need to install the puplugin manually later.
Create a GitHub repository, commit, and push the skeleton to it.
Using your preferred method, whether from GitHub.com, the GitHub Desktop GUI, or the command line, create a new repository for your new Grav website. It is better to make this a private repository, to prevent any secrets from being accidentally published on the Internet. Unzip the skeleton you previously downloaded, move its contents (without a containing folder) into your repo folder, then commit, and push the changes.
Be sure to note down the name of the repository which you created, as you will require it when you set up the App Service through the wizard in the Azure Portal. The name of the repo will be in the format <GitHub_Account_Name>/<Repo_Name>.
Create an Azure App Service resource for a PHP web application on Linux.
Login to the Azure Portal using your Microsoft account. If you haven’t used Azure before, you will either need to start a free trial ($200 credit for 30 days) or create an Azure subscription, which is the same as a billing account on other cloud platforms.
You need to verify a physical landline or mobile number and a credit/debit card to open an Azure account, even though it won’t be charged until you upgrade to a paid subscription (at 30 days or when the credit is depleted).
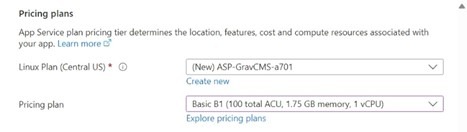
Microsoft does offer a “Free F1” tier for App Service for 12 months, but it does not support any custom domains or SSL certificates, so your web app is limited to a subdomain *.azurewebsites.net. To get started, it is better to use at least the “Basic B1” plan with “ACU 100, Memory: 1.75 GB, vCPU: 1” for $12.41-13.14 USD/Month in the US East and US Central regions, as it also supports Continuous Deployment using GitHub Actions.
Here is a summary of the relevant options, and the considerations for each step in the setup wizard:
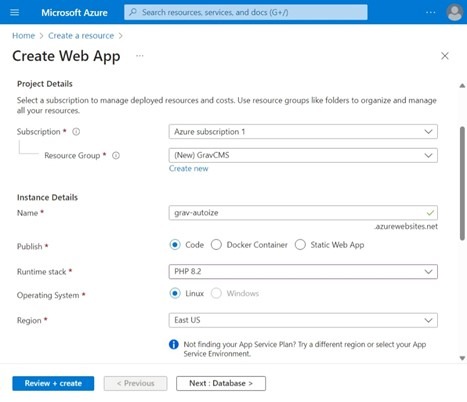
Basics
Resource Group: Create a new resource group, or select an existing resource group. A resource group is similar to a project in GCP. It is used for organizing Azure resources that are related to the same service (or group of services) together.
Name: Choose a unique subdomain name at Microsoft’s domain .azurewebsites.net to identify the Web Service where you will deploy Grav CMS. After creating the resource, you can change the URL for your Grav CMS website to a custom domain that you control.
Publish: Code, as we will be getting the code from our GitHub repository
Runtime Stack: PHP 8.2
Operating System: Linux
Region: Select a region closest to where your business is located. Note that not all plans are available in every region, and the US regions (e.g. US East 2 or US Central) will typically have the widest selection and lowest pricing.
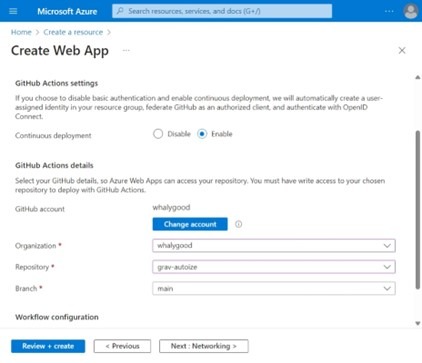
Deployment
Continuous Deployment: Enable
GitHub Actions details
GitHub account: Connect your GitHub account, and authorize it over OAuth when prompted
Organization: Choose the organization that your repo belongs to. By default, a GitHub account will only have one organization, which should be the same as your account name.
Repository: The repository name which you previously pushed the Grav skeleton to
Branch: main
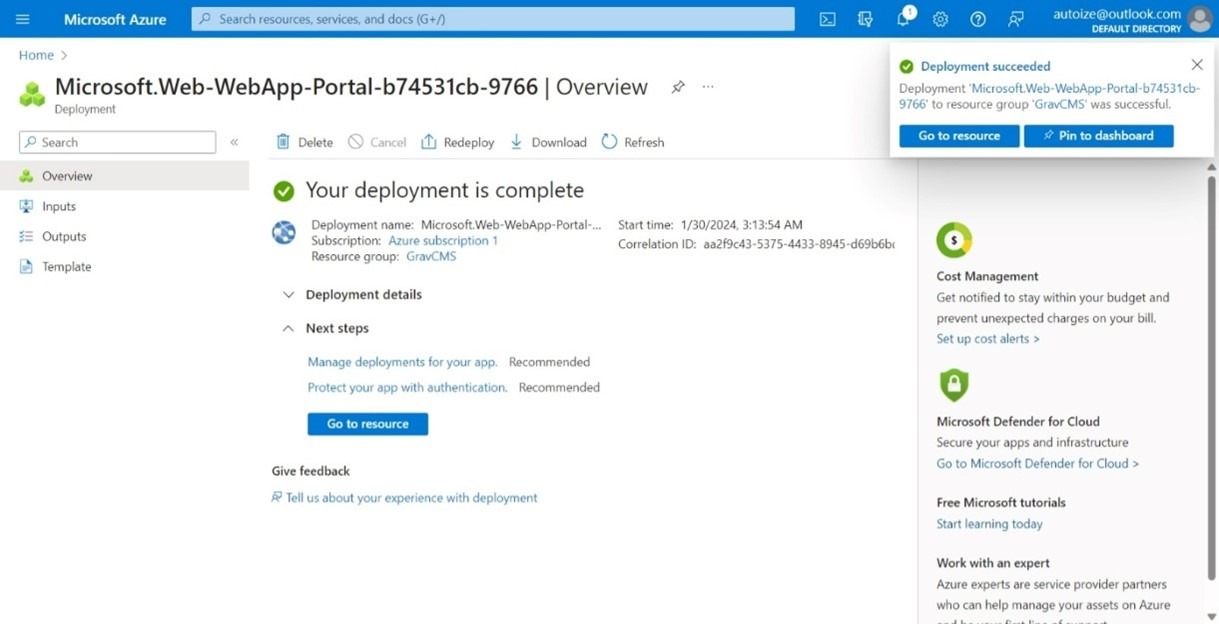
Once the App Service resource for your Grav CMS website is successfully created, you will see a confirmatory message similar to the below saying that “Your deployment is complete.” In the background, Microsoft has spun up a Linux container (Ubuntu) with PHP 8.2 and an Nginx web server, and pulled the contents of your Github repository into the webroot.
Click the “Go to resource” button to manage your new App Service inside the Azure Portal.
Install Composer and update dependencies for Grav CMS.
To make your life easier, App Service has already pre-installed most of the required dependencies, such as the most typical modules, in your PHP environment. But Grav uses a package manager called Composer to manage its own dependencies, namely its Symfony components (libraries).
The App Service container image does not include Composer out-of-the-box so you will need to exec into the container to execute some commands inside it at the command line. Note that only the /home directory is persisted between restarts or redeployments of the App Service, so any changes you wish to keep must be made under that directory.
To access a SSH terminal emulator for the container, navigate to Development Tools > SSH in the left navigation pane of the App Service resource in the Azure Portal. Click the “Go” link to launch the terminal in your browser.
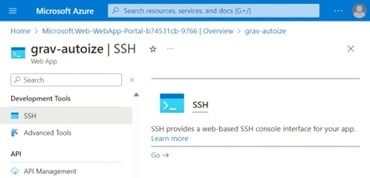
If your container has not yet finished starting up, you may encounter a blank, black screen in the terminal. Wait until you see the welcome message for “Azure App Service on Linux” and have a prompt in the container’s /home directory.
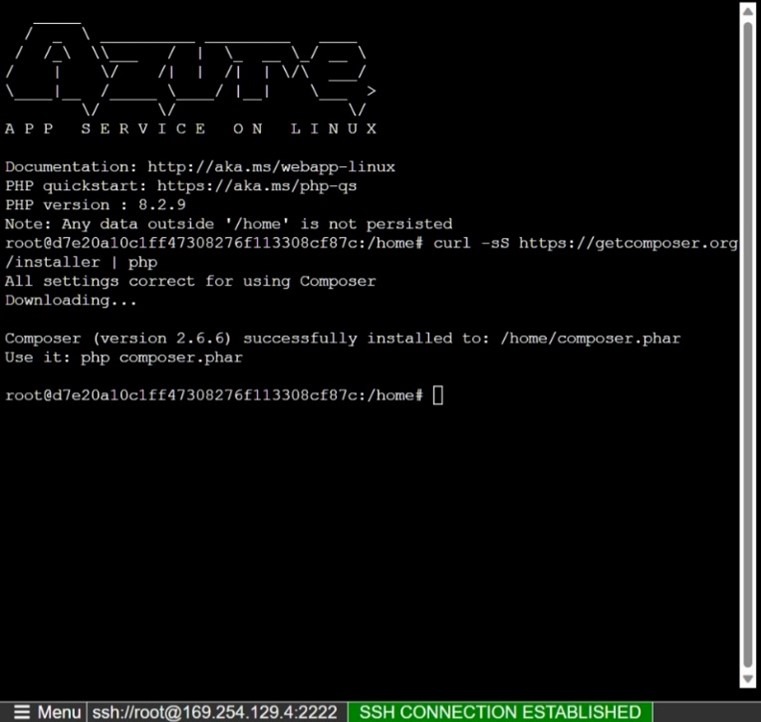
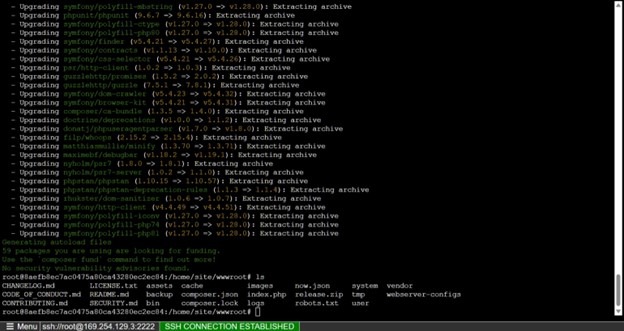
Execute the following commands to install Composer and update Grav CMS’ project dependencies.
# cd /home/
# curl -sS https://getcomposer.org/installer | php
# cd /home/site/wwwroot
# php /home/composer.phar update
Customize nginx.conf and php.ini, and make persistent with a startup script (startup.sh)
The next step is to edit the default NGINX conf in the container, so that it’s compatible with the URL rewriting scheme that is expected by Grav CMS. Otherwise, you will encounter a 404 error when attempting to visit your Grav website through a browser.
- While remaining in the App Service SSH terminal, use a text editor such as nano to edit the location / { block in the /etc/nginx/sites-available/default
# nano /etc/nginx/sites-available/default
…
client_max_body_size 64M;
…
location / {
        index  index.php index.html index.htm hostingstart.html;
        try_files $uri $uri/ /index.php?$query_string;
}
…
Add the highlighted line to the block in the excerpt above, then save the changes.
- Reload the NGINX service inside the container to make the new config take effect.
# service nginx reload
- Copy the updated NGINX config to your /home/site directory so that it’s persisted between container restarts. You also need to create a startup script that App Service will execute each time the container starts up, which will copy your custom config to the /etc
# cp /etc/nginx/sites-available/default /home/site/nginx.conf

# nano /home/site/startup.sh
        cp /home/site/nginx.conf /etc/nginx/sites-available/default
        service nginx reload
- Add the following values in the default ini.
# nano /usr/local/etc/php/conf.d/php.ini
…
upload_max_filesize = 64M
post_max_size = 64M
- Copy the updated PHP config to your /home/site directory and add the following additional lines to the startup script to persist this change at container startup as well.
# cp /usr/local/etc/php/conf.d/php.ini /home/site/php.ini

# nano /home/site/startup.sh
…
cp /home/site/php.ini /usr/local/etc/php/conf.d/php.ini
service nginx restart
- Navigate to the App Service resource for your Grav CMS site in the Azure Portal. Then, select Settings > Configuration in the left navigation pane, and change to the General settings Configure the startup script to run every time the container is restarted.
Startup Command: bash /home/site/startup.sh

Point a custom domain and add an SSL certificate.
By default, an Azure App Service is assigned a subdomain at *.azurewebsites.net corresponding to the service name you chose when creating the service during the initial setup wizard. You can access your Grav CMS instance at that subdomain or configure a custom domain.
The custom domain should be already registered at any domain registrar, and the domain’s authoritative nameservers should be delegated to a DNS hosting service (which may be same or different from your registrar) which allows advanced editing of individual DNS records in the zone.
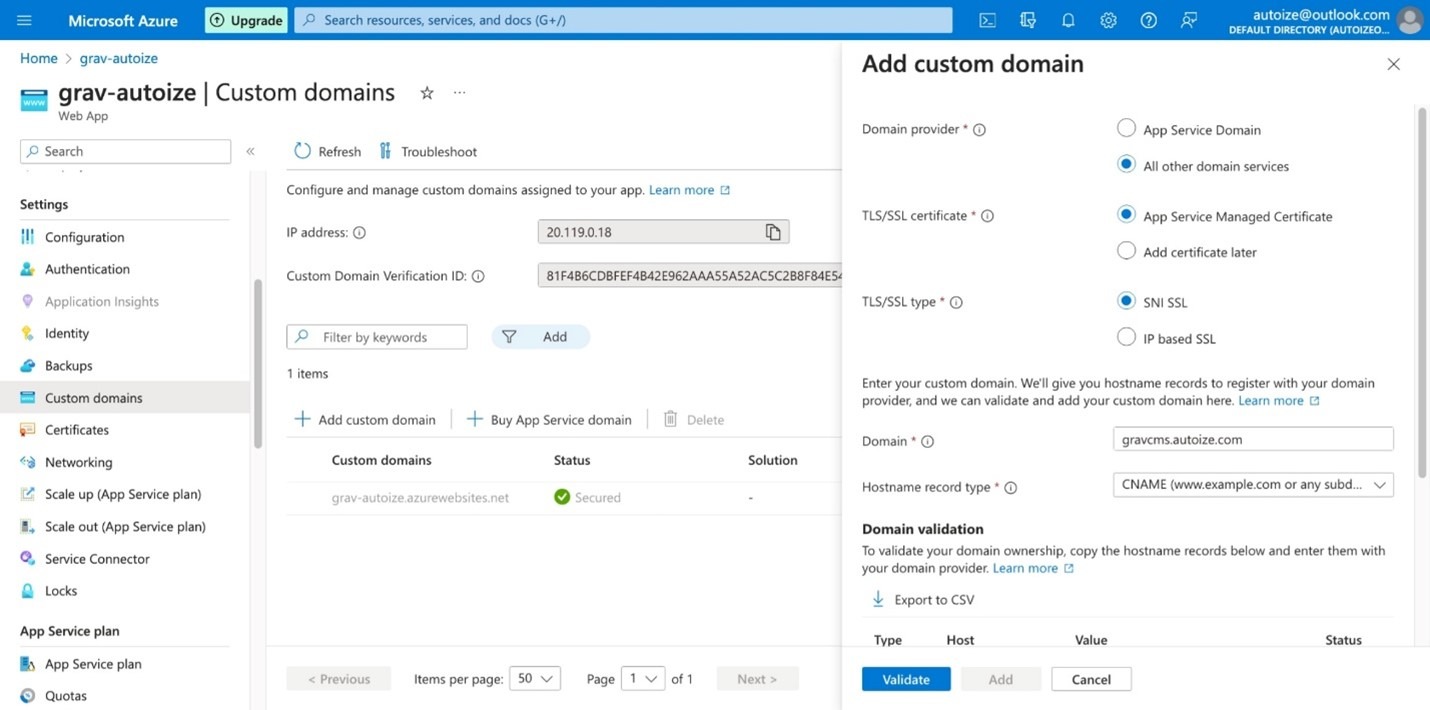
In this example, we add gravcms.autoize.com as the example custom domain for the Grav website. Navigate to the App Service in Azure Portal and select Settings > Custom Domains from the left navigation pane.
Click the “Add custom domain” button to open the blade, and select the following options:
Domain provider: All other domain services
TLS/SSL certificate: App Service Managed Certificate
TLS/SSL type: SNI SSL
Domain: The domain or subdomain name where your Grav website will be accessible at
 In the Domain validation section, a CNAME and a TXT record will be generated for you to add at your domain registrar, current web host, or DNS service provider. Where you edit your domain’s DNS zone will depend on the authoritative nameservers it is delegated to. If you are uncertain, a WHOIS query for your domain at the registry associated with its extension (TLD) will show this.
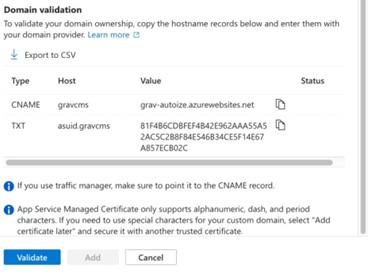
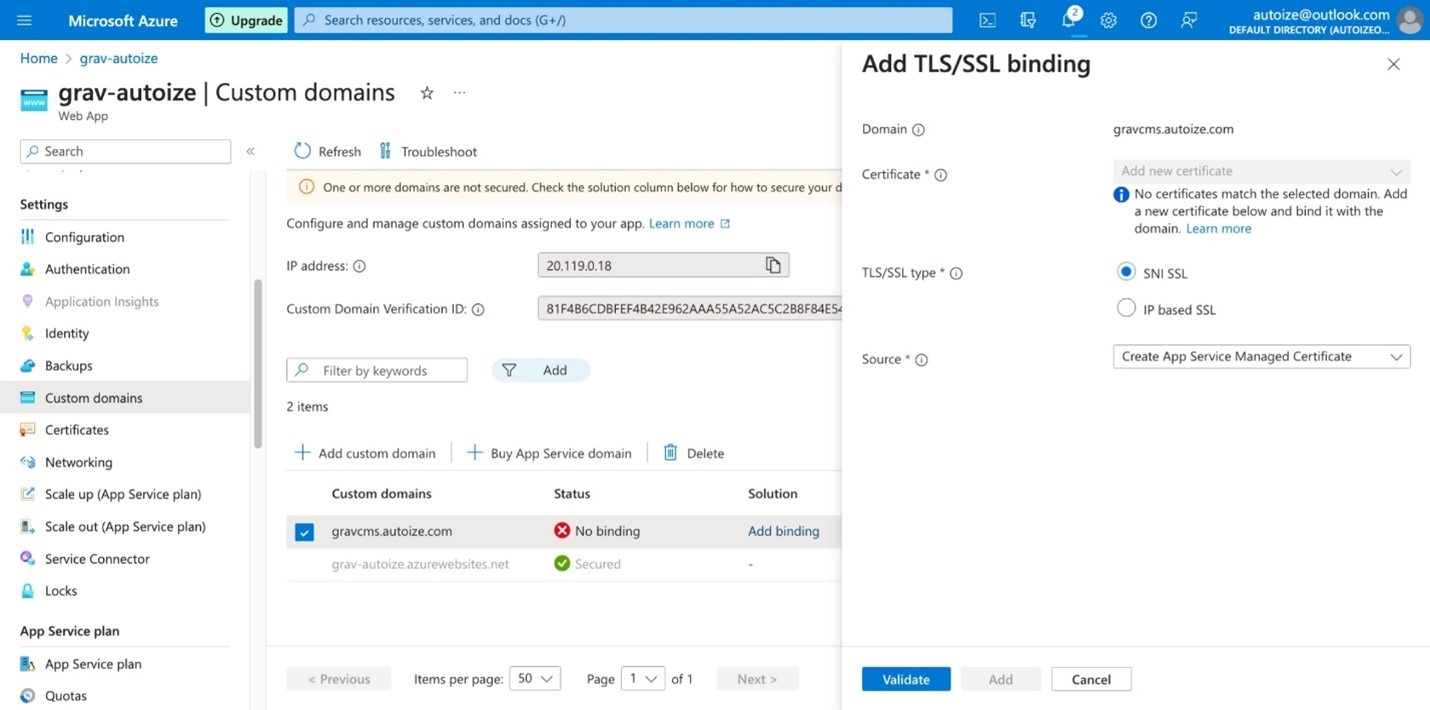
Also, you must add a TLS/SSL binding to make the certificate be issued by Azure and be associated with your Grav Web Service. Click the “Add binding” link beside the custom domain which has been added. In the blade that appears, choose the following options:
TLS/SSL type: SNI SSL
Source: Create App Service Managed Certificate
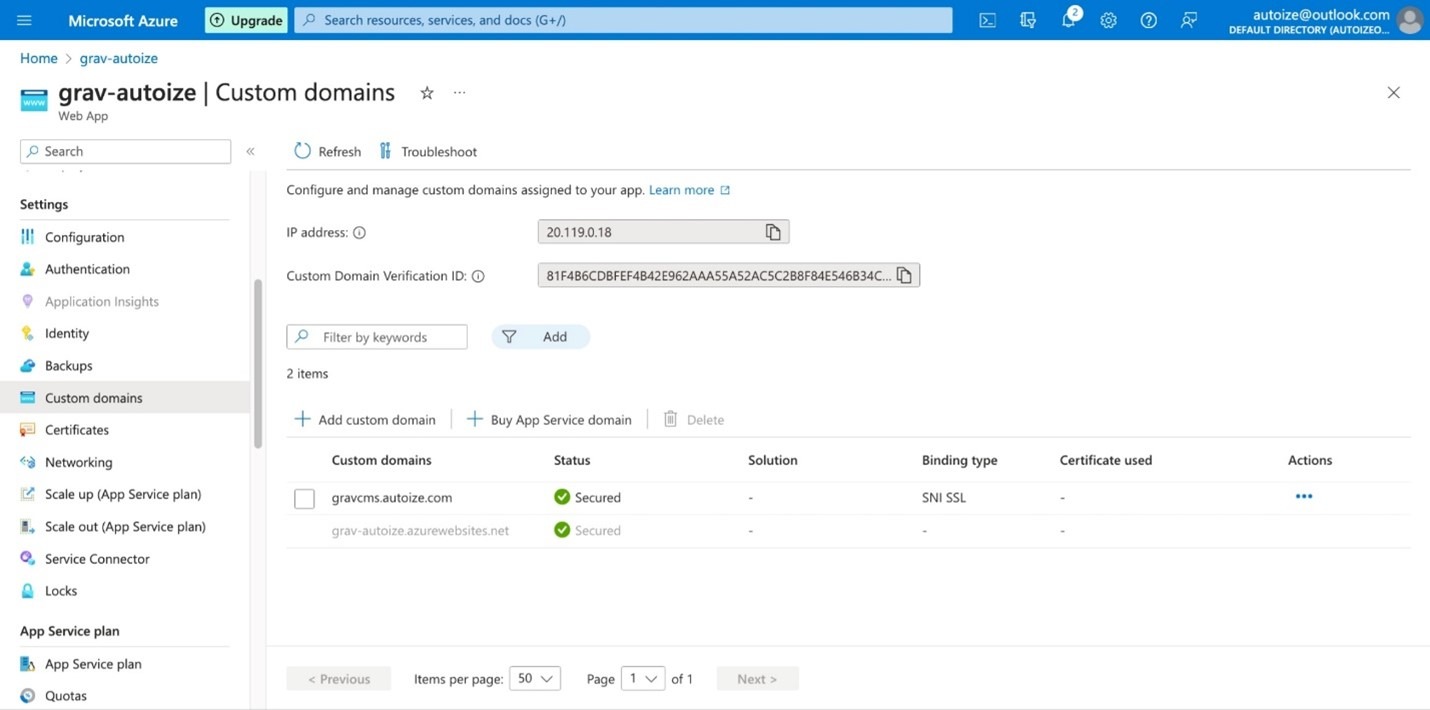
After you are entirely done issuing the certificate, you should see a green checkmark labelled as “Secured” beside your Grav website’s domain name in the Custom domains list.
Create account in Grav CMS admin backend, and edit the website.
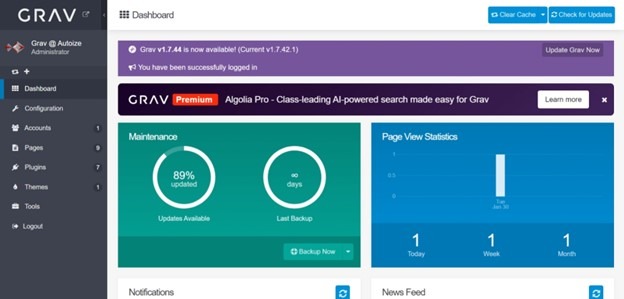
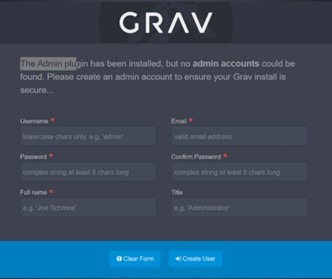
The final step is navigate to your Grav website’s custom domain in a web browser. You will be prompted to create an initial administrative user account for the admin plugin of Grav CMS. Be sure to set a strong password as anyone who signs into this account can make changes to your website.
If you encounter a 404 error when trying to access your Grav website, then go back to the previous step where you edited the NGINX config inside the App Service and be sure that the change has taken effect by reloading the container’s NGINX service.
Providing that you followed the process correctly, you should be rewarded with a shiny new Grav website with an admin backend where you can make changes to its content, create additional users, schedule backups (requires scheduler cron job), use the available plugins, switch to a different Grav theme, and much more.
To go to the frontend of your website and preview how it looks like to any visitor, click the “open external link” icon beside the Grav logo in the dashboard.