

If you’re planning to host a web application, such a website or blog, on AWS EC2 or AWS Lightsail cloud compute instances, managing SSL/TLS certificates can be easier than you think. Compared to Let’s Encrypt, AWS Certificate Manager is a lesser known service which doles out free SSL certificates trusted by all modern browsers. If you’re going with Amazon’s cloud, you might want to take advantage of this perk offered to AWS customers.
The certificates are signed by Amazon’s in-house certificate authority, with the main limitation being that the certs can only be used in conjunction with an Elastic Load Balancer (ELB) or Amazon API Gateway. If the ELB is deployed through Elastic Beanstalk and CloudFormation, it can also obtain an SSL/TLS certificate as part of the same workflow.
The Amazon SSL certificates are provisioned and renewed automatically, as long as the verification DNS record for the domain remains in place. If your DNS zone is hosted by Amazon Route 53, the required CNAME record is created with a single click during the certificate issuance process.
- Start by provisioning an EC2 instance in the AWS Management Console, such as a t2.micro on the free tier, using the default VPC. Be sure to configure port 80 as open to all hosts (source: 0.0.0.0/0) while creating the security group in the Launch Wizard.
We chose the “CentOS 7 (x86_64) with Updates HVM” AMI from the AWS Marketplace instead of using Amazon Linux. For this AMI, the username to SSH into the server using the keypair you selected, is “centos”.
- Update the operating system (sudo yum update), install Apache (sudo yum install httpd), enable and start the service (sudo systemctl enable httpd && sudo systemctl start httpd). Check that you can reach the server’s test page at its public IP address from a browser.
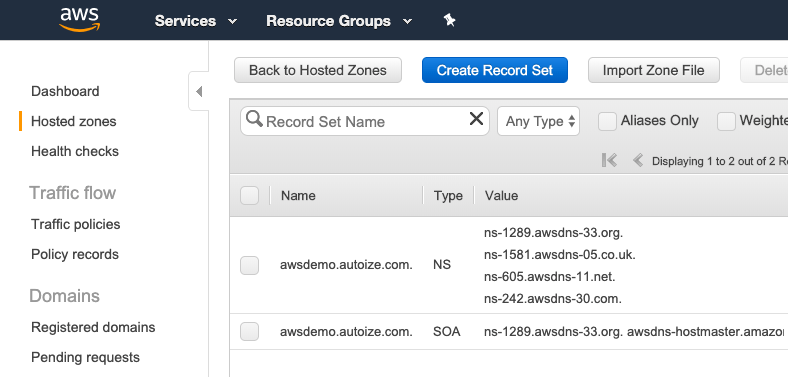
- Create a new Amazon Route 53 hosted zone by going to the Route 53 service in the dashboard. Click “Get Started Now” under DNS management, then “Create Hosted Zone.” Specify the top-level of the domain (awsdemo.example.com or example.com) for the zone you want to host using Route 53. If the zone is at the second-level domain for example.com, Route 53 will be authoritative for any DNS records *.example.com. If the zone is for the third-level subdomain awsdemo.example.com, Route 53 will be authoritative only for DNS records *.awsdemo.example.com. Select type “Public Hosted Zone” in the dropdown, then click “Create” to finish.

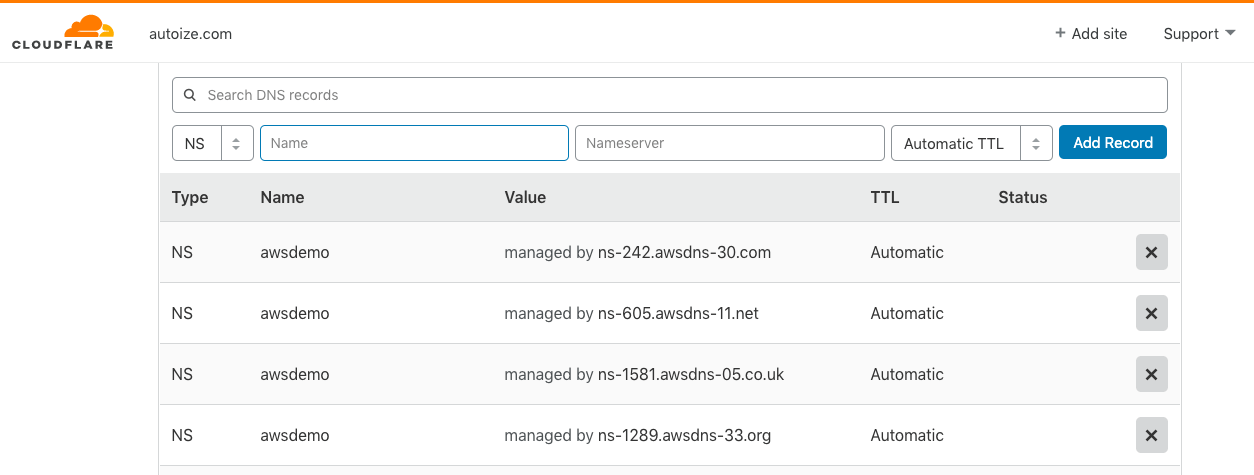
- Next, go to your domain registrar or current web host to create NS records making Route 53 authoritative for your domain (or subdomain). In our case, CloudFlare handles our DNS so we signed into their dashboard and went to the DNS settings. Copy the primary and secondary NS records from the Route 53 dashboard.
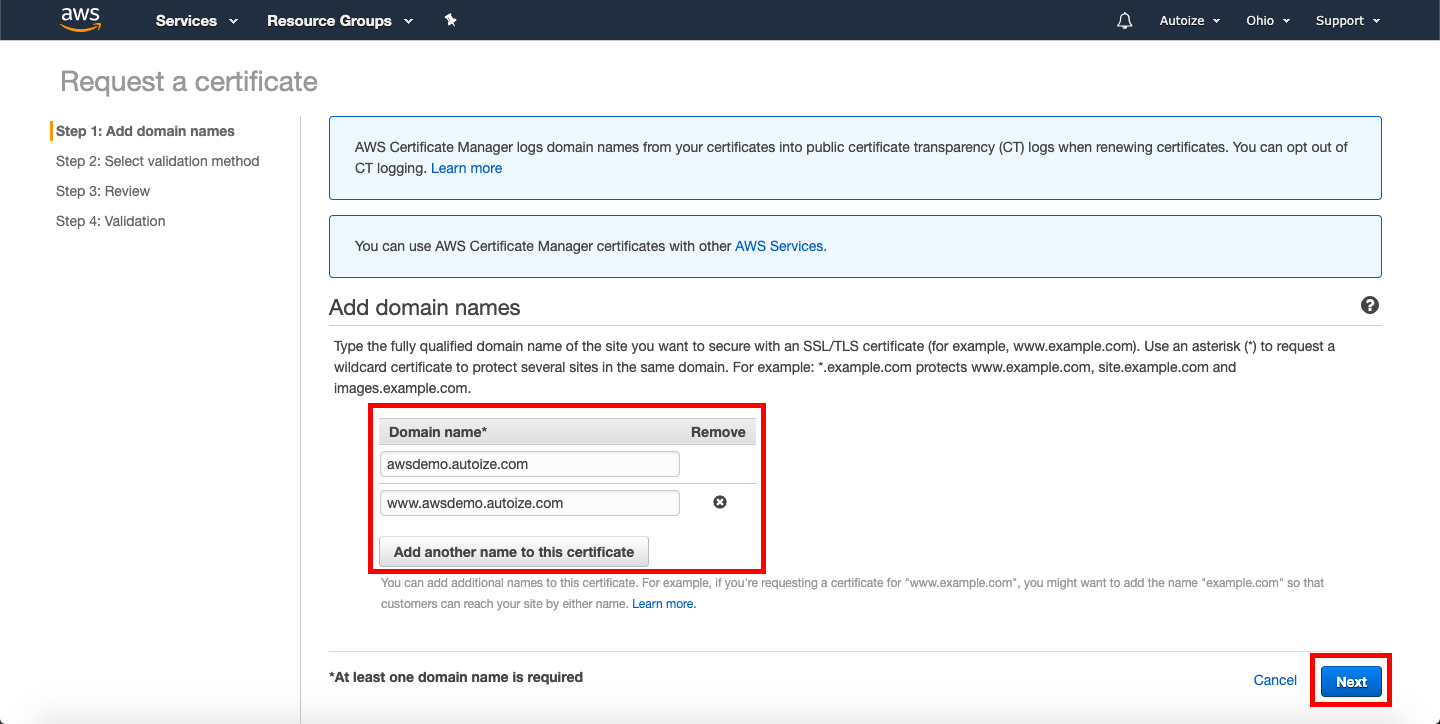
- Search for Certificate Manager in the AWS Management Console. Click “Get started” under Provision Certificates. In the following screen, select the radio button “Request a public certificate” and click “Request a Certificate” to continue.

In Step 1, specify the domain names, including all subdomains (e.g. www.) that should be on the Common Name for the SSL/TLS certificate. Then, click “Next.”
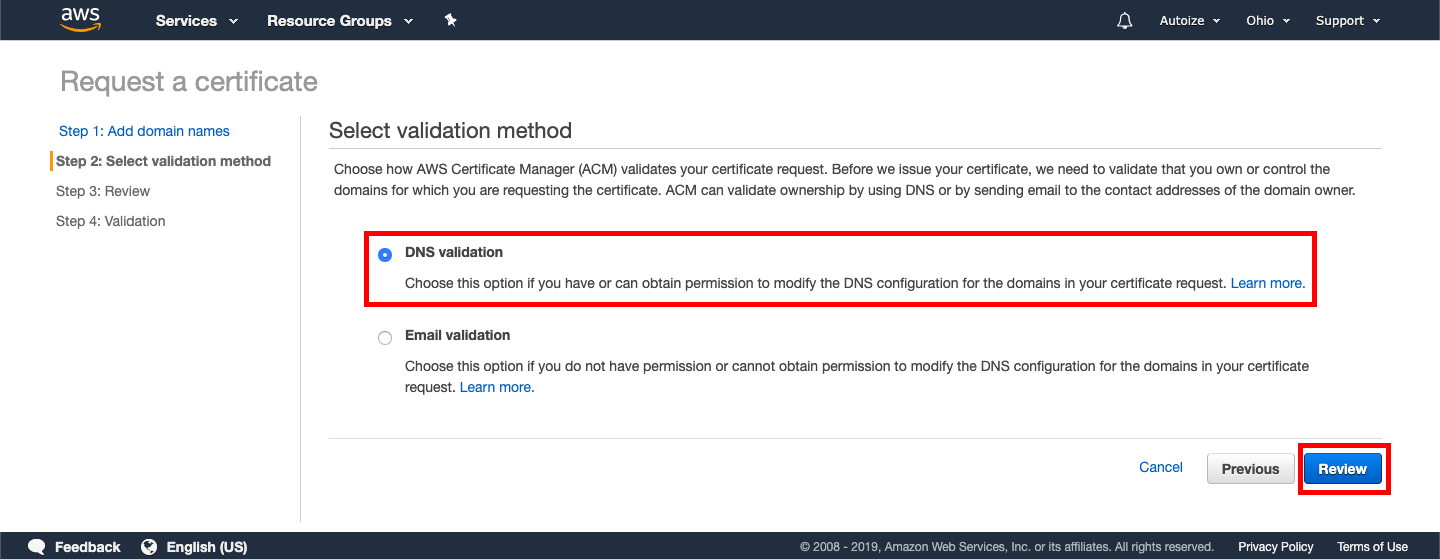
In Step 2, select the radio button for “DNS validation” as verification method and click “Review.”
In Step 3, review all the information you’ve entered is correct to proceed.
Finally in Step 4, add the verification DNS records by expanding each domain separately with the arrow, and clicking “Create record in Route 53.” You’ll be prompted to confirm each addition with a pop-up window, where you should click “Confirm.”
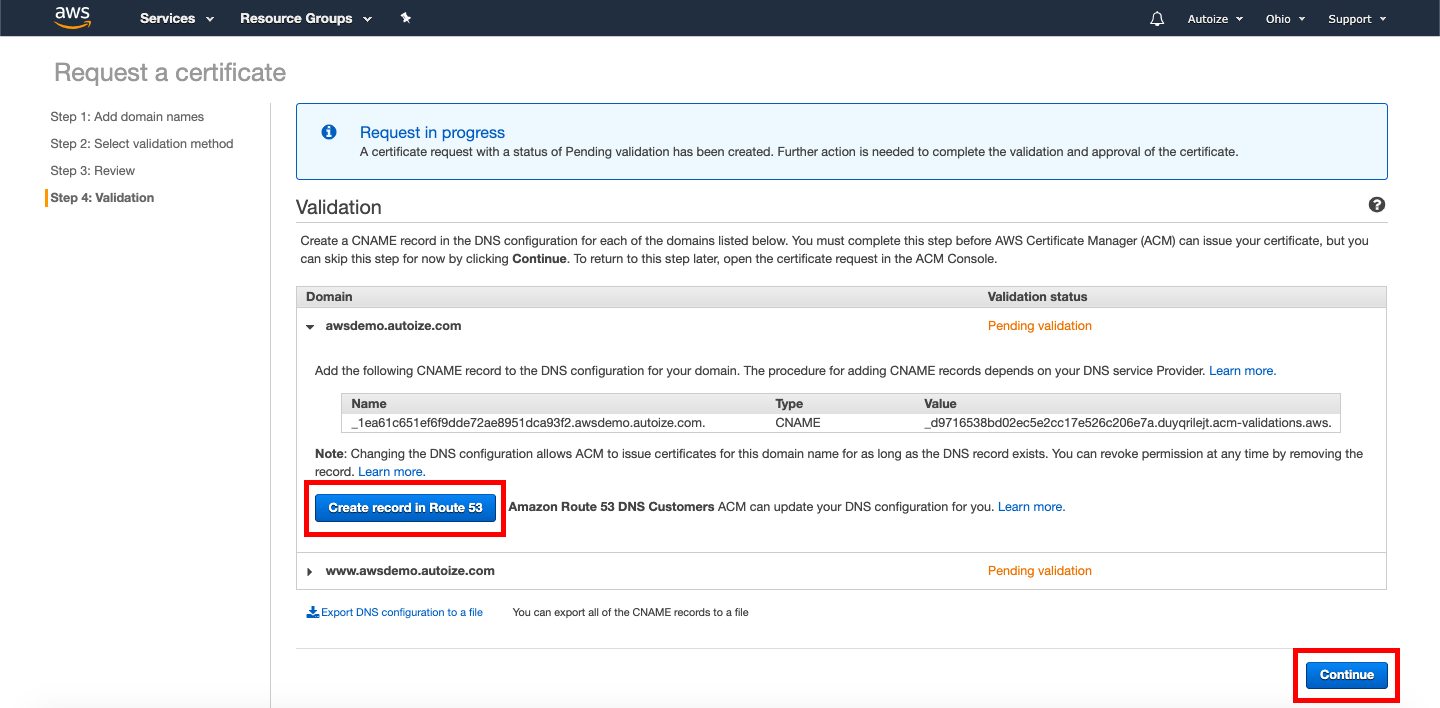
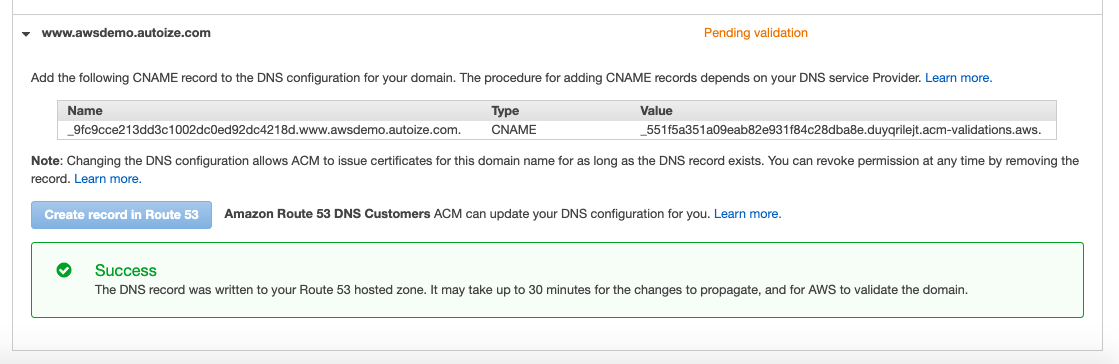
When done, click “Continue” to finish.
Once the SSL/TLS certificate is issued, it will show in AWS Certificate Manager with the Status “Issued” for the Domain Name and Additional Names specified during the wizard. Notice that Renewal Eligibility will show as “Ineligible” until you attach the certificate to an ELB.

- From the EC2 dashboard, provision an ELB by clicking “Load Balancing > Load Balancers” on the left sidebar. Click “Create Load Balancer” and select “Create” for an Application Load Balancer for HTTP and HTTPS traffic. In Step 1, Configure the ELB as follows.

Ensure you are creating the ELB in the same region where the EC2 resides. Select the checkboxes for all the availability zones to enable for the load balancer, which must include the AZ where your EC2 is deployed.
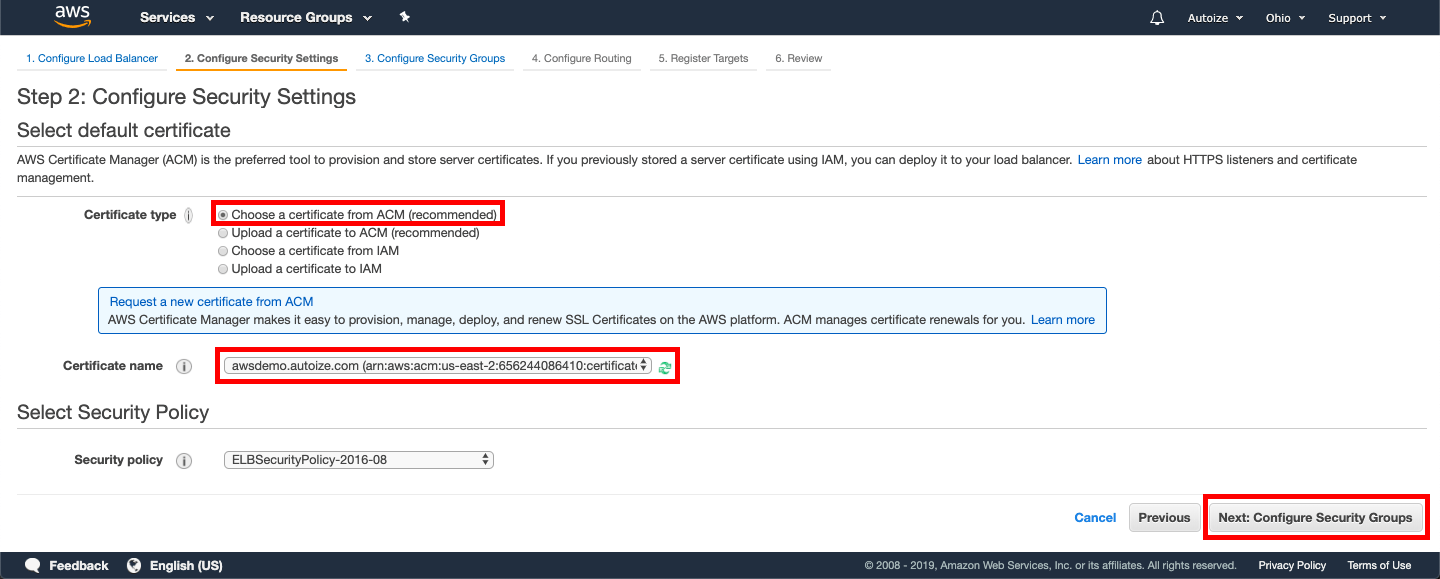
In Step 2, select the radio button “Choose a certificate from ACM (recommended)” then pick the certificate that was just issued earlier from the dropdown. Check that the certificate name matches the domain you plan to host behind this load balancer. Click “Next: Configure Security Groups” to proceed.
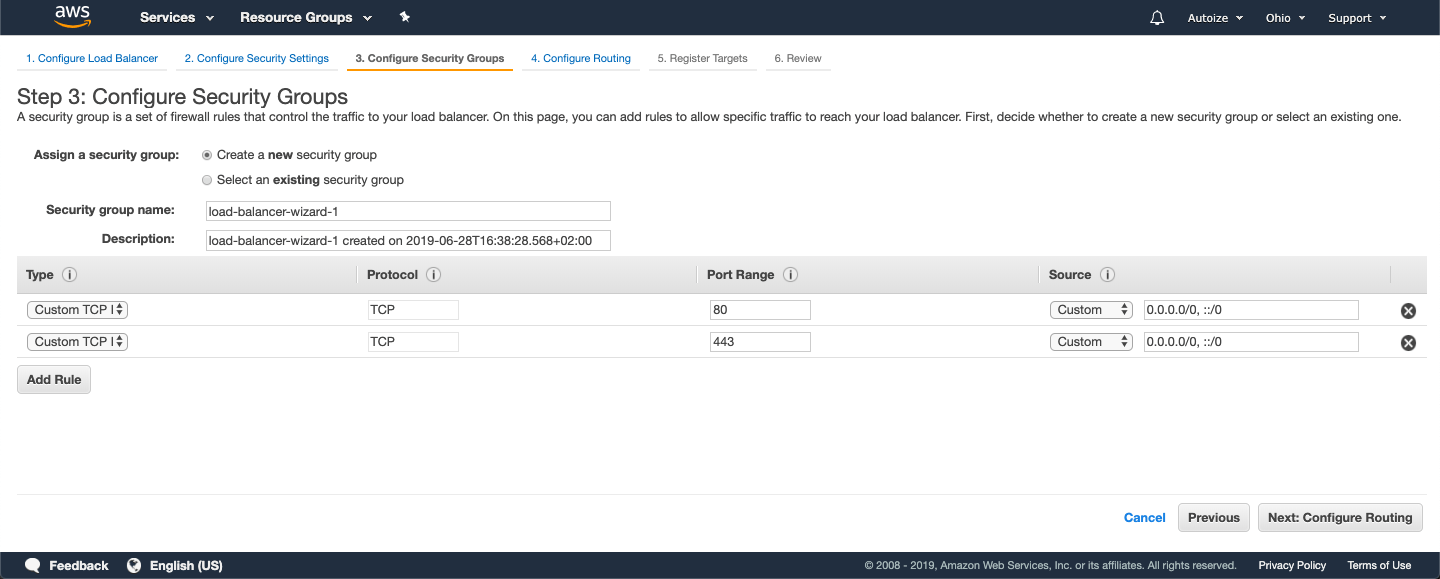
In Step 3, select the radio button to “Create a new security group” for the load balancer. Open up both port 80 and 443 to the Internet on the load balancer so HTTP to HTTPS redirects can be configured later.
In Step 4, configure the Routing options as follows.

Note that Target type should be “Instance” and the protocol for both the Target group and the Health Checks should be HTTP port 80, as Apache on the backend server is listening on port 80, not port 443. In this configuration, SSL termination is handled by the load balancer.
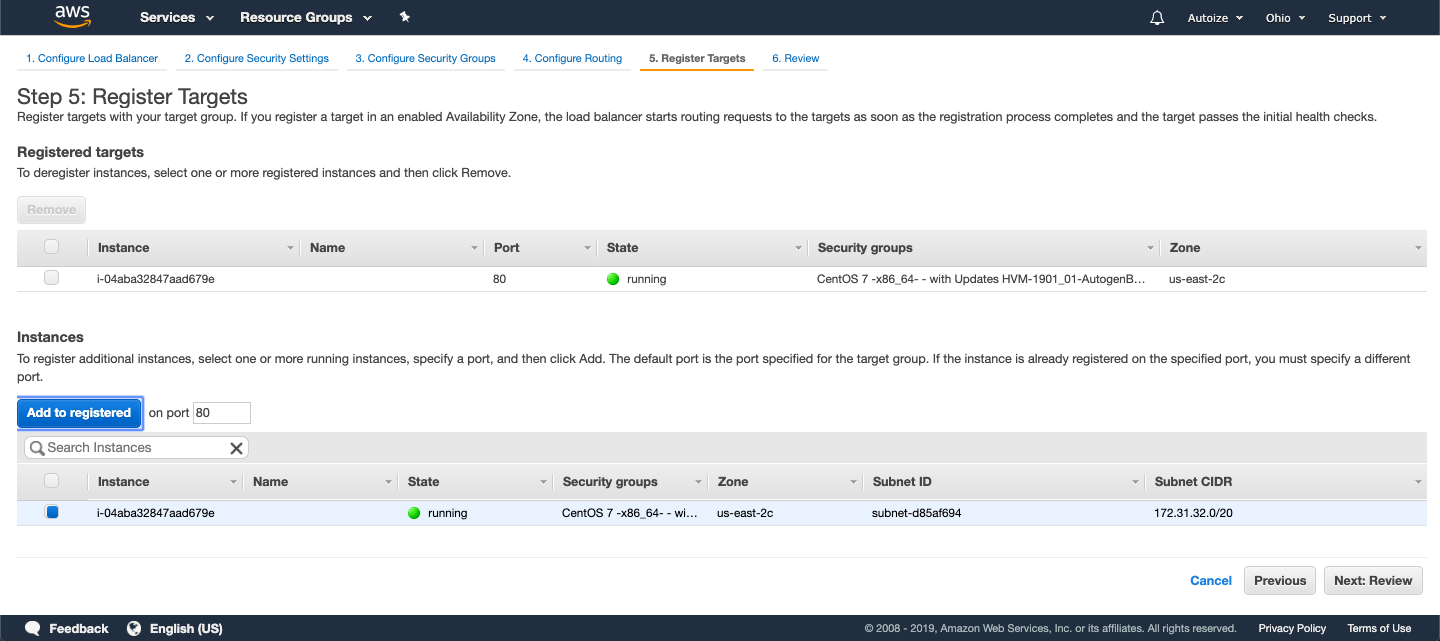
In Step 5, select the EC2 instance from the list and click “Add to registered” to register that instance as a target for the load balancer. This means traffic will be sent from the load balancer (frontend) to the backend web server to be handled by Apache.
In Step 6, review the load balancer details and click “Create” to begin provisioning the ELB. Once the ELB is created, the AWS account will begin being charged $0.0225/hour, which works out to $16.88 in a 750 hour month, plus $0.008 per LCU-hour. (For more details on ELB pricing).
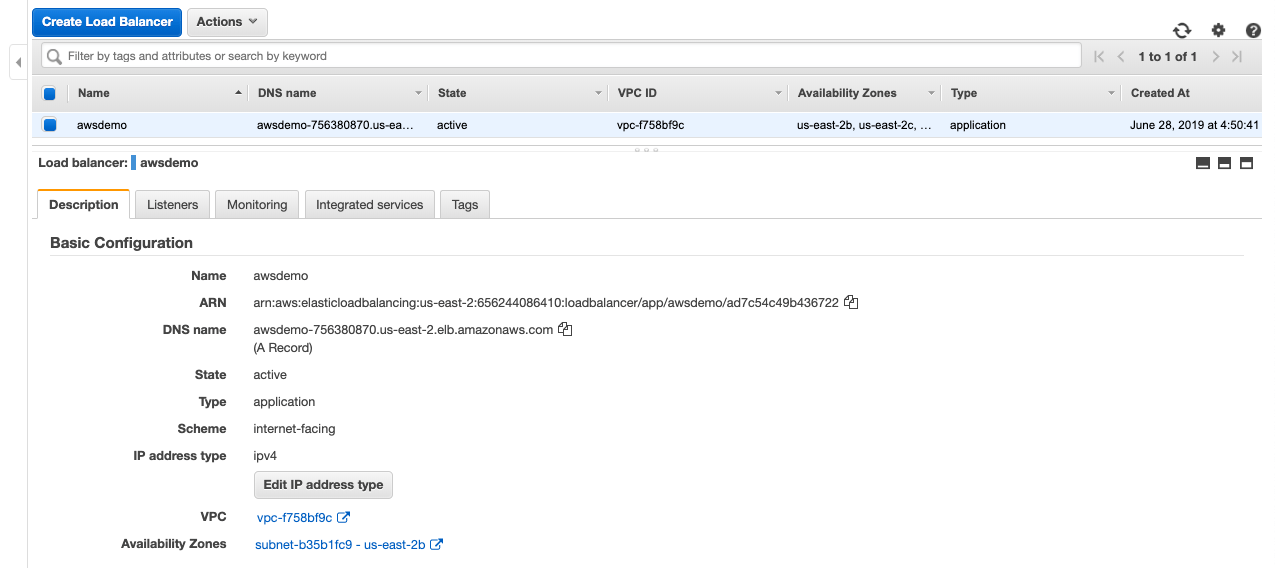
Once fully provisioned, the ELB resource will look similar to below. Normally, you would be able to access your backend resource by simply visiting the DNS name ending in us-east-2.elb.amazonaws.com in a browser. Over HTTP it will work, but over HTTPS your browser will throw a certificate error for an incorrect common name, since the ELB endpoint does not match the domain for which the certificate was signed for.
- To access the load balancer (and therefore the web server) over HTTPS using your custom domain, navigate to Route 53 in the AWS Management Console again and select the hosted zone you created earlier.
Click “Create Record Set” to add a new DNS entry.
Normally (if not using Route 53) to point a domain name to an ELB, you would create a CNAME record to the DNS name of the load balancer ending in us-east-2.elb.amazonaws.com. But in this case since Route 53 is integrated with other AWS services such as ELB, the best practice is to create an Alias Target to the ELB.

Select the “Yes” radio button for Alias, and choose the ELB you just created from the dropdown. Click “Create” to confirm the entry, and repeat with the www. version of the domain.
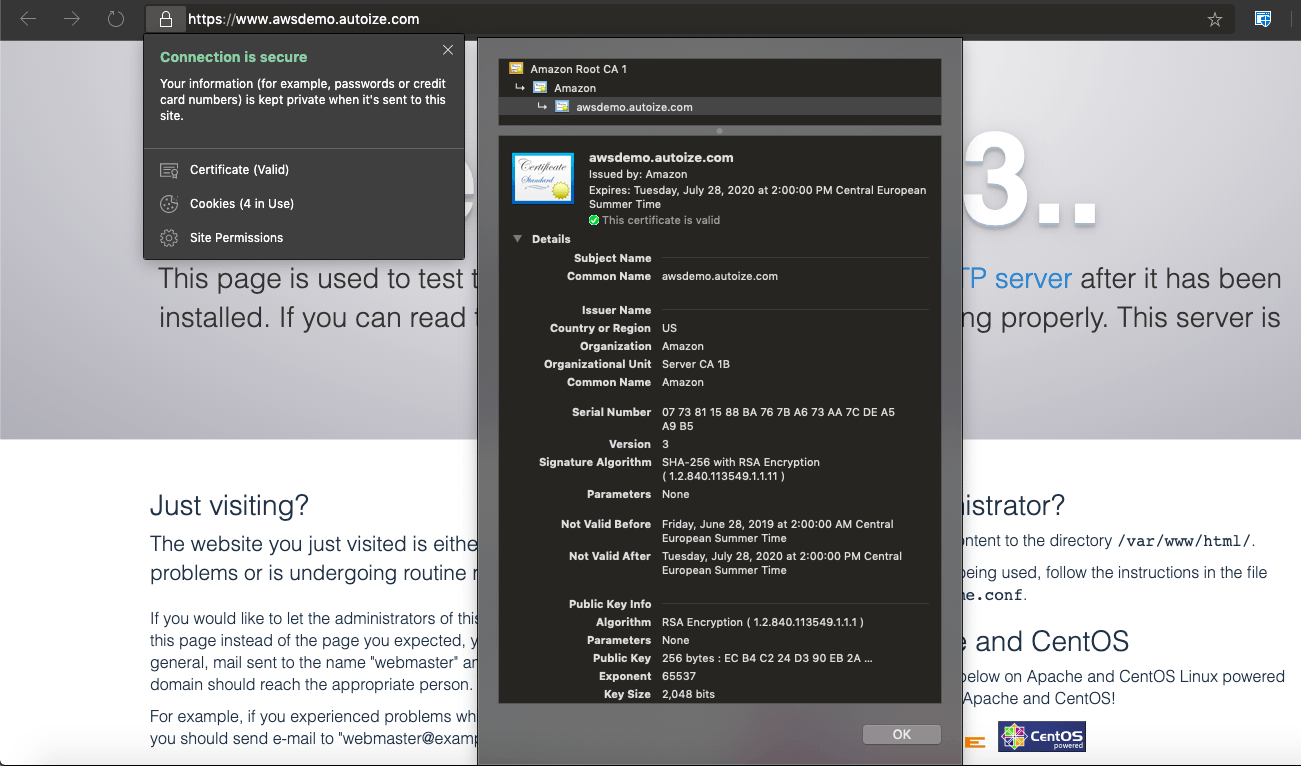
- Visit your domain such as https://www.awsdemo.example.com over HTTPS in a browser and observe that the address bar shows as fully secure, with a SSL/TLS certificate signed by Amazon.
If you double check in AWS Certificate Manager now whether the certificate (valid for 1 month) will be automatically renewed, it now shows In Use “Yes” and Renewal Eligibility “Eliglble.” As long as the certificate is being used by an ELB, AWS will automatically renew the certificate, so it’s not necessary to manually keep track of expiration dates. 
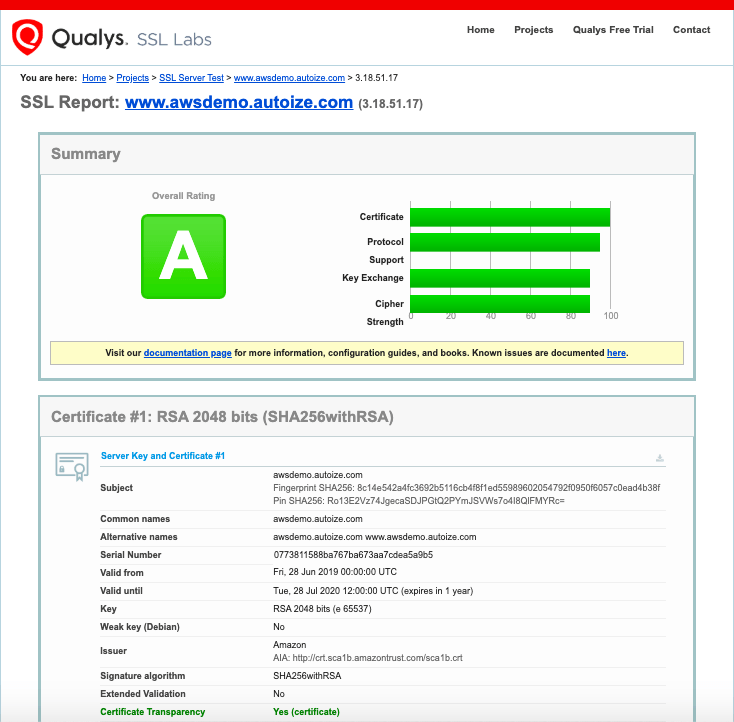
Qualys SSL Test scores Amazon’s default SSL termination configuration on the ELB an “A” which is a reassuring sign this is a simple and secure way for AWS users to configure encryption for the HTTPS resources served through an Elastic Load Balancer.
If you’re already in the AWS ecosystem, using AWS Certificate Manager can be an excellent way to simplify issuance of 100% valid SSL/TLS certificates, without worrying about importing the certificates to the ELB after each renewal. But there’s no significant advantage to switching to Amazon-issued certificates other than ease of management, if you are already using a Let’s Encrypt or paid certificate. As a reminder, the major limitation of the public certificates issued through AWS Certificate Manager is that they can only be used in conjunction with the Elastic Load Balancer, CloudFront, Elastic Beanstalk, CloudFormation, or Amazon API Gateway services. Unlike a normal SSL certificate, you have no access to the underlying certificate chain which would allow you to install the Amazon certificate wherever you wish. So in effect, the cost of the free SSL certificate from Amazon is subsidized by the monthly cost of the ELB, which is a prerequisite of using the certificate.


1 Comment.
lifesaver blog! Thank you.