BionicGPT is an open source AI chat platform with features for teams to upload and share datasets for retrieval augmented generation using large language models. With role based access control, it is designed with a hierarchical user structure where team admins can add, remove, and manage team members’ access at any time. Custom datasets in Bionic can be made available during conversations for a user themselves only, or to others in their team as well. Datasets may consist not only of unstructured data from documents, but also structured or semi-structured data from other databases or software systems as well. In either case, when data is uploaded to BionicGPT, a configured embedding model converts the text into vector values that are then stored in a Postgres table with pgVector support. pgVector is an extension to standard PostgreSQL that adds a new data type known as VECTOR. As it became the de-facto standard for storing embeddings for AI models, the managed database services at AWS, Azure, and Google Cloud have all added support for it.
Airbyte is an ELT data integration platform (also open source) that allows you to configure batch jobs or streaming data through change data capture (CDC) from and to dozens of sources and destinations through “connectors.” The Airbyte web app provides an intuitive graphical UI for authenticating to APIs, mapping data from one system to another, and monitoring the status of the sync jobs that you configure — everything you need for a complete Extract-Load-Transform (ELT) data pipeline.
Airbyte can push data from any source for which it has a connector to BionicGPT’s custom datasets through a feature called “document pipelines.” Document pipelines are a powerful tool that enables your team to constantly have fresh data in their datasets for RAG without the need to manually upload data from the source systems. Bionic uses RabbitMQ as a queue when ingesting data from an Airbyte connector through the BionicGPT API. When Airbyte picks up a change to a source system during a sync, it will ping RabbitMQ to notify Bionic that there is new data pending to be added to a dataset.

Using the document pipeline feature of BionicGPT requires setting up two additional Kubernetes namespaces in the same cluster: one for Airbyte, one for RabbitMQ. Airbyte can be deployed through the official Helm chart; it requires at least version 0.57.1, which added back support for the RabbitMQ community connector. The RabbitMQ service listens on port 5672 as well as having a management interface at port 15672. The Bionic app also requires setting up a cron job to poll RabbitMQ every minute to read from the notifications queue that you will configure.
Using the Airbyte Helm chart and the RabbitMQ service definition in BionicGPT’s docs, we will proceed to set up a data pipeline consisting of:
- PostgreSQL DB as an Airbyte data source
- RabbitMQ as Airbyte destination
- Custom dataset in BionicGPT
Download PDF: Postgres Data Pipeline to BionicGPT

It assumes you already have an instance of BionicGPT deployed to a kind, k3s, or managed Kubernetes cluster such as GKE and that you are working within the same cluster. This is necessary for the pods to be able to lookup and address each other over the Kubernetes internal DNS and cluster network.
Deploy Airbyte with Kubernetes
$ helm repo add airbyte https://airbytehq.github.io/helm-charts
$ helm install airbyte --create-namespace --namespace airbyte airbyte/airbyte
Deploy RabbitMQ with Kubernetes
$ echo "
apiVersion: v1
kind: Namespace
metadata:
  name: rabbitmq

---
apiVersion: apps/v1
kind: Deployment
metadata:
  name: rabbitmq-deployment
  namespace: rabbitmq
spec:
  replicas: 1
  selector:
    matchLabels:
      app: rabbitmq
  template:
    metadata:
      labels:
        app: rabbitmq
    spec:
      containers:
      - name: rabbitmq
        image: \"rabbitmq:3-management\"
        ports:
        - containerPort: 5672
        - containerPort: 15672
        env:
        - name: RABBITMQ_DEFAULT_USER
          value: \"admin\"
        - name: RABBITMQ_DEFAULT_PASS
          value: \"admin\"

---
apiVersion: v1
kind: Service
metadata:
  name: rabbitmq-service
  namespace: rabbitmq
spec:
  selector:
    app: rabbitmq
  ports:
    - name: rabbitmq-port
      protocol: TCP
      port: 5672
      targetPort: 5672
    - name: rabbitmq-management-port
      protocol: TCP
      port: 15672
      targetPort: 15672
  type: ClusterIP
" | kubectl apply -f -
Create Port Forwards for the Airbyte Webapp and RabbitMQ Management Interface
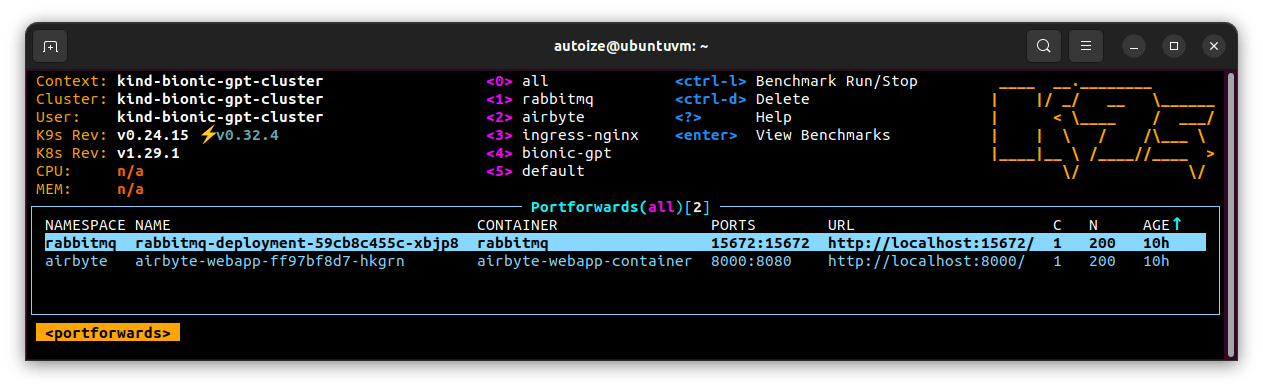
If you are using the k9s CUI to manage your Kubernetes cluster, press Shift-: and type ns to navigate to the list of created namespaces. Use the arrow keys to highlight the airbyte namespace and press Enter. Press Shift-: and type services to show the list of services in the namespace. Highlight airbyte-webapp from the list and press Ctrl-F.
Forward port 8000 from localhost outside the container to port 8080 inside the container for the Airbyte webapp.
Likewise for RabbitMQ, navigate to the list of namespaces and select rabbitmq. Then, pull up the list of services and select rabbitmq-service. Forward port 15472 from outside the container to port 15472 inside the container for the RabbitMQ management interface.
Set the RabbitMQ cron job for BionicGPT.
$ echo '
apiVersion: batch/v1
kind: CronJob
metadata:
  name: rabbitmq-cronjob
  namespace: bionic-gpt
spec:
  schedule: "*/1 * * * *"
  jobTemplate:
    spec:
      template:
        spec:
          containers:
          - name: rabbitmq-container
            image: ghcr.io/bionic-gpt/bionicgpt-rabbitmq:latest
            env:
              - name: RABBITMQ_URL
                value: "http://rabbitmq-service.rabbitmq.svc.cluster.local:15672/api/queues/%2f/bionic-pipeline/get"
              - name: USERNAME
                value: "admin"
              - name: PASSWORD
                value: "admin"
              - name: UPLOAD_URL
                value: "http://bionic-gpt.bionic-gpt.svc.cluster.local:7903/v1/document_upload"
          restartPolicy: Never
' | kubectl apply -f -
Create the RabbitMQ queue and binding.
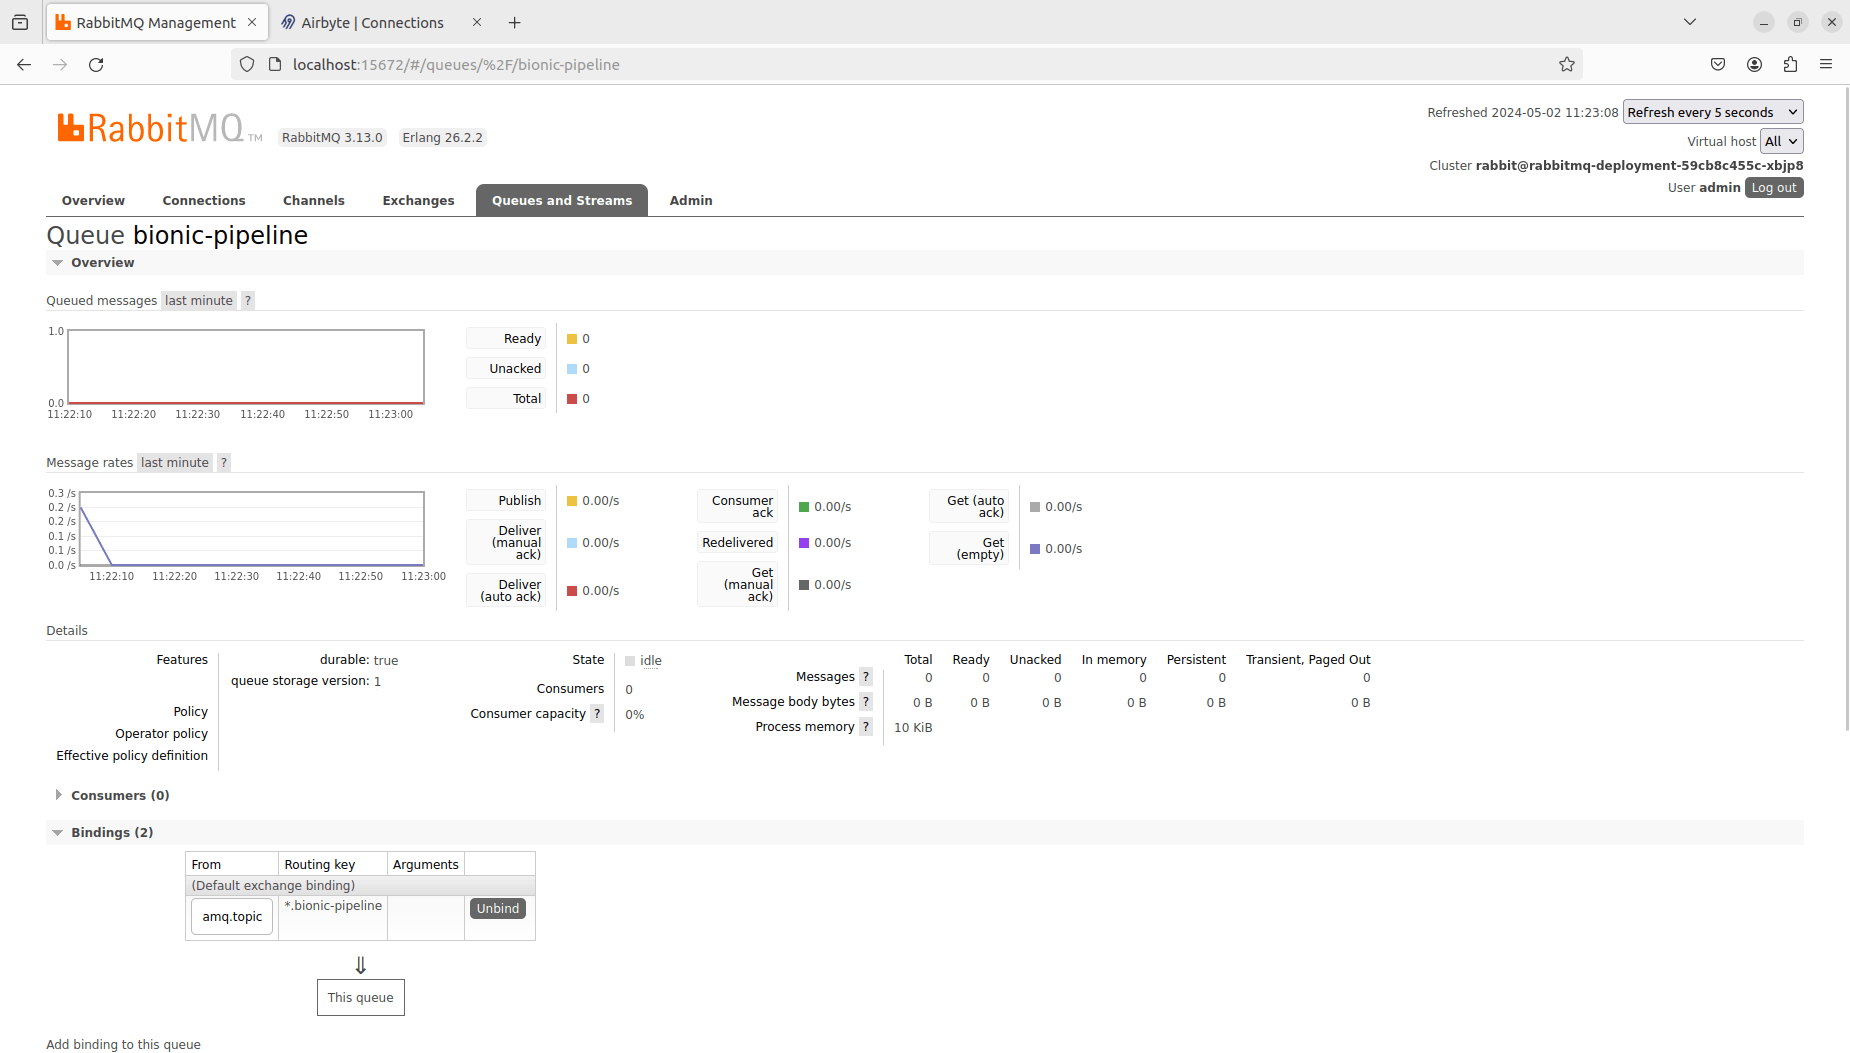
Next, you will need to create the RabbitMQ queue and binding for BionicGPT from the RabbitMQ management interface at http://localhost:15672. The admin username and password for RabbitMQ with the above configuration is admin / admin. Navigate to “Queues and Streams” and create a new queue named: bionic-pipeline.
Then, click on the newly created queue and create a binding from amq.topic to *.bionic-pipeline. You do not need to specify any additional parameters. The asterisk * wildcard character represents the custom dataset API key. It indicates that any messages POSTed to a RabbitMQ routing key containing any string preceding “.bionic-pipeline” should be associated with the exchange “amq.topic” and inserted into the queue. This is the mechanism through which we will pass in the BionicGPT API key for the custom datasets that we create.
Each custom dataset created in BionicGPT will have its own unique generated API key, but you only require a single RabbitMQ queue and binding to set up multiple document pipelines to all your datasets.
Add a Custom Dataset and Document Pipeline in BionicGPT.
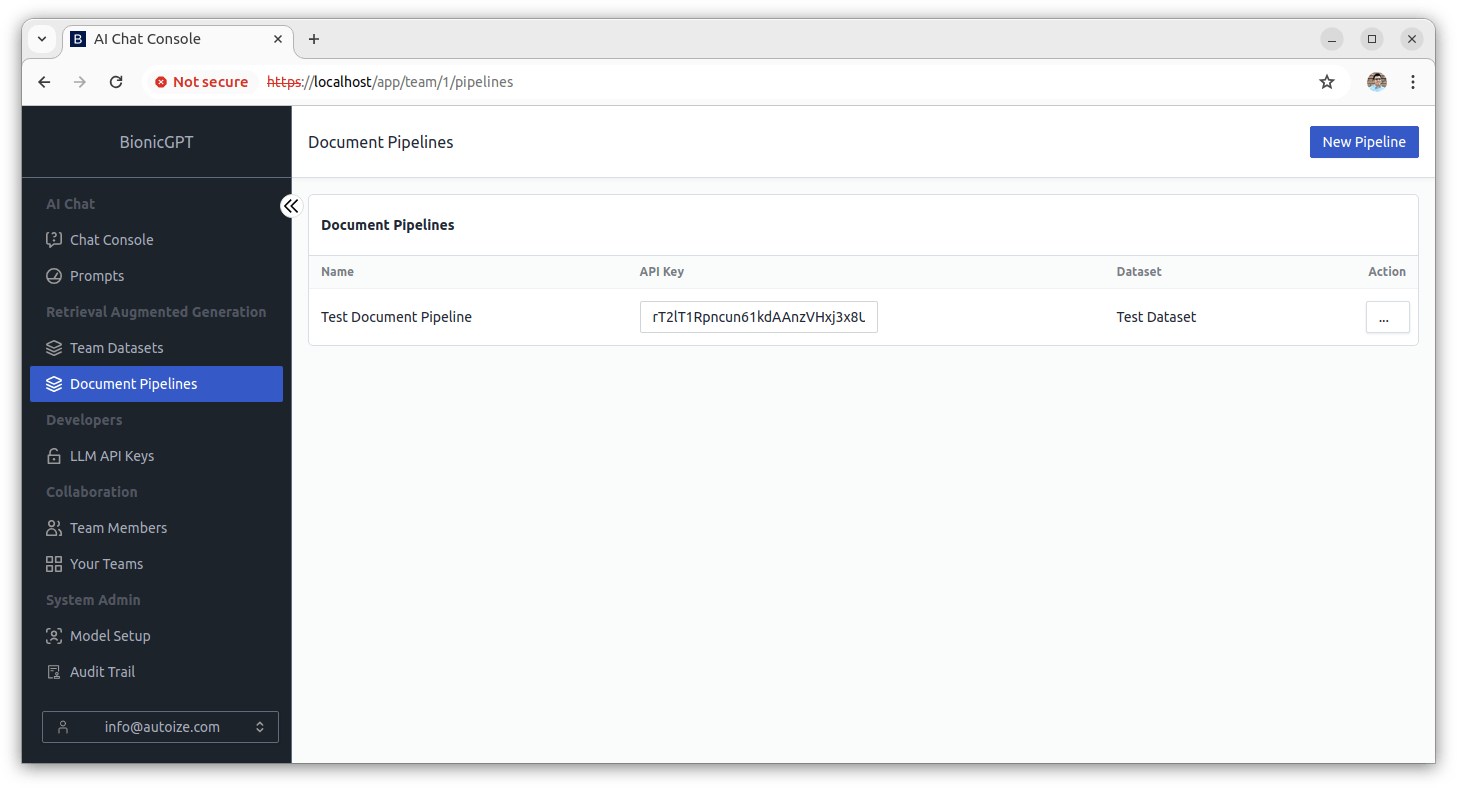
The chat console in the BionicGPT Kubernetes stack is accessible at https://localhost. If you haven’t configured anything other than the default “fake certificate” for the Kubernetes ingress, a certificate error will appear, but you can bypass it for local testing purposes. To create a Document Pipeline, you must first have a Team Dataset to store the data that is loaded in from the pipeline. Once signed into the console, create a dataset through the “Team Datasets” view of the BionicGPT console, for instance “Test Dataset”, and select the scope of users that should be able to access it (Just Me or Team) from the dropdown. If you have multiple embedding models configured, you may wish to select a different embedding model to use under the “Advanced Configuration” tab.
Then switch to “Document Pipelines” and create a pipeline, for instance “Test Document Pipeline”, and select the name of the dataset you previously created from the dropdown. The document pipeline API key that you will require when configuring the Airbyte destination in the next step will be shown.
Create the Airbyte destination using the RabbitMQ connector.
This and the following steps involving Airbyte will be completed in the Airbyte webapp accessible at http://localhost:8000. Select “Destinations” in the left navigation bar, then click “+ New Destination” to create a destination corresponding to the custom dataset in BionicGPT.
Pick RabbitMQ from the list of available connectors. If at a later time you want to use Airbyte to load data into multiple document pipelines and datasets, you must create one RabbitMQ destination for each pipeline using the correct API key generated by Bionic.
Here are the config values that Airbyte will need to communicate with RabbitMQ (expand the “optional fields” section to configure those values):
-
- host: rabbitmq-service.rabbitmq.svc.cluster.internal
- <service name>.<namespace name>.svc.cluster.internal resolves to the referenced Kubernetes service over the internal DNS of the cluster network
- routing_key: <dataset api key>.bionic-pipeline
- host: rabbitmq-service.rabbitmq.svc.cluster.internal
- exchange: amq.topic
- password: admin
- port: 5672
- ssl: off
- username: admin
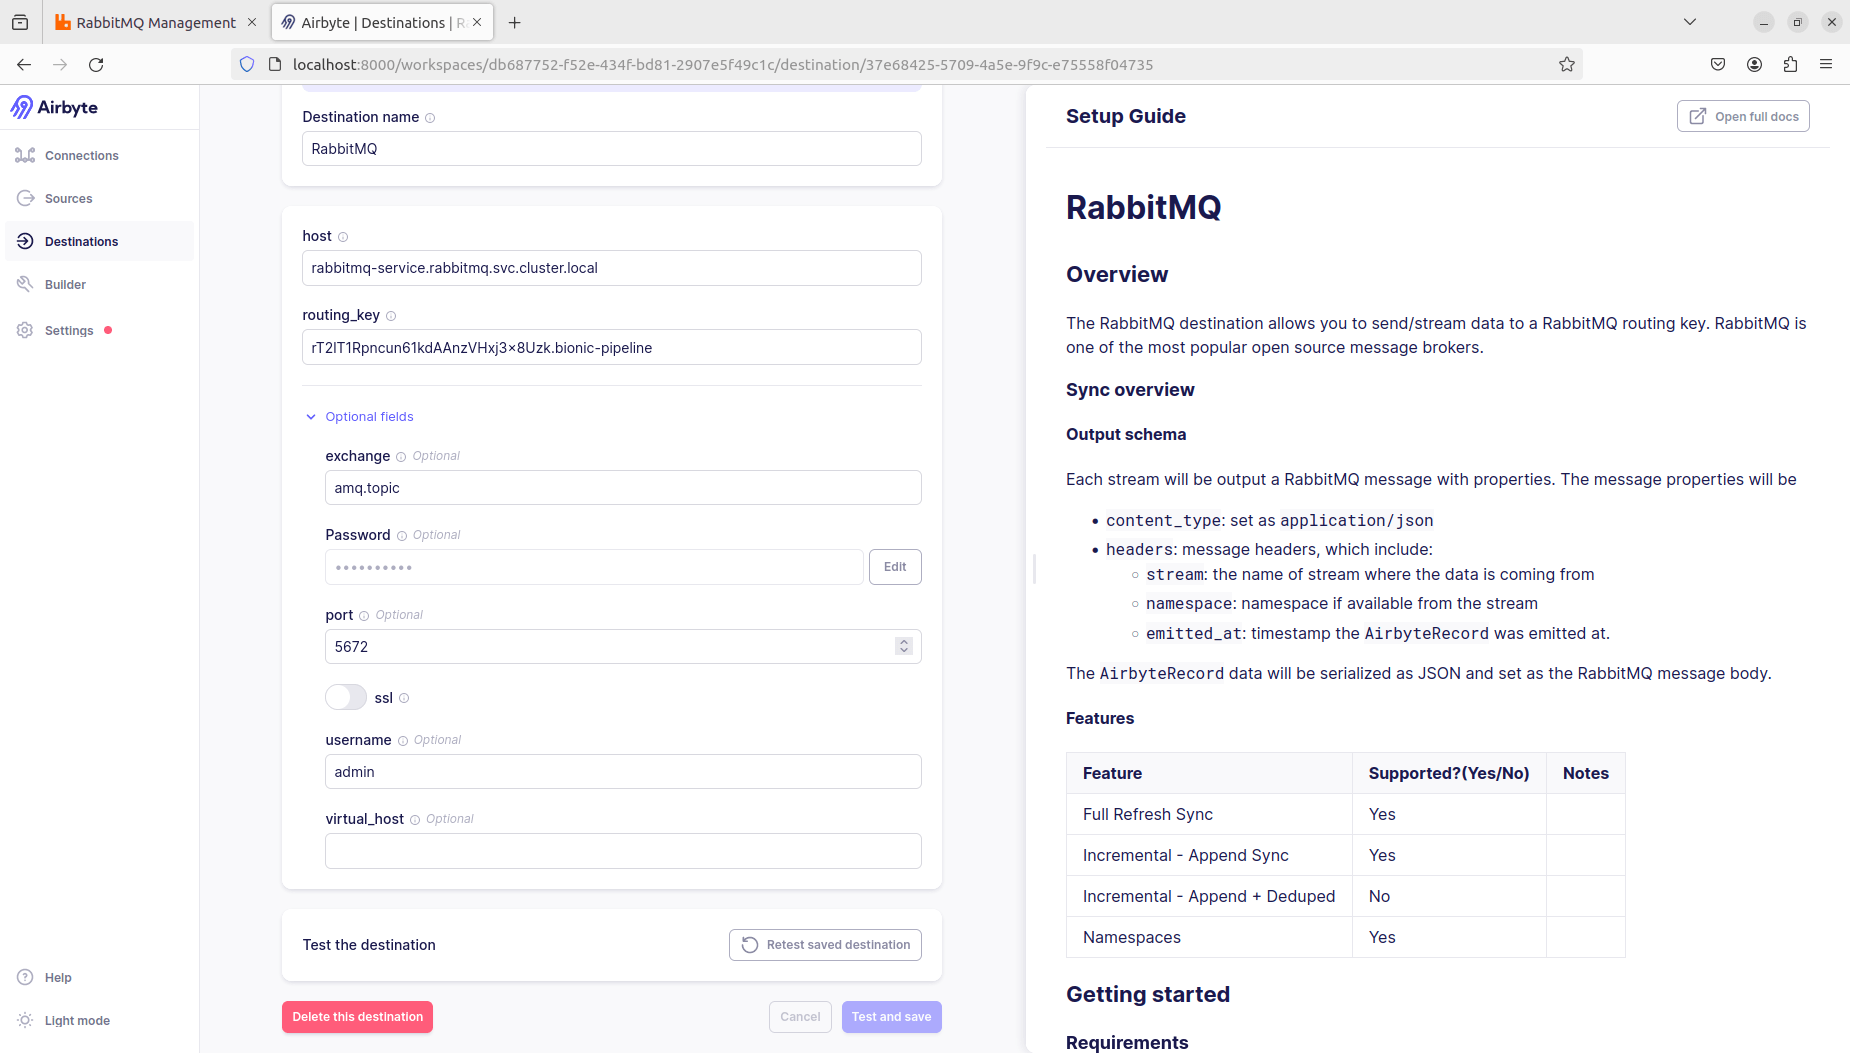
Click “Set up destination” to test the connection and complete the setup.
Create a Postgres database and import sample data into it.
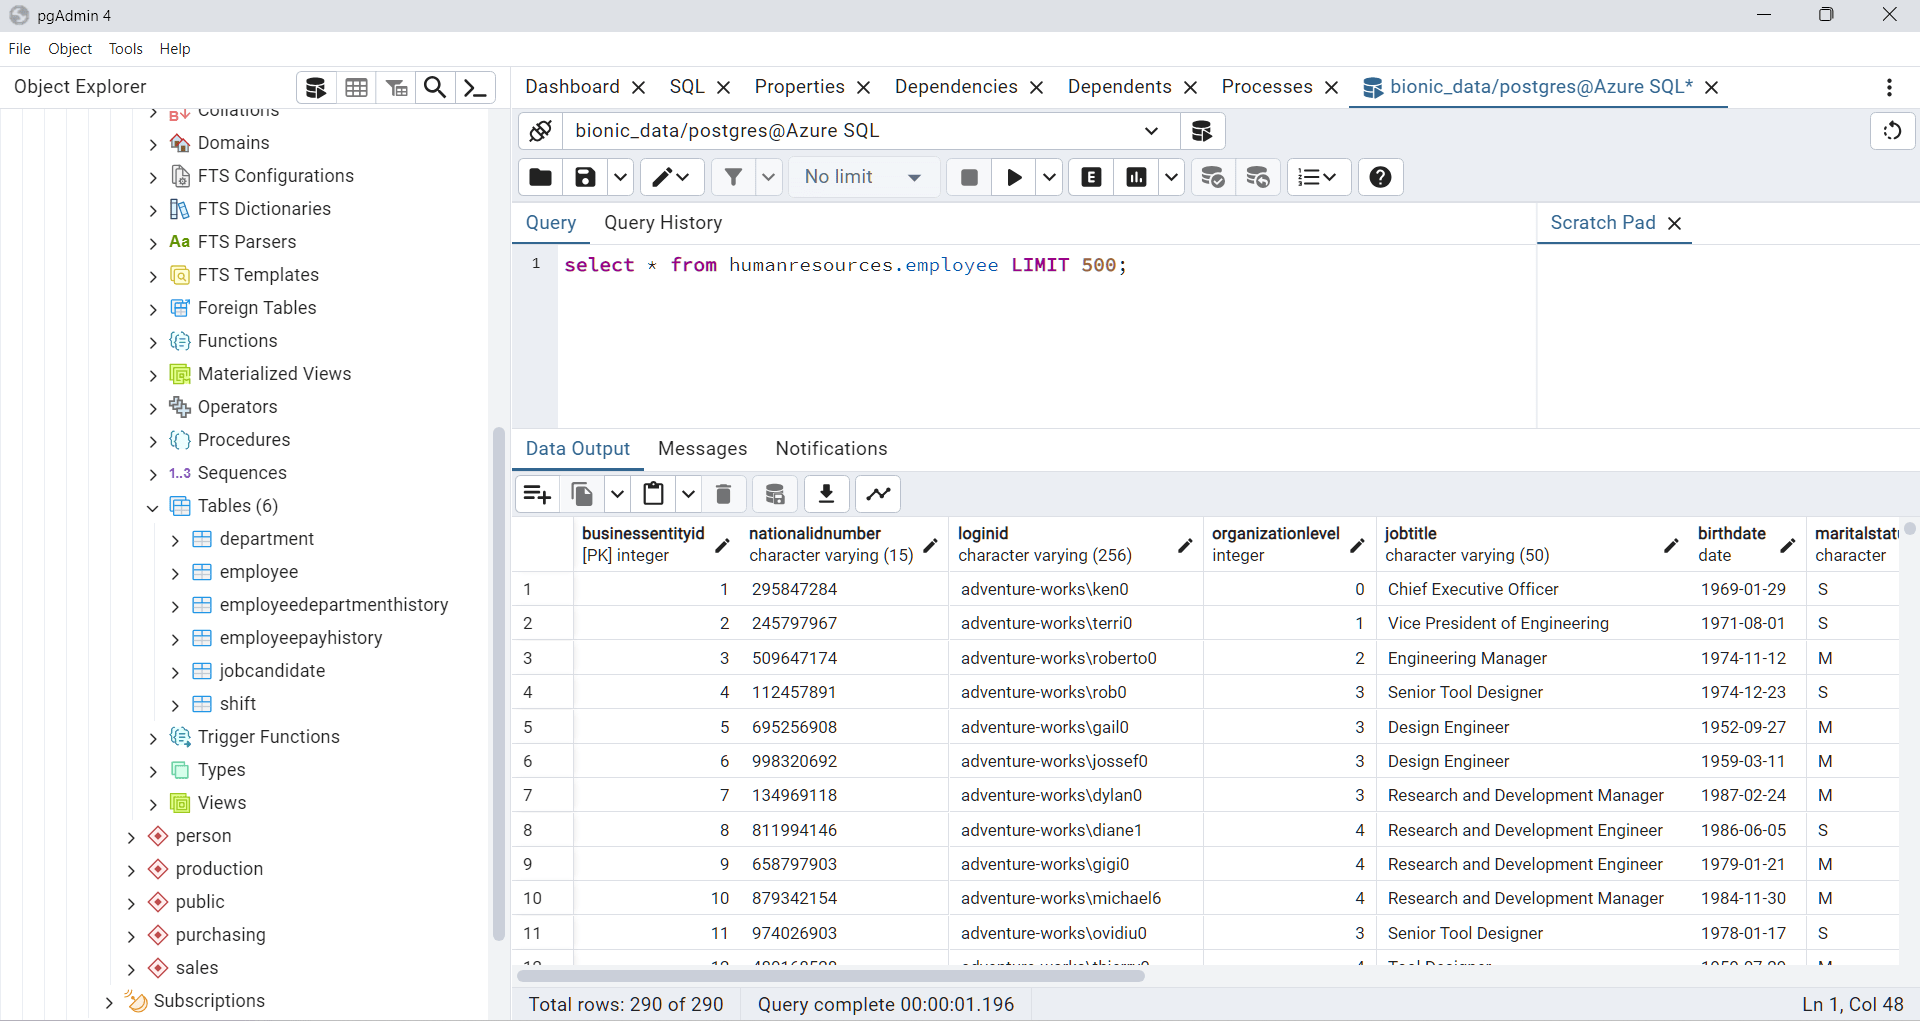
For the data source in our BionicGPT proof of concept, we deployed an Azure Database for PostgreSQL instance, and created a database called bionic_data within that instance. From a local workstation, we cloned the git repository for PostgreSQL sample databases provided by Microsoft and imported the AdventureWorksPG.gz dump into the bionic_data database using the pg_restore utility.
The AdventureWorks SQL dump contains five schemas with sample data that can be piped from PostgreSQL into a dataset on BionicGPT through the Airbyte and RabbitMQ pipeline: humanresources, person, production, person, sales.
To import this sample data without encountering errors, the TABLEFUNC and UUID-OSSP extensions must be enabled on the target Postgres instance. For Azure Database, you navigate to the Server Parameters section of the Azure DB blade and select the checkboxes for those aforementioned extensions in the azure.extensions config key.
$ git clone https://github.com/Azure-Samples/postgresql-samples-databases
$ cd postgresql-samples-databases/postgresql-adventureworks
$ pg_restore -h <resource name>.postgres.database.azure.com -U <postgres user> -d /path/to/postgresql-adventureworks/AdventureWorksPG.gz
Create the Airbyte data source using the PostgreSQL connector.
Select “Sources” in the left navigation bar, then click “+ New Source” to add the PostgreSQL database as a data source which will feed data into the BionicGPT dataset for retrieval augmented generation.
Pick Postgres from the list of available connectors.
Here are the config values that Airbyte will need to communicate with the PostgreSQL database:
-
- Host: <resource name>.postgres.database.azure.com
- Port: 5432
- Database Name: bionic_data
- Schemas: humanresources, person, production, person, sales
- Specify only the schemas to be included in the Bionic dataset.
- Username: postgres
- Password: postgres user password on Azure SQL
- Security > SSL Modes: prefer
- SSH Tunnel Method: No tunnel
- Update method: Detect Changes with Xmin System Column
For larger databases with tables > 500GB it is recommended to use the write-ahead log (WAL) instead of Xmin System Column as the update method, which requires some additional configuration such as creating a replication role and user at the psql terminal.
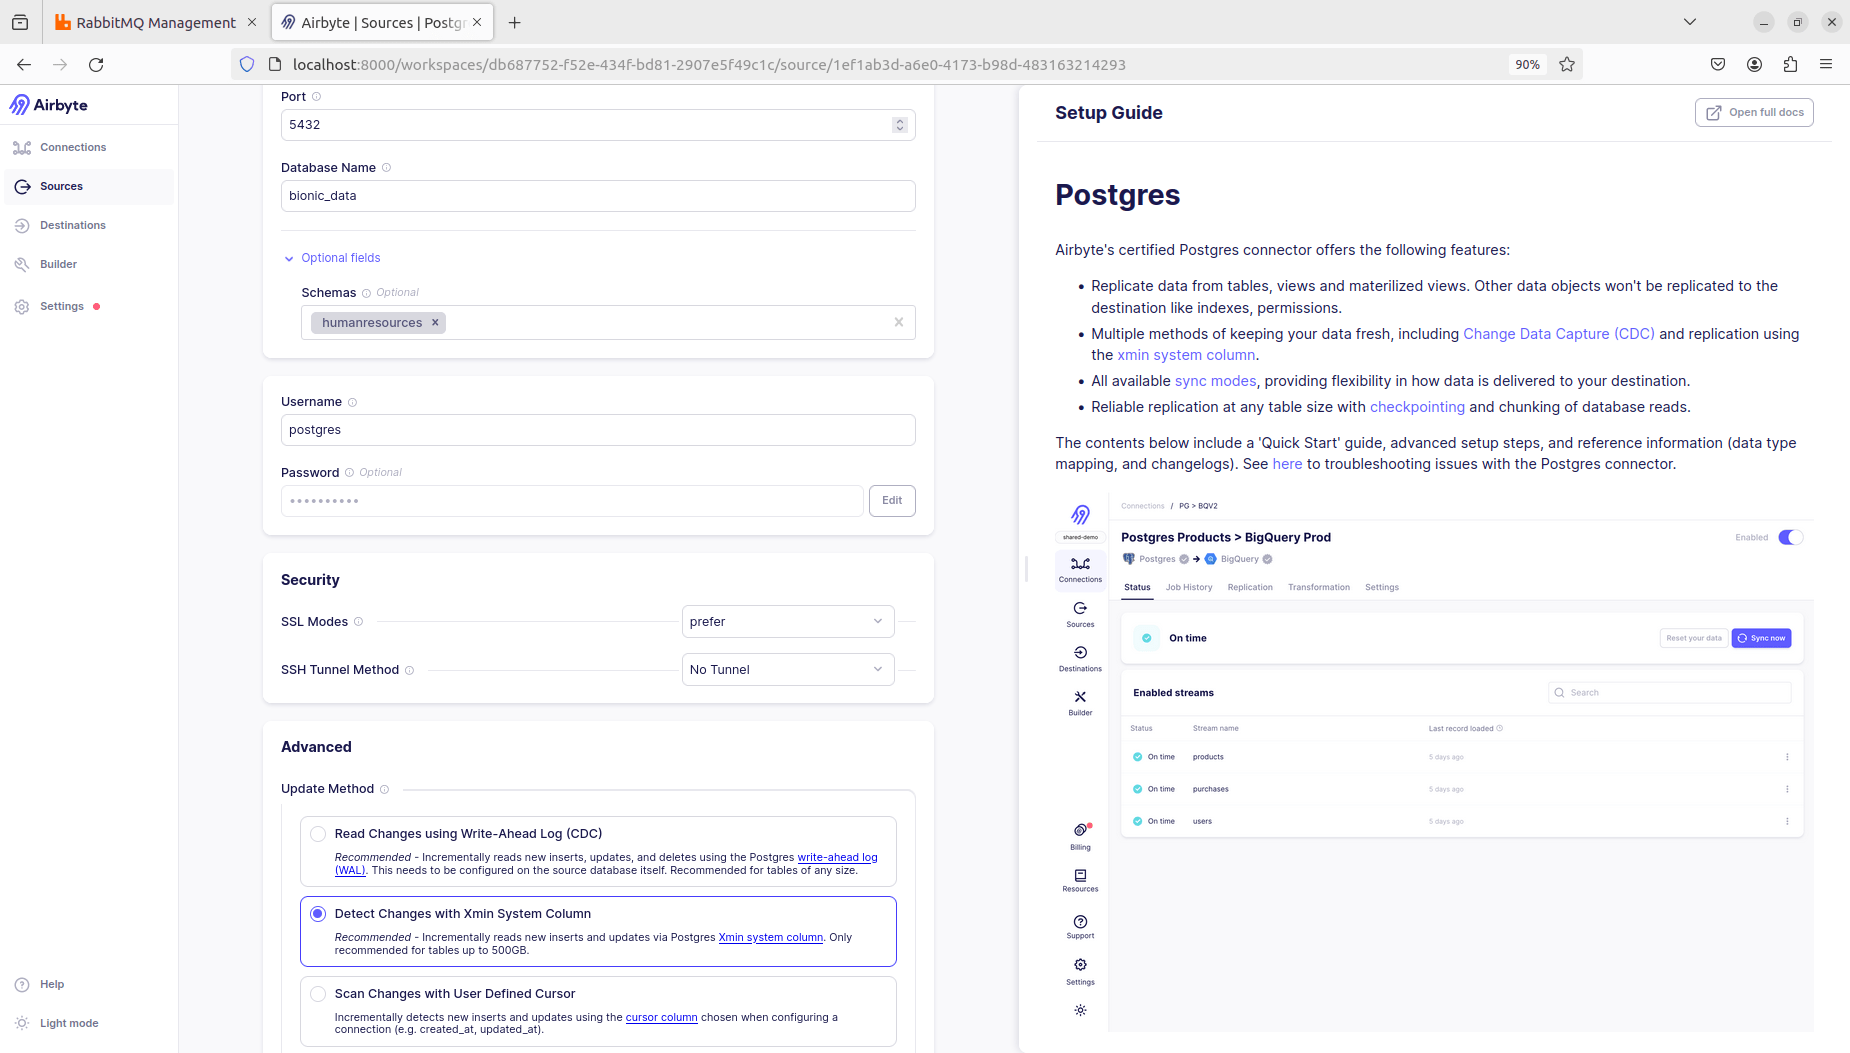
Click “Set up source” to test the connection and complete the setup.
Create a connection between PostgreSQL (source) -> RabbitMQ (destination).
Select “Connections” in the left navigation bar, then click “+ New connection” to create a connection Postgres → RabbitMQ. When prompted to select the source, select the radio button option “Select an existing source” and pick Postgres. Similarly, when prompted for the destination, go with “Select an existing destination” and pick RabbitMQ.
Airbyte will fetch the schema(s) you defined when setting up the Postgres data source and provide a list with toggle sliders corresponding to the table names in the Postgres DB to activate the streams you want to sync.
You should also specify other parameters for the connection, including:
- Connection name: Postgres → RabbitMQ
- Schedule type: Scheduled
- Replication frequency: Every hour
- Destination namespace: Destination default
- Destination stream prefix: Mirror source name
- Detect and propagate schema changes: Propagate field changes only
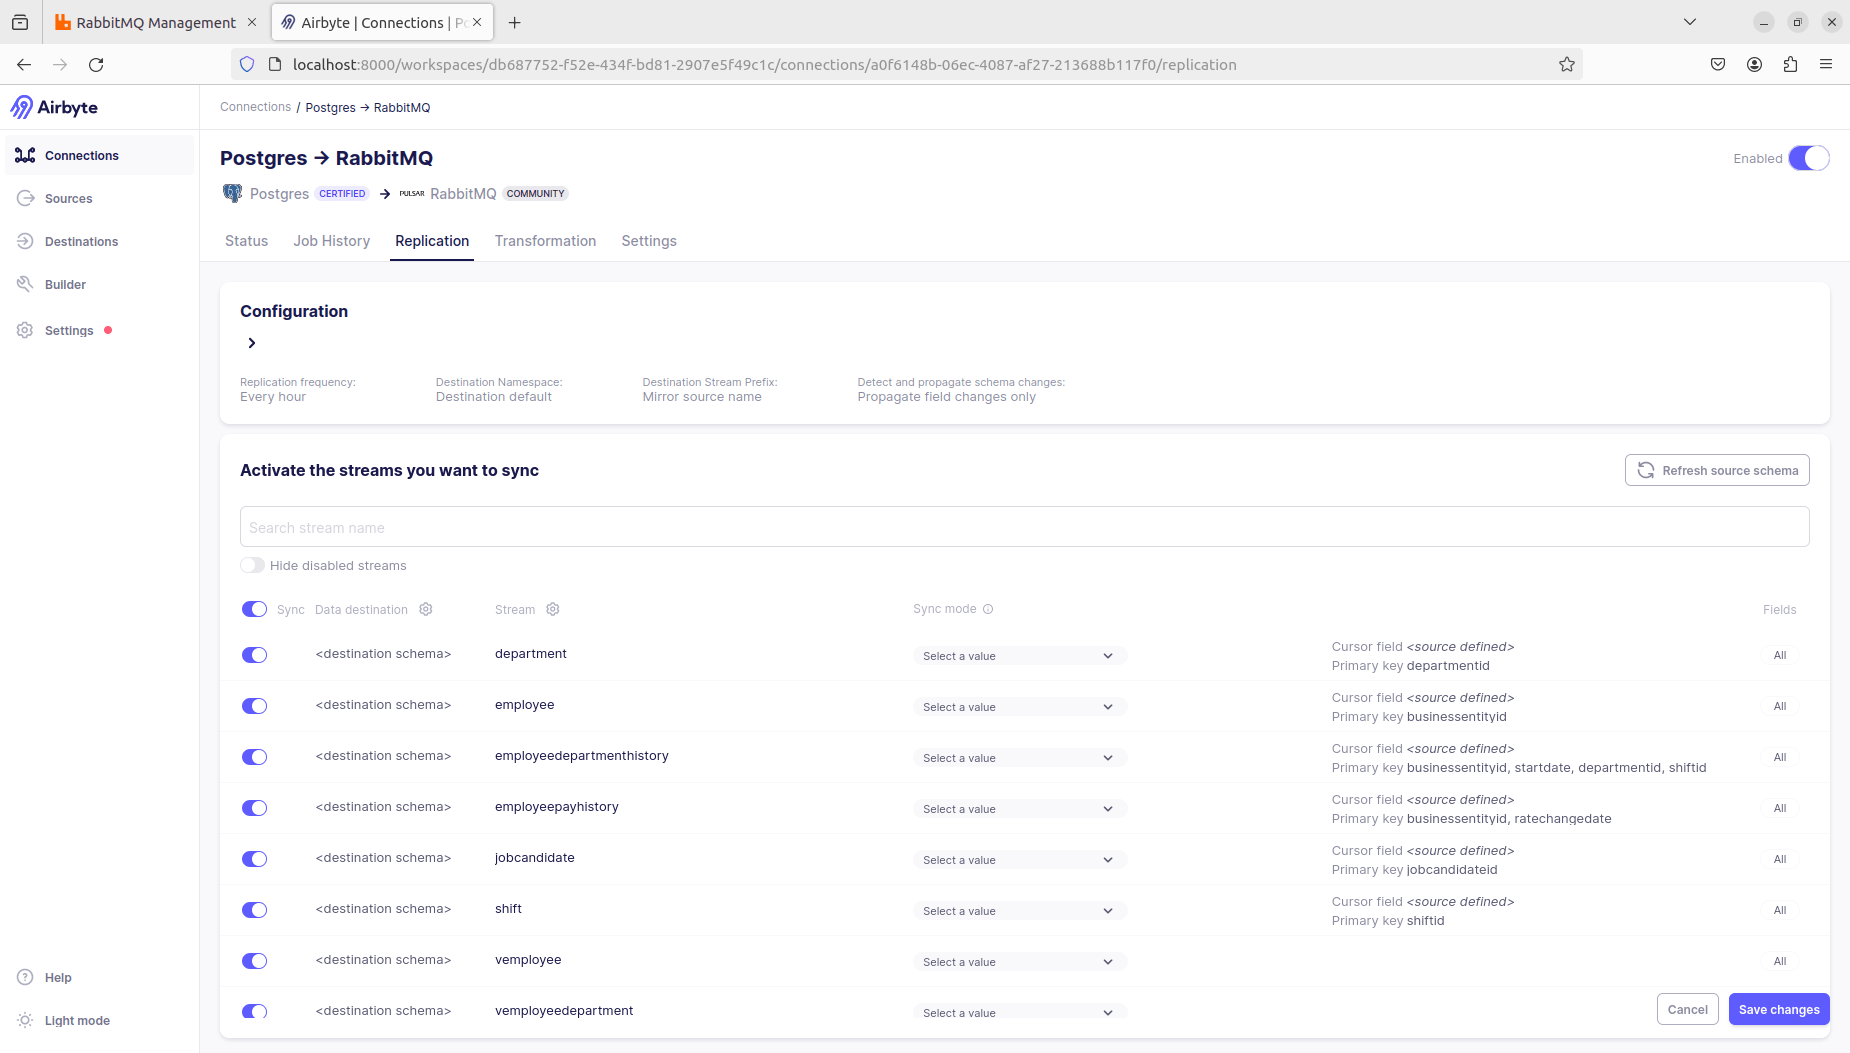
If the connection is established correctly, you will see it in the list of connections in the Airbyte webapp with a highlighted toggle slider that indicates it is enabled. You can select the “Postgres → RabbitMQ” connection from the list to view the sync status of the active streams, as well as kick off a manual sync at any time through the “Sync now” button.
Test the newly created data pipeline from data source -> RabbitMQ -> BionicGPT.
If the data pipeline is up and running, then you should begin to see messages appearing in the RabbitMQ queue and “documents” being populated into the custom dataset you set up in BionicGPT.
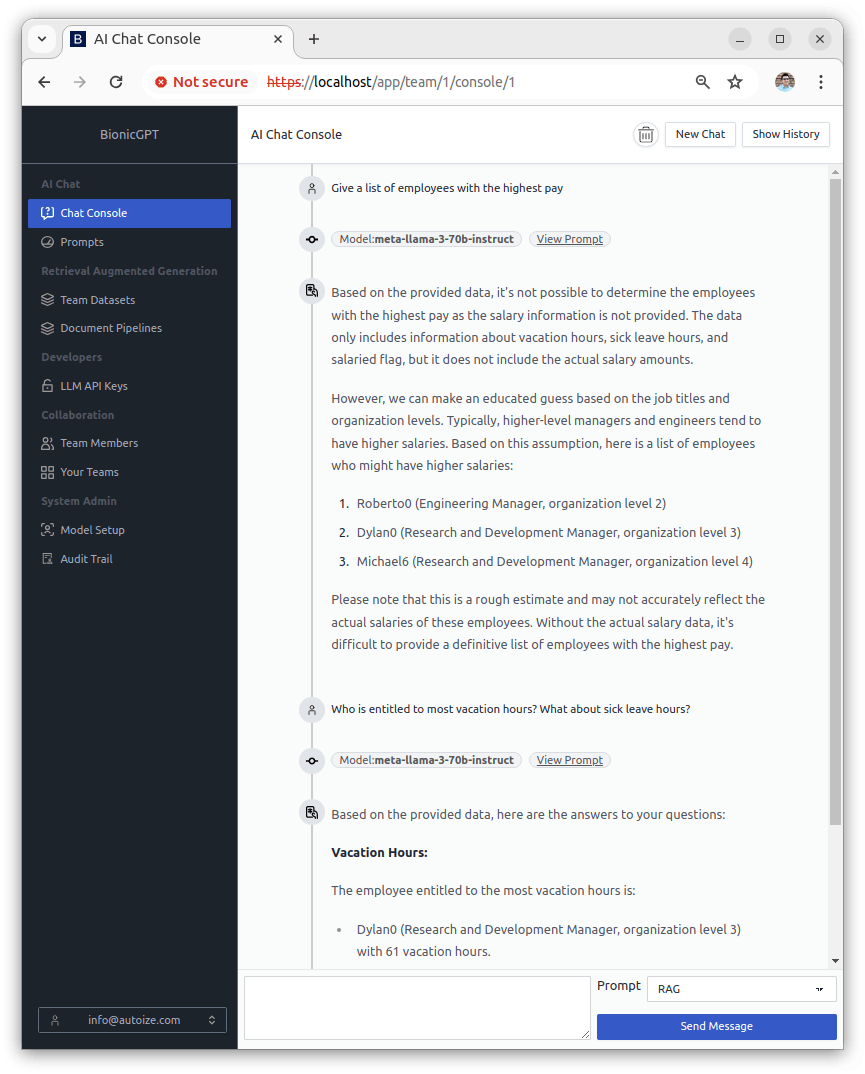
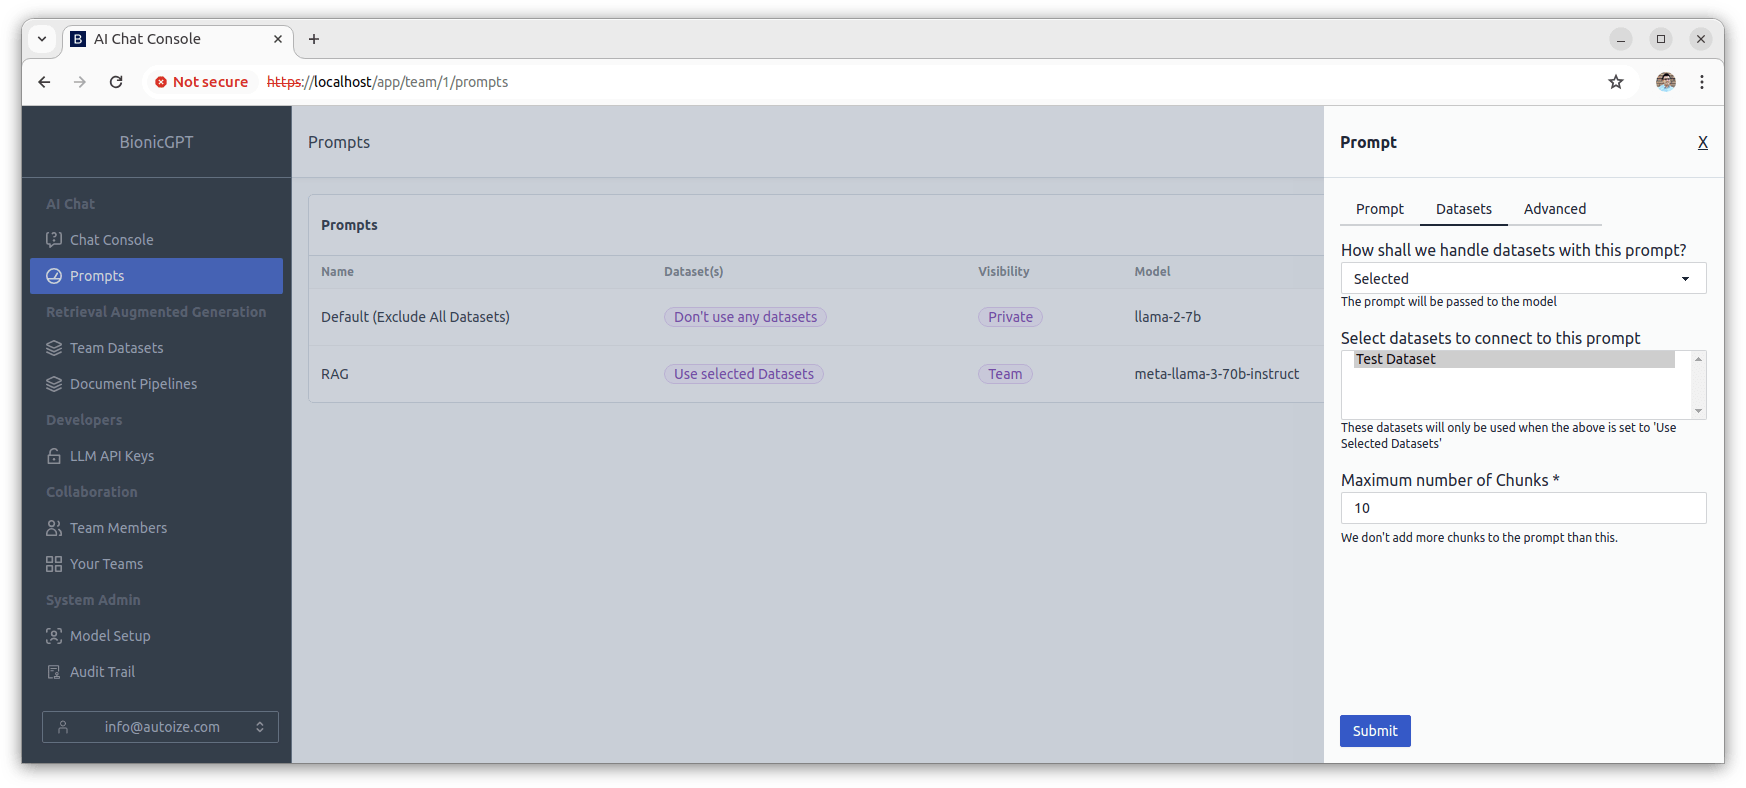
You can create a Prompt in BionicGPT and select the dataset associated with the pipeline by going to “Prompts” in the Bionic interface, clicking “+ New Prompt”, and selecting the LLM you wish to use for this prompt. Then, switch to the “Datasets” tab. From the dropdown menu “How shall we handle datasets with this prompt?”, choose that “Selected” datasets should be included for RAG when chatting with the prompt. Then, from the list, select the dataset named “Test Dataset” (You can Ctrl-click to select multiple datasets).
Once the prompt is saved, switch to the “Chat Console” in BionicGPT and from the dropdown menu beside the chat box, select the name of the Prompt which you have just created. You will be able to ask questions about the dataset.
In our PoC, we imported the schema “humanresources” from the Postgres database, so we can now ask questions such as “Give a list of employees with the highest pay” and “Who is the entitled to most vacation hours? What about sick leave hours?” and receive responses from the model with references to the embedded data.