
Let’s Encrypt has become the de-facto Certificate Authority for automating certificate management with web applications. The certbot ACME (Automated Certificate Management Environment) client can completely automate the issuance, renewal, and installation process for SSL certificates from Let’s Encrypt, making it easy to negotiate connections securely over HTTPS.
The previous two articles of this series, Building a Load Balanced LAMP Cluster and PHP Session Storage for Load Balanced Applications, walk readers through some of the considerations associated with deploying a web application on a load balanced architecture in the cloud. Notably, one aspect that we acknowledged was incomplete for a production environment was the lack of HTTPS support.
Fortunately, the previous architecture already lays the groundwork for using free SSL certificates from Let’s Encrypt to secure your web application. Normally with a single LAMP server, the Let’s Encrypt client is installed directly on the web server itself, where the webroot for the HTTP validation challenge and the issued certificates both reside locally. Where there are multiple web servers behind a load balancer, there arises the need to coordinate them so they are serving HTTPS requests with the identical certificates.
If you simply installed the Let’s Encrypt client on all of the backend web servers, and automated certificate renewal with a cron job, each server would attempt to renew the certificates at around the same time — causing conflicts where the validation token is being overwritten by the other servers. At a sufficient scale, you would also exceed the Let’s Encrypt API’s rate limits, preventing you from obtaining an updated certificate at all.
The best practice for automating certificate renewal behind a load balancer is to have a single Let’s Encrypt client running the certbot renew job daily, and copying the certificates to a shared directory accessible by all the web servers.
If you followed the previous articles, you already have an NFS server with a shared webroot directory (/var/webroot_share/ mounted as /var/www/html/ on all the web servers), so you can also use the same storage server to share Let’s Encrypt certificates.
On the nfs server
– Create the directory for the Let’s Encrypt certificate store.
mkdir -p /etc/letsencrypt/
– Export a new share by adding this line to /etc/exports
Notice that this share is intended to be read only to the web servers, as they are only expected to retrieve the certificates from the share, not modify them.
sync option is not necessary as that only applies to writable NFS shares.
norootsquash option tells NFS not to downgrade the permissions of the files in the share owned by root to the nobody user for the remote clients. This is crucial as all Let’s Encrypt certificates are generated and owned by root.
Where 10.132.0.0/16 is the subnet of the private network belonging to the cluster.
/etc/letsencrypt/ 10.132.0.0/16(ro,norootsquash)
– Install the Let’s Encrypt ACME client.
yum install epel-release
yum install certbot
– Generate the certificates for each of your Apache VirtualHosts.
Provide your email address for renewal reminders (you’ll get none as the cron job will automatically renew the certificates close to expiry) and accept the TOS.
certbot certonly --webroot -w /webroot_share/ -d example.com -d www.example.com
certbot certonly --webroot -w /webroot_share/mautic/ -d mautic.example.com
If the validation & certificate issuance were successful, you should receive a message stating:
- Congratulations! Your certificate and chain have been saved at:

/etc/letsencrypt/live/example.com/fullchain.pem

Your key file has been saved at:

/etc/letsencrypt/live/example.com/privkey.pem
– Test whether automatic renewal would be successful when the certs are close to expiry.
certbot renew --dry-run
Everything is all set if you see:
Congratulations, all renewals succeeded. The following certs have been renewed:

/etc/letsencrypt/live/example.com/fullchain.pem (success)

/etc/letsencrypt/live/mautic.example.com/fullchain.pem (success)
– Now add this cron job to /etc/crontab, to check for certificate renewals at 3:30am daily.
30 3 * * * root certbot renew > /dev/null 2>&1
On the web/application servers
– Where 10.132.xxx.xxx is the private IP address of the nfs server:
mkdir -p /etc/letsencrypt
mount -t nfs 10.132.xxx.xxx:/etc/letsencrypt/ /etc/letsencrypt/
– Add the following line to /etc/fstab to mount the NFS share at boot.
10.132.xxx.xxx:/etc/letsencrypt/ /etc/letsencrypt/ nfs ro 0 0
– Install mod_ssl and restart Apache.
yum install mod_ssl
systemctl restart httpd
– Update the Apache config files as follows.
Recall that /etc/httpd/conf.d is an NFS mount shared across all the web servers in the original guide, so you only need to make the changes once — to have them updated across all the Apache servers. However, all the servers must be restarted to have the changes take effect.
These config files force redirect from HTTP to HTTPS, which is considered a best practice for most web applications today. It is best to prevent users from accidentally transmitting secret information, such as logins over plain-text.
/etc/httpd/conf.d/default.conf
<VirtualHost *:80>

ServerAdmin admin@example.com

ServerName example.com

ServerAlias www.example.com

DocumentRoot /var/www/html/

ErrorLog /var/log/httpd/error.log

CustomLog /var/log/httpd/access.log combined

<Directory /var/www/html/>

AllowOverride All

</Directory>

RewriteEngine on

RewriteCond %{SERVER_NAME} =example.com

RewriteRule ^ https://%{SERVER_NAME}%{REQUEST_URI} [END,NE,R=permanent]

</VirtualHost>
/etc/httpd/conf.d/default-ssl.conf
<IfModule mod_ssl.c>

<VirtualHost *:443>

ServerAdmin admin@example.com

ServerName example.com

ServerAlias www.example.com

DocumentRoot /var/www/html/

ErrorLog /var/log/httpd/ssl_error.log

CustomLog /var/log/httpd/ssl_access.log combined

<Directory /var/www/html/>

AllowOverride All

</Directory>

SSLCertificateFile /etc/letsencrypt/live/example.com/cert.pem

SSLCertificateKeyFile /etc/letsencrypt/live/example.com/privkey.pem

Include /etc/letsencrypt/options-ssl-apache.conf

SSLCertificateChainFile /etc/letsencrypt/live/example.com/chain.pem

</VirtualHost>

</IfModule>
/etc/httpd/conf.d/mautic.conf
<VirtualHost *:80>

ServerAdmin admin@example.com

ServerName mautic.example.com

DocumentRoot /var/www/html/mautic/

ErrorLog /var/log/httpd/error.log

CustomLog /var/log/httpd/access.log combined

<Directory /var/www/html/mautic/>

AllowOverride All

</Directory>

RewriteEngine on

RewriteCond %{SERVER_NAME} =mautic.example.com

RewriteRule ^ https://%{SERVER_NAME}%{REQUEST_URI} [END,NE,R=permanent]

</VirtualHost>
/etc/httpd/conf.d/mautic-ssl.conf
<IfModule mod_ssl.c>

<VirtualHost *:443>

ServerAdmin admin@example.com

ServerName mautic.example.com

DocumentRoot /var/www/html/mautic/

ErrorLog /var/log/httpd/ssl_error.log

CustomLog /var/log/httpd/ssl_access.log combined

<Directory /var/www/html/mautic/>

AllowOverride All

</Directory>

SSLCertificateFile /etc/letsencrypt/live/mautic.example.com/cert.pem

SSLCertificateKeyFile /etc/letsencrypt/live/mautic.example.com/privkey.pem

Include /etc/letsencrypt/options-ssl-apache.conf

SSLCertificateChainFile /etc/letsencrypt/live/mautic.example.com/chain.pem

</VirtualHost>

</IfModule>
– Test the syntax, then restart Apache to have it reload the new configuration.
If you see a warning “AH00558: httpd: Could not reliably determine the server’s fully qualified domain name…” it can safely be ignored.
apachectl -t
systemctl restart httpd
Update Load Balancer Settings
Once the SSL VirtualHosts are in place, the DigitalOcean load balancer’s forwarding rules should be updated to forward HTTPS traffic in addition to HTTP traffic. The HTTP forwarding rule must be left in place for Let’s Encrypt challenge validation and the HTTP-to-HTTPS redirect to function.
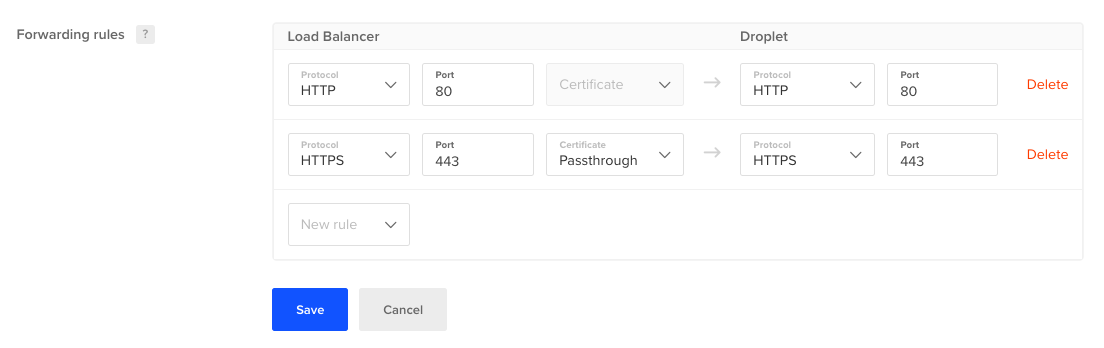
The Certificate dropdown is set to “Passthrough”, as SSL is terminated on the backend Apache servers themselves, instead of at the load balancer. Once the settings are saved, the DigitalOcean load balancer will begin forwarding HTTPS requests to the backend servers over port 443, where they are served by Apache’s SSL module.
With the alternative of terminating SSL (on the frontend) at the load balancer, the certificate must be uploaded to the load balancer itself through the DigitalOcean dashboard. In this scenario, the backend servers typically listen on HTTP (not HTTPS) on an alternate port such 8080 while accepting only requests from the load balancer IP.
It’s a somewhat less secure option than terminating SSL directly on the backend servers, as TLS traffic is first decrypted by the load balancer, then transmitted in plain-text (over the private network) to the upstream web server. For sensitive applications such as e-commerce or electronic health records which require end-to-end encryption, terminating SSL at the load balancer is therefore not a suitable option.
Also, terminating SSL on the load balancer versus on the backend servers can introduce compatibility issues (e.g. too many redirects error) with applications that don’t expect an HTTPS URL when the backend receives an HTTP connection from the load balancer. Usually to circumvent the problem it requires changes to the application code or configuration to get it to recognize a load balancer is making upstream HTTP requests as a reverse proxy, even though the page is served over HTTPS.
If you can overcome the issue of automated certificate management & maintaining a shared certificate store using a strategy such as the one this article describes, there are clearly compatibility & security benefits to terminating SSL directly the backend servers — as traffic remains encrypted up to each individual node.