

n8n is a data integration & workflow automation tool that can be self hosted on your own infrastructure. Compared to cloud-based automation platforms such as Zapier, Integromat, Make, or the cloud version of n8n, self hosting has two major benefits. First and foremost, streaming or batch data flowing through n8n into your data warehouse to destinations for further processing are transmitted through your own cloud or on-prem infrastructure for greater privacy & control over data residency. Secondarily, there is no usage based pricing for the self-hosted version of n8n — the number of actions and workflows are limited only by the capacity of your server.
Docker Compose is the speediest way to set up an instance of n8n on a virtual machine. There are some considerations such as how to persist n8n’s data in a Docker volume when the container is recreated, and how to provide the Postgres database service that n8n requires to store stateful information.
You will also need to set up NGINX as a reverse proxy with a Let’s Encrypt certificate generated by Certbot, as n8n requires a secure connection.
n8n is a remarkably versatile tool with a “drag-and-drop” workflow builder for low-code or no-code development of AI automations, as it includes support for multi-step workflows including actions (nodes) such as:
- Retrieving data from data sources such as Postgres, Google Drive, and more
- Calling hosted AI inference models at OpenAI, Azure OpenAI, Anthropic, Google Gemini, AWS Bedrock, Hugging Face (Inference), Groq, and Cohere
- Calling local AI inference models self-hosted on Ollama
- Calling hosted AI embedding models at OpenAI, Azure OpenAI, Google Gemini, AWS Bedrock, Hugging Face (Embedding), Mistral Cloud, and Cohere
- Calling local AI embedding models self-hosted on Ollama
- Storing and retrieving embeddings with vector databases including in-memory, Pinecone, Supabase, Qdrant, or Zep

The n8n platform supports LangChain code as well if you wish to use it, but their “Basic LLM Chain” node enables even non-programmers to build workflows where inputs such as a Chat Trigger are handed off to any of the language models listed above, and the output is handed off to the next node for further processing (including conditional logic and branching with IF or SWITCH) or displaying back to the user.
When you publish a completed workflow with a chat input in n8n, you can embed an n8n-hosted chat input form on your own website, or call it programmatically from your own application libraries (including authentication).

n8n has a library of workflow templates where you can search by apps, roles, and use cases. As of this writing, there are 78 workflows in the AI category that you can import into your self-hosted n8n instance and edit based on your needs. The creator David Roberts (@davidn8n) has published a particularly interesting list of AI-enabled workflows that integrate the OpenAI API and Pinecone vector database out of the box, but that you can modify to use other models or vector data stores.
In this example, we adapted the Chat with PDF docs using AI (quoting sources) n8n workflow template to use the Azure OpenAI Service instead of the OpenAI API. Through an active Google Cloud project (with billing enabled), we enabled the Google Drive API — one of the Google Enterprise APIs — so that the n8n can retrieve a PDF stored in user’s Drive storage. Then, we inputted our Azure OpenAI key, resource group, and deployment name to use the GPT-3.5 or GPT-4 model for chat inference and text-embedding-3-small model for embedding. Finally, we connected a Pinecone database (there is a Starter free tier with up to 2 GB storage) for storing the vector values generated by the embedding model.

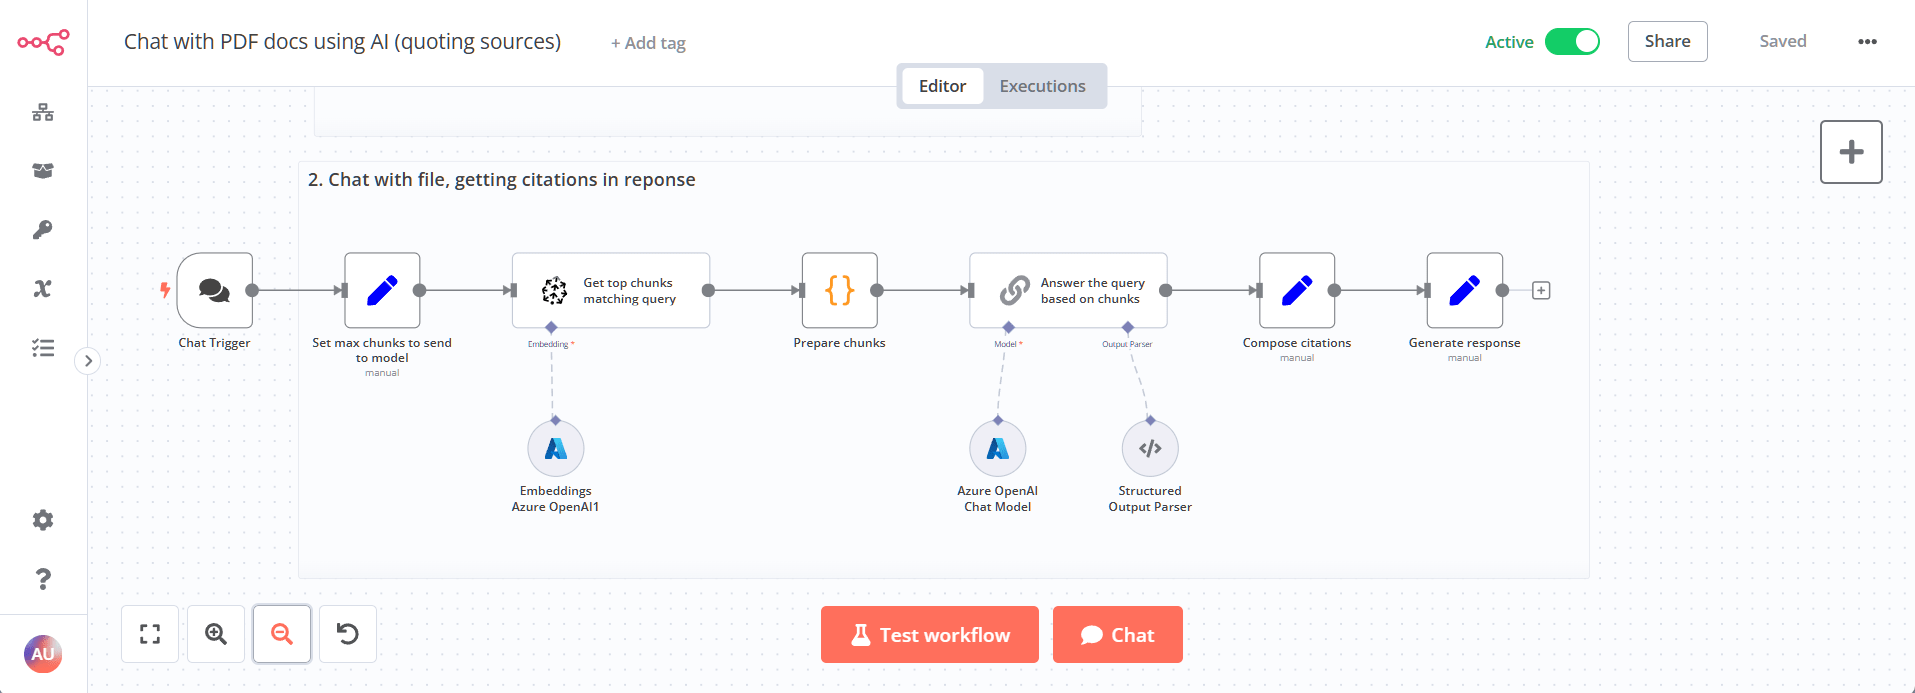
n8n walked us through connecting and testing each set of credentials so the process was quite easy. It is possible for a knowledgeable user of n8n to set up a working AI automation workflow with their own data set within minutes, and embed it as a chat bot in a web application, e.g. internal knowledge base, pre-sales, customer service and support.

The hardware requirements for n8n are quite lightweight considering it’s such a capable piece of software. According to the official system requirements for self-hosting n8n, the n8n container can run with as few as 1 vCPU and 320MB – 2GB of RAM.
There is a community edition of n8n and an enterprise edition without published pricing (to get a quote for the annual pricing, you must contact the n8n team). The community edition is fully featured and has no limits on the number of workflows you can create, nor the number of steps and branches they have. The main limitation of the community edition vs. enterprise edition is that the backend is limited to a single admin user, and credentials are stored encrypted in the Postgres database instead of being able to use external secrets providers (AWS Secrets Manager, Infisical and HashiCorp Vault).
The cost of running the community edition of n8n on a virtual machine or Docker/Kubernetes cluster at any cloud provider of your choice will almost certainly be lower than relying on a SaaS provider with tiers based on the number of “automations” and “steps” such as Zapier, Integromat, or Make — not to mention retaining control over your sensitive data.
To begin deploying an instance of n8n using Docker Compose, you need to provision a VM at your cloud provider of choice, then install Docker according to the docs. We used an Ubuntu 22.04 LTS Azure VM of the Standard_B2als_v2 size with 2 vCPUs and 4 GB RAM. It was enough to run two separate Compose stacks (containers) for n8n on separate NGINX virtual hosts at two different subdomains. You simply need to use two separate project directories and docker-compose.yml files exposing the n8n service on localhost at two different ports, for example 127.0.0.1:5678:5678 for instance #1 and 127.0.0.1:5679:5678 for instance #2.
In your home directory, create a project sub-directory such as n8n and a new file called docker-compose.yml. When deployed, the services of the Compose stack will be prefixed with the name of the containing folder, for example n8n_n8n-1 and n8n_postgres-1.
Deploy n8n and Postgres containers using Docker Compose stack
The below Compose example, when replaced with your own email server credentials and n8n URL will produce an instance of n8n with functioning account management, API callbacks, and embedded chats. The containers will automatically come back up following a server reboot, thanks to the restart: always key, and the named volumes n8n_data and pg_data are mounted into the /home/node/.n8n and /var/lib/postgresql/data paths of the n8n and postgres containers respectively to persist data.
We use SendGrid’s SMTP service but you can use any other email gateway which has an SMTP endpoint that supports SSL. There should be a DNS A record created from your chosen hostname (e.g. n8n.autoize.net) to the public IP address of your VM instance, and the network security group (NSG) should allow inbound connections on port 80 (HTTP) and port 443 (HTTPS).
To deploy the Compose stack, use the command docker compose up -d -f docker-compose.yml when in the same working directory as the YAML file.
docker-compose.yml
version: '3.9'

services:
  n8n:
    image: docker.n8n.io/n8nio/n8n
    restart: always
    environment:
      - DB_TYPE=postgresdb
      - DB_POSTGRESDB_DATABASE=n8n
      - DB_POSTGRESDB_HOST=postgres
      - DB_POSTGRESDB_PORT=5432
      - DB_POSTGRESDB_USER=postgres
      - DB_POSTGRESDB_SCHEMA=public
      - DB_POSTGRESDB_PASSWORD=<password>
      - N8N_PROTOCOL=https
      - N8N_HOST=<n8n.autoize.net>
      - VUE_APP_URL_BASE_API=https://<n8n.autoize.net>/
      - WEBHOOK_TUNNEL_URL=https://<n8n.autoize.net>/
      - WEBHOOK_URL=https://<n8n.autoize.net>/
      - N8N_EMAIL_MODE=smtp
      - N8N_SMTP_HOST=<smtp.sendgrid.net>
      - N8N_SMTP_PORT=<465>
      - N8N_SMTP_USER=<apikey>
      - N8N_SMTP_PASS=<sendgrid api key>
      - N8N_SMTP_SENDER=<n8n@autoize.net>
      - N8N_SMTP_SSL=true
    ports:
      - 127.0.0.1:5678:5678
    depends_on:
      - postgres
    volumes:
      - n8n_data:/home/node/.n8n

  postgres:
    image: postgres:16
    restart: always
    environment:
      - POSTGRES_DB=n8n
      - POSTGRES_USER=postgres
      - POSTGRES_PASSWORD=<password>
    ports:
      - 5432:5432
    volumes:
      - pg_data:/var/lib/postgresql/data

volumes:
  n8n_data:
  pg_data:
Once the containers have been spun up, it is time to set up the NGINX reverse proxy (outside of a container, on the host machine) so that the n8n instance can be accessed publicly. Install NGINX from the system repository, like so:
$ sudo apt update
$ sudo apt install nginx
$ sudo systemctl enable nginx
$ sudo systemctl start nginx
Then, install Certbot as a snap which you will use to obtain the SSL certificate.
$ sudo snap install --classic certbot
$ sudo certbot certonly --nginx -d <n8n.autoize.net> -m <admin email address> --accept-tos
You will probably want to add the daily certbot renew job to your system-wide cron tab at /etc/crontab so that the SSL certificate renews itself every 90 when it is close to expiry, to avoid any certificate errors when accessing n8n.
30 1 * * * root sudo certbot renew --noninteractive --post-hook "service nginx reload"
After the SSL certificate has been obtained, configure an NGINX server block (virtual host) as follows in /etc/nginx/sites-available. After creating the config file, enable it by creating a sym link from sites-available to sites-enabled.
$ sudo ln -s /etc/sites-available/n8n.conf /etc/sites-enabled/n8n.conf
$ sudo rm -f /etc/sites-enabled/default
$ sudo service nginx reload
n8n.conf
server_tokens off;

server {
    listen 80;
    server_name default_server;
    if ($host = <n8n.autoize.net>) {
        return 301 https://$host$request_uri;
    }
}

server {
    listen 443 ssl;
    server_name <n8n.autoize.net>;

    # Enable streaming text generation
    proxy_buffering off;

    ssl_certificate /etc/letsencrypt/live/<n8n.autoize.net>/fullchain.pem;
    ssl_certificate_key /etc/letsencrypt/live/<n8n.autoize.net>/privkey.pem;
    include /etc/letsencrypt/options-ssl-nginx.conf;
    # ssl_dhparam /etc/letsencrypt/ssl-dhparams.pem;

    client_max_body_size 25M;

    location / {
        proxy_pass http://localhost:5678/;
        proxy_http_version 1.1;
        proxy_set_header Upgrade $http_upgrade;
        proxy_set_header Connection 'upgrade';
        proxy_set_header Host $host;
        proxy_cache_bypass $http_upgrade;
        proxy_set_header X-Real-IP $remote_addr;
        proxy_set_header X-Forwarded-For $proxy_add_x_forwarded_for;
        proxy_set_header X-Forwarded-Proto $scheme;
    }
}
After completing all of these steps and starting the Docker containers and the NGINX reverse proxy, you should be able to access the self-hosted n8n instance from the URL you specified in the config, and set up any AI workflow from scratch or using templates from the workflow library.


