Load balancing is an essential tool for architecting a cloud infrastructure that can scale web applications across two servers or more. Most applications quickly outgrow a single LAMP (Linux, Apache, MySQL, PHP/Perl/Python) server, so the first step is typically breaking the database server out to a separate cloud instance on the backend. With this two-tier setup of 1 web & application (frontend) + 1 database server (backend), you can scale to a certain extent by simply resizing the two instances as load increases.
This setup may suffice for a while, but it lacks the fault-tolerant and highly available characteristics of a load balanced architecture distributing traffic to multiple web & application servers behind the scenes. There are also limitations on how large you can vertically scale a cloud server, so it makes sense to start looking at a load balanced LAMP cluster sooner or later.
A load balancer (LB) stands in front of your entire infrastructure, serving as the gatekeeper for any HTTP/HTTPS requests which hit your domain name. Once you implement the load balancer, you would point your DNS records for your domain/subdomains to the endpoint (an IP address or FQDN) of the load balancer using A or CNAME records.
A load balancer can be a server you configure yourself with a reverse proxy such as nginx, Traefik, or HAProxy, or a managed load balancer from your cloud provider. Using a managed load balancing service eliminates the complexity of scaling your LB to ensure it doesn’t become a single point of failure that results in downtime for your entire infrastructure. Typically a managed load balancer such as Amazon ELB or DigitalOcean Load Balancer can be configured entirely from a GUI dashboard, from adding servers to balance between, to settings such as health check intervals, thresholds, and session stickiness.
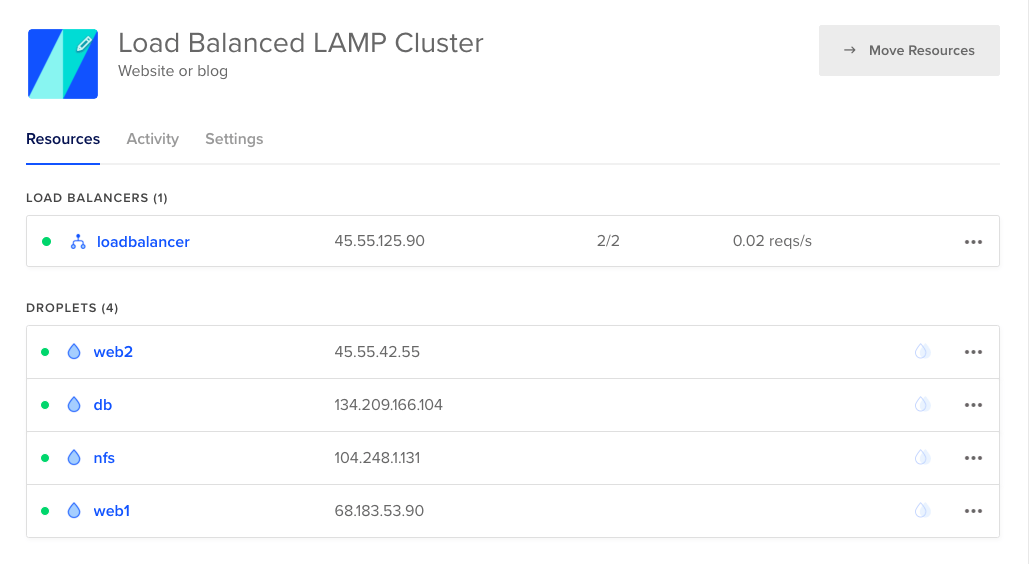
![]() For the purpose of this article, we will illustrate how to setup a minimal load balanced LAMP cluster on DigitalOcean consisting of the following resources. We’ll also leverage the private networking functionality of DO, which assigns all of the Droplets an internal IP on the same /16 subnet they can communicate on (for the NYC3 datacenter it is 10.132.0.0/16).
For the purpose of this article, we will illustrate how to setup a minimal load balanced LAMP cluster on DigitalOcean consisting of the following resources. We’ll also leverage the private networking functionality of DO, which assigns all of the Droplets an internal IP on the same /16 subnet they can communicate on (for the NYC3 datacenter it is 10.132.0.0/16).
On the web/application servers, we will install WordPress, the web’s most popular blogging/content management system, and Mautic, an open-source, self-hosted marketing automation tool. The stateful aspects of the applications will be persisted on the NFS server (media, themes, and plugins) and DB server (blog posts and Mautic contacts).
- Load Balancer $10.00/mo
- Web/Application Server 1 $5.00/mo
- Web/Application Server 2 $5.00/mo
- NFS Server $5.00/mo
- DB Server $5.00/mo
- Total: $30.00/mo
This is a Proof of Concept, not a full production setup.
 Take note that this sample architecture is only a starting point for a production deployment, as the NFS server (storage) and DB server (MySQL) remain single points of failure. Options to scale the storage and database services out to multiple nodes, include setting up a NFS cluster with DRBD + Pacemaker, and MySQL replication to slaves which can be used as read replicas and/or standby instances (for failover). If running on AWS, managed services such as Amazon EFS (Elastic File Service) and Amazon RDS (Relational Database Service) in Multi-AZ mode can also be used in place of a standalone NFS and MySQL server to achieve high availability.
When our cloud consultants deploy an infrastructure like this one for our customers in production, we take care to bind the NFS server (and related services) to static ports, and set up a firewall to ensure only authorized nodes can access the storage server. By default, NFS does not authenticate clients and any hosts on the specified subnet can access the shares.
Likewise, the MySQL server port should be locked down with a firewall so that only the web/application nodes in your cluster can connect to them.
On DigitalOcean, only Droplets provisioned in your account (or team) can communicate with each other over the private network. Other customers with Droplets in the same datacenter cannot access the open ports on your servers. However, not all cloud providers are this way. With Linode private networking, any Linodes can communicate with other Linodes in the same datacenter, whether they belong to your account or not. That’s why it’s crucial, and highly recommended in any case, to set up iptables or firewalld rules, as an additional line of defense to prevent unauthorized access.
Also in production it is always a good practice to setup SSL certificates prior to installing WordPress and Mautic on the web/application server, so that the database & admin dashboard passwords are never transmitted in plain-text over the Internet — only over HTTPS. Then some additional configuration is required to terminate SSL either on the load balancer, or by installing the certificate on each of the web servers.
To keep things simple, this sample cluster uses session stickiness to circumvent the issue of authenticated users hitting a different backend server than the one they logged in on — thereby being logged out. For a more comprehensive understanding of PHP session stores, refer to this article which builds upon the cluster described below.
1 – NFS Server
The NFS server provides shared storage for all of the web/application nodes in the LAMP cluster. For this cluster, we will export two shares on the NFS server, one to store the data in the Apache webroot, and another for the Apache configuration files.
– Create a new project, and spin up a Droplet on DigitalOcean with the following parameters:
Image: CentOS 7.6 x64
Plan: Standard 1 GB / 1 CPU
Backups: Optional
Datacenter region: Any – All nodes in the cluster must be deployed within the same datacenter.
Additional options: Private networking
SSH Keys: Select your SSH key.
Number of Droplets: 1
Hostname: nfs
Project: Name of the project you created
– SSH into the instance through its public IP.
– Install the nfs kernel server package and dependencies.
yum update
yum install nfs-utils nfs-utils-map portmap
– Enable (at startup) and start the nfs-server service, and related services.
systemctl enable rpcbind
systemctl start rpcbind
systemctl enable nfs-server
systemctl start nfs-server
systemctl enable nfs-lock
systemctl start nfs-lock
systemctl enable nfs-idmap
systemctl start nfs-idmap
– Create the directories for the NFS shares and set permissions to 777.
mkdir /var/webroot_share
chmod 777 /var/webroot_share
mkdir /var/apache_conf_share
chmod 777 /var/apache_conf_share
– Add the following lines to the /etc/exports file to make the above directories mountable by NFS clients.
/var/webroot_share/ 10.132.0.0/16(rw,sync,no_root_squash,no_all_squash)
/var/apache_conf_share/ 10.132.0.0/16(rw,sync,no_root_squash,no_all_squash)
– Restart the NFS service to have changes take effect.
systemctl restart nfs-server
2 – DB Server
The DB server will run MySQL server and be the “single source of truth” for any user data which the applications store within the database. The MySQL daemon will be set up to listen, and accept connections from any host on the local network.
– Spin up a Droplet on DigitalOcean with the following parameters:
Image: CentOS 7.6 x64
Plan: Standard 1 GB / 1 CPU
Backups: Optional
Datacenter region: Same as previous datacenter
Additional options: Private networking
SSH Keys: Select your SSH key.
Number of Droplets: 1
Hostname: db
Project: Name of the project you created
– Add the MySQL Community Server repo from the Oracle website, and enable installation of the 5.7.x branch.
yum update
rpm -Uvh https://dev.mysql.com/get/mysql80-community-release-el7-3.noarch.rpm
yum install yum-utils
yum-config-manager --disable mysql80-community
yum-config-manager --enable mysql57-community
– Install MySQL server, enable (at startup), and start mysqld.
yum install mysql-community-server
systemctl enable mysqld
systemctl start mysqld
– Edit /etc/my.cnf to enable connections from remote hosts.
In the [mysqld] block, add the following line where 10.132.xxx.xxx is the internal IP of the DB server. You can find the IP by clicking on the db Droplet in your DigitalOcean dashboard
bind-address=10.132.xxx.xxx
– Retrieve the temporary (randomly generated) root password from the install log to complete mysql_secure_installation and set a custom MySQL root password. The root password must contain at least one special character.
cat /var/log/mysqld.log | grep password
mysql_secure_installation
– Reboot the MySQL server.
systemctl restart mysqld
– Create a database and user for each of the applications, WordPress and Mautic.
mysql -uroot -p
mysql > create database wordpress;
mysql > create user ‘wordpress’@’%’ identified by ‘wordpress_s3cur3_pa$$w0rd’;
mysql > grant all privileges on wordpress.* to ‘wordpress’@’%’
mysql > create database mautic;
mysql > create user ‘mautic’@’%’ identified by ‘mautic_s3cur3_pa$$w0rd’;
mysql > grant all privileges on mautic.* to ‘mautic’@’%’;
mysql > flush privileges;
mysql > exit;
3 – Web/Application Server 1
On the web/application servers, Apache and PHP will be installed, and the NFS shares created previously will be mounted into the webroot directory /var/www/html and Apache configuration directory /etc/httpd/conf.d, respectively.
– Spin up a Droplet on DigitalOcean with the following parameters:
Image: CentOS 7.6 x64
Plan: Standard 1 GB / 1 CPU
Backups: Optional
Datacenter region: Same as previous datacenter
Additional options: Private networking
SSH Keys: Select your SSH key.
Number of Droplets: 1
Hostname: web1
Project: Name of the project you created
– Disable SELinux by modifying this line in the /etc/sysconfig/selinux file.
From: SELINUX=enforcing
To: SELINUX=disabled
– And stop SELinux by executing this command:
setenforce 0
– Mount the NFS shares, where 10.132.xxx.xxx is the internal IP of the NFS server.
You can find the IP by clicking on the nfs Droplet in your DigitalOcean dashboard.
mkdir -p /var/www/html
mkdir -p /etc/httpd/conf.d
mount -t nfs 10.132.xxx.xxx:/var/webroot_share/ /var/www/html/
mount -t nfs 10.132.xxx.xxx:/var/apache_conf_share/ /etc/httpd/conf.d/
– Make the mounts persistent by adding these lines to /etc/fstab
10.132.xxx.xxx:/var/webroot_share/ /var/www/html/ nfs rw,sync,hard,intr 0 0
10.132.xxx.xxx:/var/apache_conf_share/ /etc/httpd/conf.d/ nfs rw,sync,hard,intr 0 0
– Add the epel-release and Remi additional repositories.
yum update
yum install epel-release
rpm -Uvh https://rpms.remirepo.net/enterprise/remi-release-7.rpm
– Enable PHP 7.1 as the PHP version to be installed.
yum install yum-utils
yum-config-manager --enable remi-php71
– Install PHP and the following PHP modules.
yum install php php-zip php-xml php-imap php-mcrypt php-mysql php-mbstring php-curl php-amqplib php-mbstring php-bcmath php-intl php-gd php-process
– Install, enable (at startup), and start Apache HTTP server.
yum install httpd
systemctl enable httpd
systemctl start httpd
– Create the following Apache configuration files.
/etc/httpd/conf.d/default.conf
<VirtualHost *:80>

ServerAdmin admin@example.com

ServerName example.com

ServerAlias www.example.com

DocumentRoot /var/www/html/

ErrorLog /var/log/httpd/error.log

CustomLog /var/log/httpd/access.log combined

<Directory /var/www/html/>

AllowOverride All

</Directory>

</VirtualHost>
/etc/httpd/conf.d/mautic.conf
<VirtualHost *:80>

ServerAdmin admin@example.com

ServerName mautic.example.com

DocumentRoot /var/www/html/mautic/

ErrorLog /var/log/httpd/mautic.error.log

CustomLog /var/log/httpd/mautic.access.log combined

<Directory /var/www/html/mautic/>

AllowOverride All

</Directory>

</VirtualHost>
– Extract the WordPress and Mautic binaries into their respective directories.
Where 2.xx.x is the latest stable release of Mautic found on Github.
cd /var/www/html
yum install wget unzip
wget https://wordpress.org/latest.tar.gz
tar -xvzf latest.tar.gz
cp -ar wordpress/* .
rm -rf latest.tar.gz wordpress
mkdir /var/www/html/mautic
wget https://github.com/mautic/mautic/releases/download/2.xx.x/2.xx.x.zip
unzip 2.xx.x.zip
chown -R apache:apache /var/www/html
– Test the Apache configuration and restart Apache.
apachectl -t
systemctl restart httpd
– Configure DNS: Point example.com and mautic.example.com with A records at the public IP of the web1 Droplet. You can find the IP in your DigitalOcean dashboard.
– Once DNS has propagated, go to example.com for the WordPress install and mautic.example.com for the Mautic install wizards. The DB connection information should be as follows:
DB Name: wordpress or mautic
DB User: wordpress or mautic
DB Password: wordpress_s3cur3_pa$$w0rd or mautic_s3cur3_pa$$w0rd
DB Host: Internal IP of the DB server 10.132.xxx.xxx
4 – Web/Application Server 2 (Replica of Web/Application Server 1)
Once WordPress and Mautic have both been successfully installed on the first server, you are now ready to proceed to cloning the web1 server to a new Droplet, web2.
– Navigate to the web1 Droplet in the DigitalOcean dashboard and select it.
– In the left sidebar, select Snapshots.
– Power off the server to ensure data consistency while taking the snapshot.
– Click “Take Snapshot.”
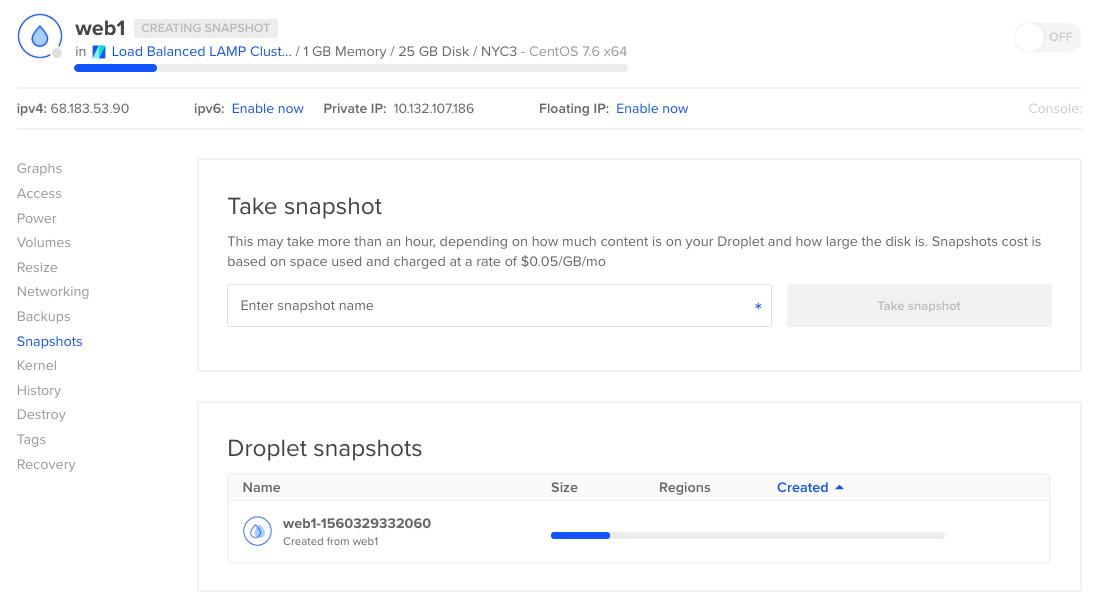 – Once the snapshot has completed, click the dropdown arrow to “Create Droplet” based on that snapshot (a clone).
Image: CentOS 7.6 x64
Plan: Standard 1 GB / 1 CPU
Backups: Optional
Datacenter region: Same as previous datacenter
Additional options: Private networking
SSH Keys: Select your SSH key.
Number of Droplets: 1
Hostname: web2
Project: Name of the project you created
– Power web1 back up.
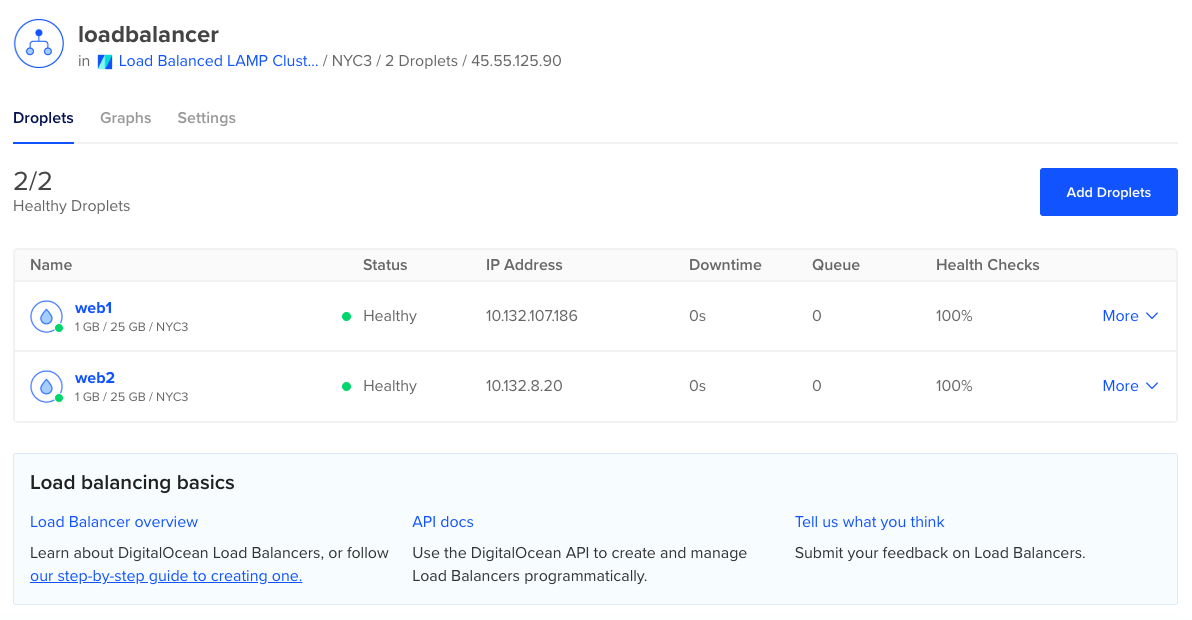
5 – Load Balancer
Finally, you’re ready to provision a load balancer to distribute the incoming traffic across your two web/application Droplets, web1 and web2.
– Login to the DigitalOcean dashboard, select your project, and click Create > Load Balancers.
Datacenter region: Same as previous datacenter
Forwarding rules: HTTP 80 -> HTTP 80
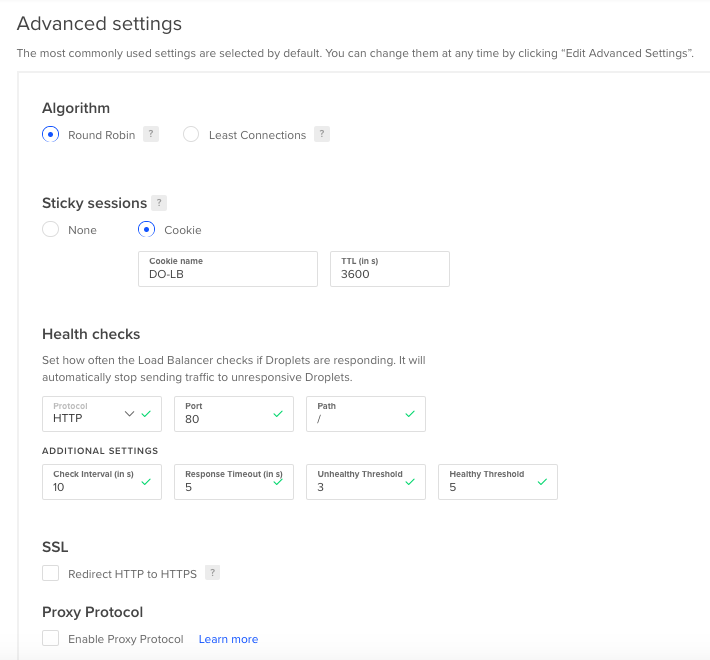 Advanced settings:
Algorithm: Round Robin
Sticky Sessions: Cookie / Cookie Name: DO-LB / TTL: 3600s
Health Checks: Protocol: HTTP / Port: 80 / Path: /
Additional Settings:
Check interval: 10s Response timeout: 5s
Unhealthy threshold: 3 Healthy Threshold: 5
SSL: Redirect HTTP to HTTPS: No
Enable Proxy Protocol: No
Name: loadbalancer
Click “Create Load Balancer” to confirm provisioning the load balancer.
– Redirect DNS to the load balancer: Point example.com and mautic.example.com using A records to the public IP of the load balancer. www.example.com should be created as a CNAME with value example.com. You can find the IP by selecting the Load Balancer within your DigitalOcean dashboard.
– As soon as the DNS propagates, traffic hitting example.com and mautic.example.com will be routed through the load balancer, which will evenly distribute visitors to each of the web servers. The session stickiness means users will be served by the same web server for 1 hour after the initial visit, before they might be assigned a different server. This is helpful to prevent users from getting sporadically logged out of the WP-Admin dashboard or Mautic dashboard as their PHP session wouldn’t exist on the other web servers.
You can monitor how many requests/second and the average response time (in ms) your cluster is serving from the Load Balancer graphs dashboard in DigitalOcean, if your backend hosts are healthy, and what % of the time they passed the Health Check.