
Mine Cryptocurrencies Using Containers
Mine Monero with Docker
With the meteoric rise of cryptocurrencies, mining Bitcoin has become a popular pastime among computer enthusiasts and for some, it has even become a business. While Bitcoin mining is no longer feasible without a GPU or ASIC-based mining rig, Monero (XMR), a privacy-oriented alt-coin is still possible to mine with a regular desktop or even a cloud server.
Meanwhile, you can learn more about the benefits of using Monero over Bitcoin. In short, all Bitcoin transactions are publicly visible on the blockchain but Monero is 100% private. With Bitcoin, it’s trivial to find out which wallets a coin changed hands between since the day it was mined. Nobody can know the balance of a Monero wallet unless they have the ‘view’ key associated with that wallet.
Despite Monero being much easier to mine than Bitcoin, most likely you will still want to join a mining pool. A pool combines the computing power of many nodes to solve a cryptographic hash. It distributes a reward proportionate to the work your node performed when the pool collectively finds a block.
Even with a powerful desktop PC, it could be months or years before you find a block yourself. As of Sep 2017, the block reward is 6.45 XMR. Joining a large pool virtually guarantees that blocks will be found daily, allowing you to partake in the profits. ServeTheHome and MoneroBenchmarks.info have published some benchmarks to illustrate what hashrates you can expect using different equipment. Using the hashrate, you can calculate how many XMR you would mine (at the current difficulty) and whether you’d make a profit or loss based on your cost of power.

Why Use Docker to Mine Cryptocurrencies
Unless you have dedicated hardware for your mining enterprise, you probably want to run the Monero miner only in the background or with a portion of the CPU cores on your system. The mining apps can be tricky to set up, because you need to edit config files and install dependencies manually. With Docker, all you need is pull a container from the Docker Hub and specify your Monero address or mining pool login. You can also setup a swarm of Docker nodes to use multiple machines to mine Monero.
Docker Recipe: Manage a Monero mining operation with Portainer
In this Docker recipe, you’ll learn how to install Portainer – a GUI for Docker and set up the containers you need to mine Monero on a single node. Before you begin, you should set up a Docker environment on your machine.
Launch Portainer
In this step, you will create a Docker network and set up the nginx-proxy containers that automatically obtain a Let’s Encrypt certificate and proxy traffic over HTTPS to the Portainer container. For a deeper understanding of this setup, refer to our Docker recipe that used this setup to host multiple WordPress containers.
docker network create dockernet
docker run --name nginx-proxy --net dockernet -p 80:80 -p 443:443 -v ~/certs:/etc/nginx/certs -v /etc/nginx/vhost.d -v /usr/share/nginx/html -v /var/run/docker.sock:/tmp/docker.sock:ro --label com.github.jrcs.letsencrypt_nginx_proxy_companion.nginx_proxy -d jwilder/nginx-proxy
docker run --name letsencrypt-nginx-proxy-companion --net dockernet -v ~/certs:/etc/nginx/certs:rw -v /var/run/docker.sock:/var/run/docker.sock:ro --volumes-from nginx-proxy -d --restart always jrcs/letsencrypt-nginx-proxy-companion
docker run --name portainer --net dockernet -v /var/run/docker.sock:/var/run/docker.sock -v portainer:/data -e VIRTUAL_HOST=domain.com -e VIRTUAL_PORT=9000 -e LETSENCRYPT_HOST=domain.com -e LETSENCRYPT_EMAIL=admin@domain.com --restart always -d portainer/portainer
Set up Monero mining containers
ServeTheHome (STH) maintains a set of Monero mining containers based on Wolf’s CPU miner, one of the most popular mining tools since Monero began to take off. When launched, the container automatically compiles Wolf’s miner and starts the most optimal number of threads based on your CPU’s L3 cache ÷ 2.
There are three Docker images to choose from, depending on which Monero mining pool you prefer:
- servethehome/monero_cpu_minergate (1-1.5% fee)
- servethehome/monero_cpu_moneropool (1.9% fee, 0.5 XMR min. payout)
- servethehome/monero_cpu_xmrpooldotnet (0.4-0.6% fee, 0.8 XMR min. payout)
Many users in the Monero subreddit discourage using MinerGate because the mining software is closed source and reportedly, the pool understates your hash rate. We haven’t been able to verify this, but we encourage you to try another pool, such as MoneroPool.com or XMRPool.net. It’s also worth considering that Minergate has dominated up to 38% of Monero’s hash rate before. Based on how cryptocurrencies are designed, a concentration of hashing power in a single pool makes the Monero network less secure.
MinerGate requires you to sign up with an email address (Affiliate link for STH) before mining, all MoneroPool.com and XmrPool.net need is a Monero wallet address. You can set up an online wallet at MyMonero.com or generate a paper wallet. For storing funds long-term, a paper wallet is more secure – but it is easier to send/receive XMR using MyMonero.com as you don’t need a desktop client.
If you want to try mining but don’t have your own wallet address yet, you can send any mined Moneroj to the Monero dev team donation address: 44AFFq5kSiGBoZ4NMDwYtN18obc8AemS33DBLWs3H7otXft3XjrpDtQGv7SqSsaBYBb98uNbr2VBBEt7f2wfn3RVGQBEP3A
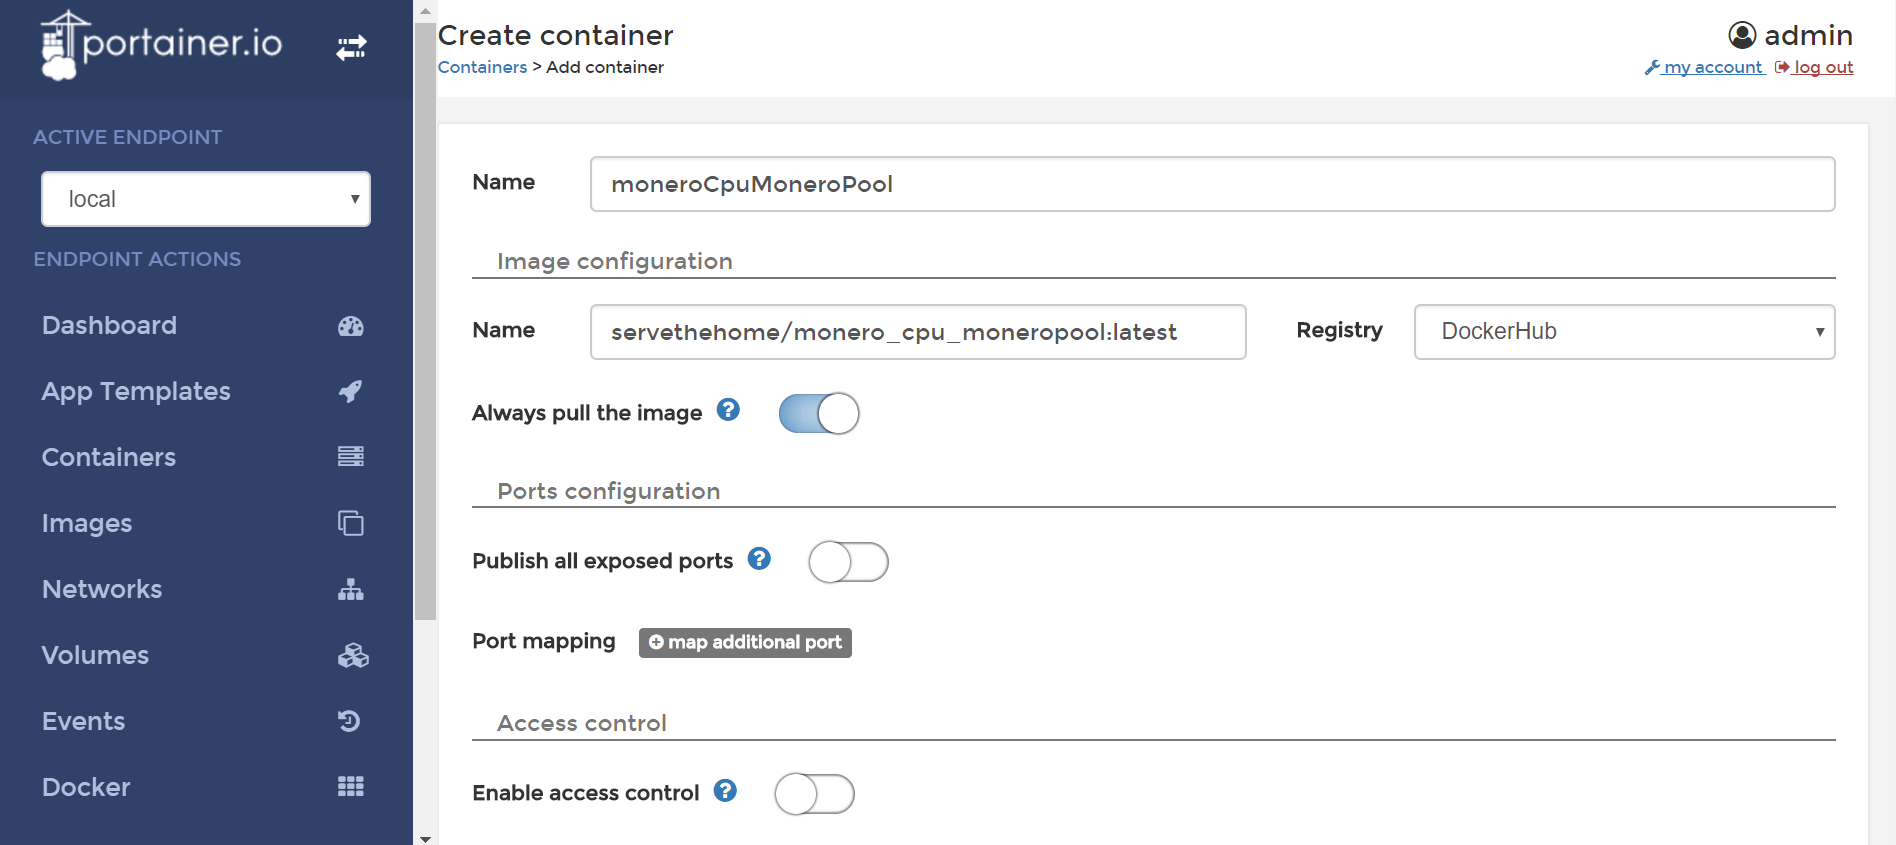
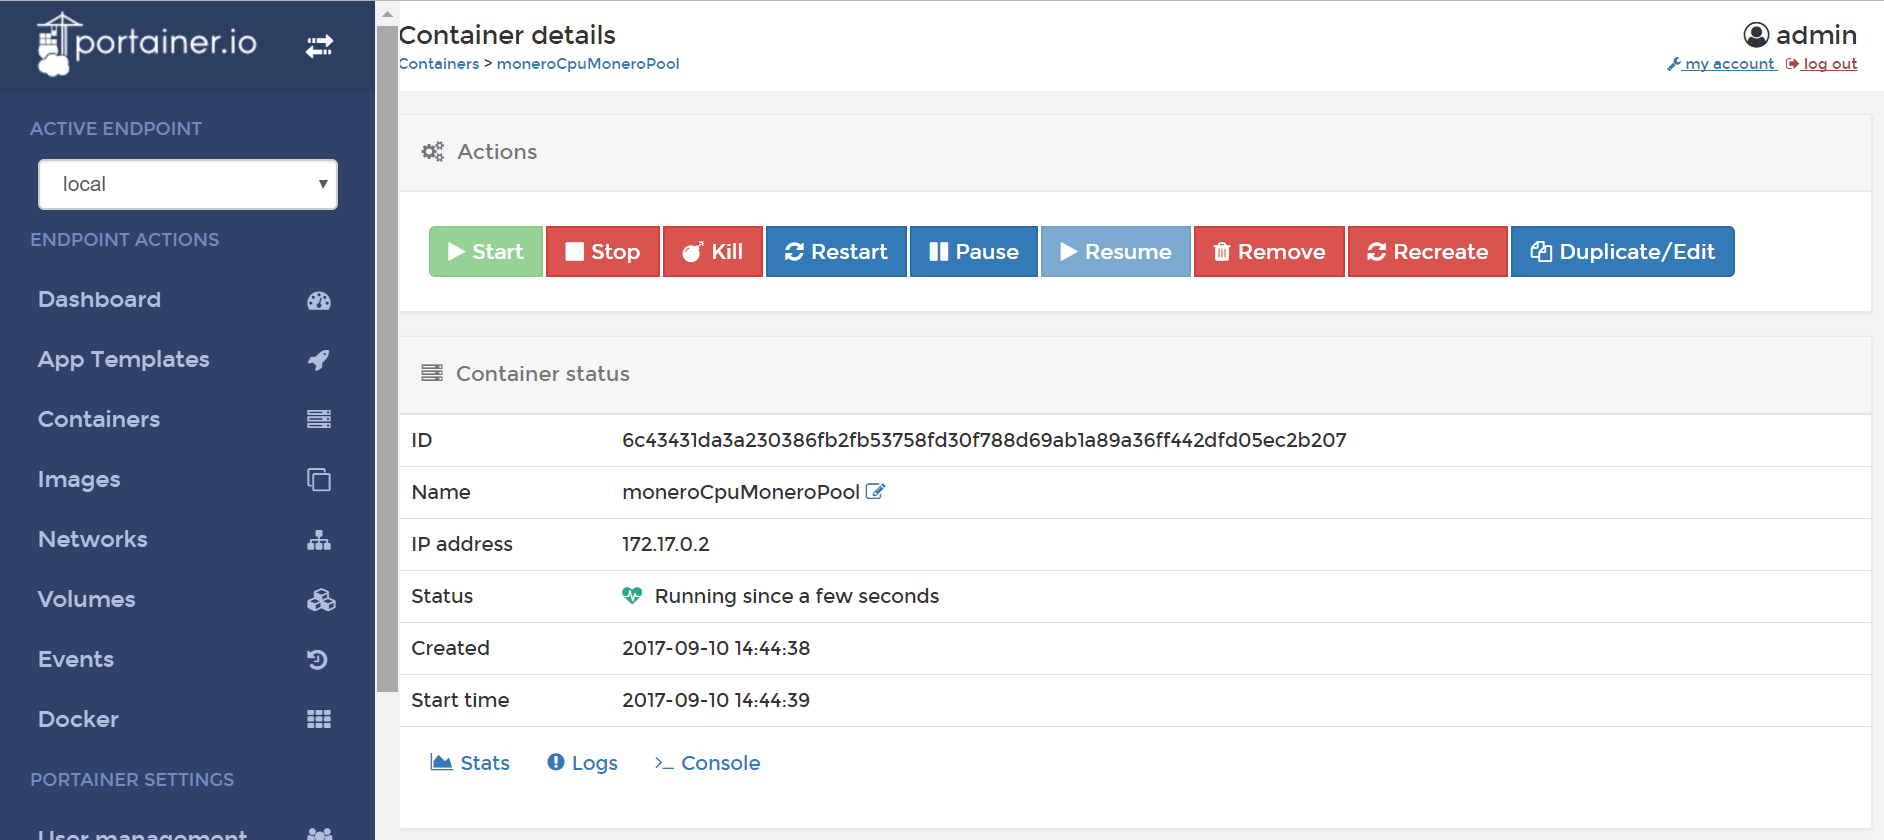
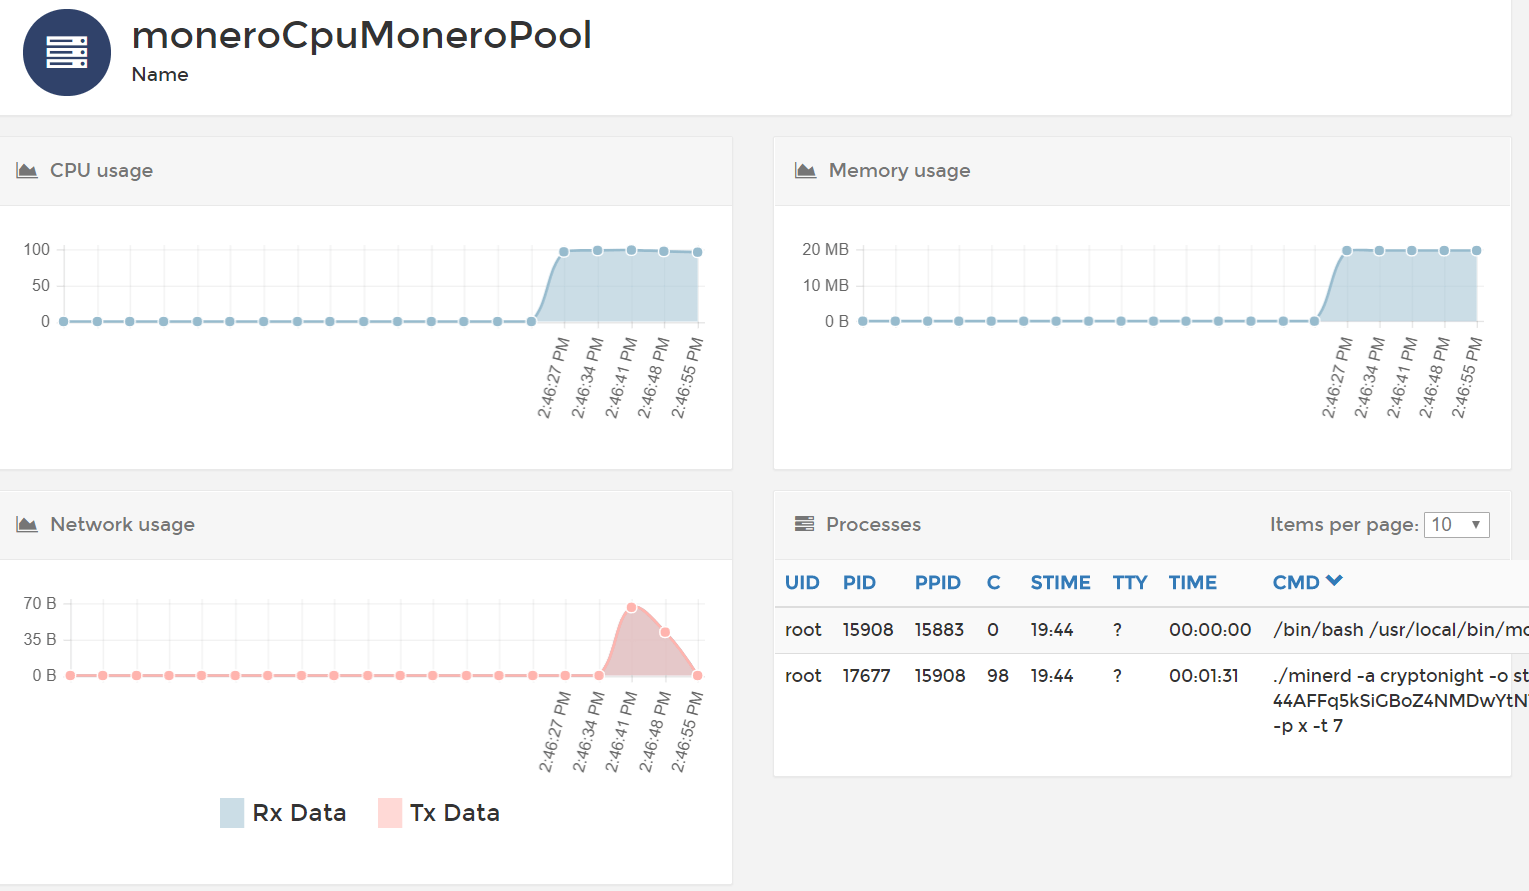
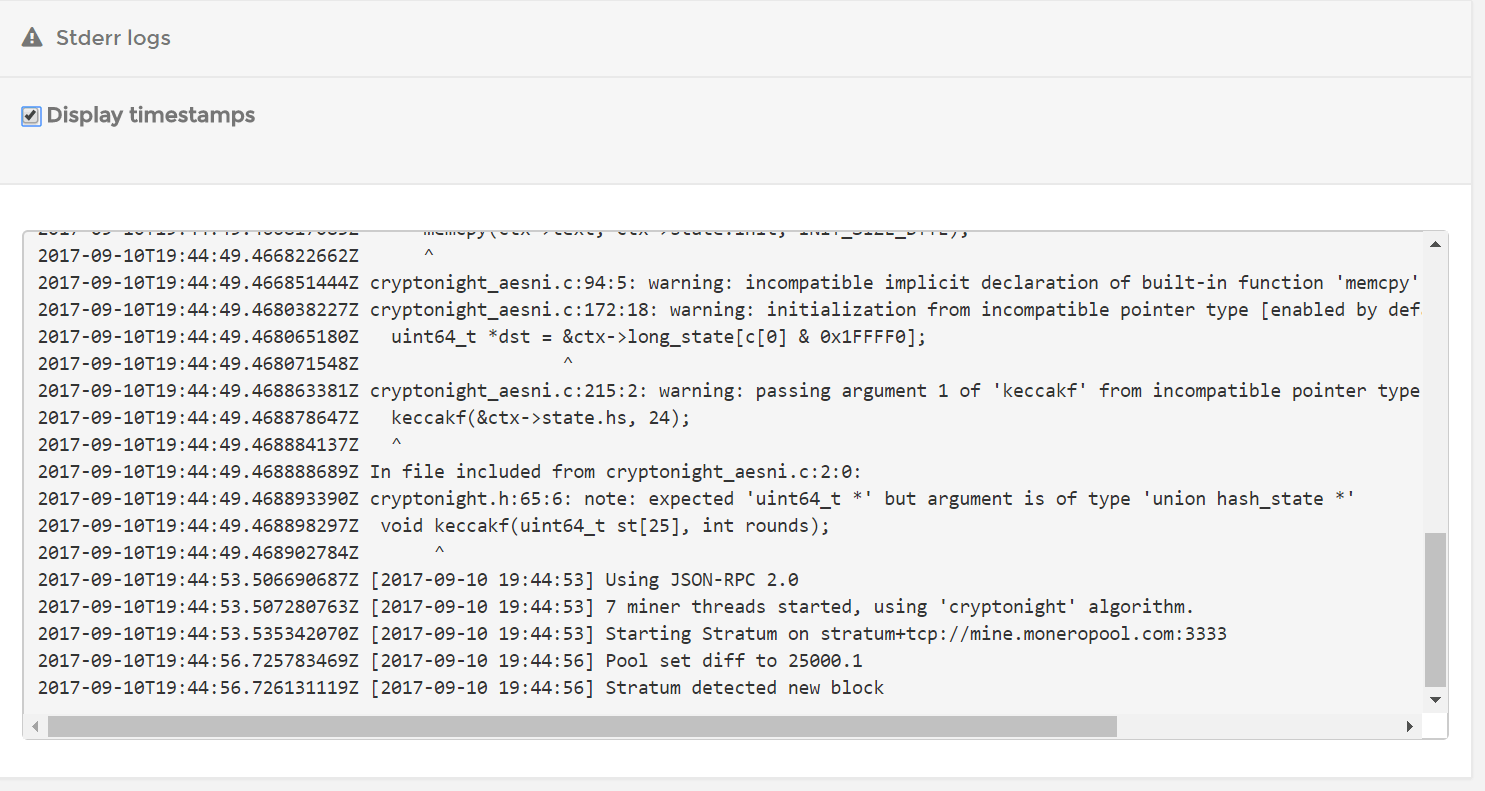
Below is how you would start each container in Portainer, or with the equivalent docker run command. In Portainer, navigate to Containers on the sidebar and click the “+ Add Container” button. Once you’ve filled in the details, click “Create Container.” After the container has launched, you can verify that mining has commenced by seeing there is network and CPU activity in the Container stats, and the Container logs show that “X mining threads started.”
MoneroPool.com
docker run -d -e username=wallet_address servethehome/monero_cpu_moneropool
Portainer:
Name: moneroCpuMoneroPool
Image name: servethehome/monero_cpu_moneropool:latest
Environment variables:
name: username value: wallet_address
XMRPool.net
The XMRPool.net image has multiple tags, depending on which CPU family you are using. For Intel Core and Xeon processors, use the latest tag. For Atom and Xeon Phi processors, use the nproc tag. For AMD Ryzen processors, use the ryzen tag.
docker run -d -e username=wallet_address servethehome/monero_cpu_xmrpooldotnet
Portainer:
Name: moneroCpuXmrPool
Image name: servethehome/monero_cpu_xmrpooldotnet:latest
Environment variables:
name: username value: wallet_address
MinerGate
docker run -d -e username=example@example.com servethehome/monero_cpu_minergate
Portainer:
Name: moneroCpuMinergate
Image name: servethehome/monero_cpu_minergate:latest
Environment variables:
name: username value: example@example.com
Set CPU quotas for each container
You can set CPU quotas to limit each container to the number of cores it can use on your system. This setting is helpful if you want to run a container in the background and keep the remaining CPU cores available for other processes. Previously, the –cpus flag must be set by creating the container from the Docker command line. Edit: Portainer has added this to the GUI in a Portainer 1.14.1 and above, so you can specify this when you create the container in the UI.
For instance, the docker run command below would launch a Monero mining container on XMRPool.net with a limit of 1 CPU cores.
docker run --name MoneroCpuXmrPool -e username=wallet_address --cpus 1 -d servethehome/monero_cpu_xmrpooldotnet