How to Install Pydio 8
![]() Pydio 8 Community Edition is a freely available enterprise file sharing & sync server distributed under the open-source AGPL license. It supports modern versions of PHP and runs as a web application on any Linux server. The user interface is inspired by Google’s Material Design language, giving the Pydio web portal a look-and-feel that will be familiar & aesthetically pleasing to anybody with an Android or Google Account. Make no mistake however, Pydio is a cross-platform app with PydioSync clients for Windows, Mac OS, and Linux desktops, in addition to mobile apps for both iOS and Android.
Pydio 8 Community Edition is a freely available enterprise file sharing & sync server distributed under the open-source AGPL license. It supports modern versions of PHP and runs as a web application on any Linux server. The user interface is inspired by Google’s Material Design language, giving the Pydio web portal a look-and-feel that will be familiar & aesthetically pleasing to anybody with an Android or Google Account. Make no mistake however, Pydio is a cross-platform app with PydioSync clients for Windows, Mac OS, and Linux desktops, in addition to mobile apps for both iOS and Android.
The official documentation to install Pydio 8 is available on Pydio’s website, but it references a package repository that installs PHP 5.6 which has reached end-of-life. PHP 7.1 is now the recommended version for Pydio 8. It also doesn’t outline how to add a custom Apache configuration, which we will show you in this tutorial to get a free SSL certificate from Let’s Encrypt and enable HTTPS to secure your Pydio 8 server. We’ll also show you how to enable large file uploads on Pydio 8 so you can upload files larger than 200MB not only in the desktop client, but also using the web portal.
Technical Requirements for Pydio 8 Server
This tutorial is for a CentOS 7 environment. The minimum requirements for a Pydio server are 4GB RAM and 2 CPUs, with 8GB being the recommended spec for a production deployment. Pydio recommends the m4.large AWS instance with 8GB RAM and 2 Virtual Cores, which costs $0.10/hour (approximately $75/month).
DigitalOcean is also a great cloud hosting provider for your Pydio instance. They have a $20/mo plan with 4GB RAM and 2 CPUs, and a $40/mo plan with 8GB RAM and 4 CPUs, making them significantly less expensive than AWS. New customers: Use our referral link to receive $100 in free Pydio hosting for 60 days (We get $25 as a thank you from DigitalOcean).
This tutorial is intended to illustrate how to get a minimal Pydio instance up and running. If you require a fully optimized Pydio instance for production use in your organization, contact our Pydio consultants for help with planning a scalable & secure implementation that can grow in capacity with your needs.
Tutorial
This Pydio 8 tutorial assumes you will be installing Pydio at a subdomain of a second-level-domain (pydio.example.com/pydio) that is already registered with an accredited registrar. It also assumes you are starting with a fresh CentOS 7 instance that will be used exclusively for the purpose of hosting Pydio 8. Pydio can co-exist with other web applications on a single VPS instance, but it requires special Apache VirtualHost configuration to share ports 80/443, which is outside the scope of this article.
sudo yum update -y
sudo yum install nano wget yum-utils -y
sudo yum install epel-release scl-utils centos-release-scl -y
wget https://rpms.remirepo.net/enterprise/remi-release-7.rpm
sudo rpm -Uvh remi-release-7.rpm
sudo rpm -Uvh https://download.pydio.com/pub/linux/centos/php71/7/pydio-php71-release-1-1.el7.noarch.rpm
sudo yum clean all
sudo yum update -y
sudo yum install pydio-core -y
source /opt/rh/rh-php56/enable
source /opt/rh/httpd24/enable
sudo nano /etc/opt/rh/rh-php71/php.ini
max_execution_time = 86400
post_max_size = 15G
upload_max_filesize = 15G
output_buffering = Off
sudo systemctl restart httpd24-httpd
sudo yum update -y
sudo yum install nano screen wget yum-utils -y
wget https://dev.mysql.com/get/mysql80-community-release-el7-2.noarch.rpm
sudo rpm -ivh mysql80-community-release-el7-2.noarch.rpm
sudo yum-config-manager --disable mysql80-community
sudo yum-config-manager --enable mysql57-community
sudo yum install mysql-community-server -y
sudo systemctl enable mysqld
sudo systemctl start mysqld
‘grep’ for the initial mysql root password in the mysqld log.
sudo cat /var/log/mysqld.log | grep password
sudo mysql_secure_installation
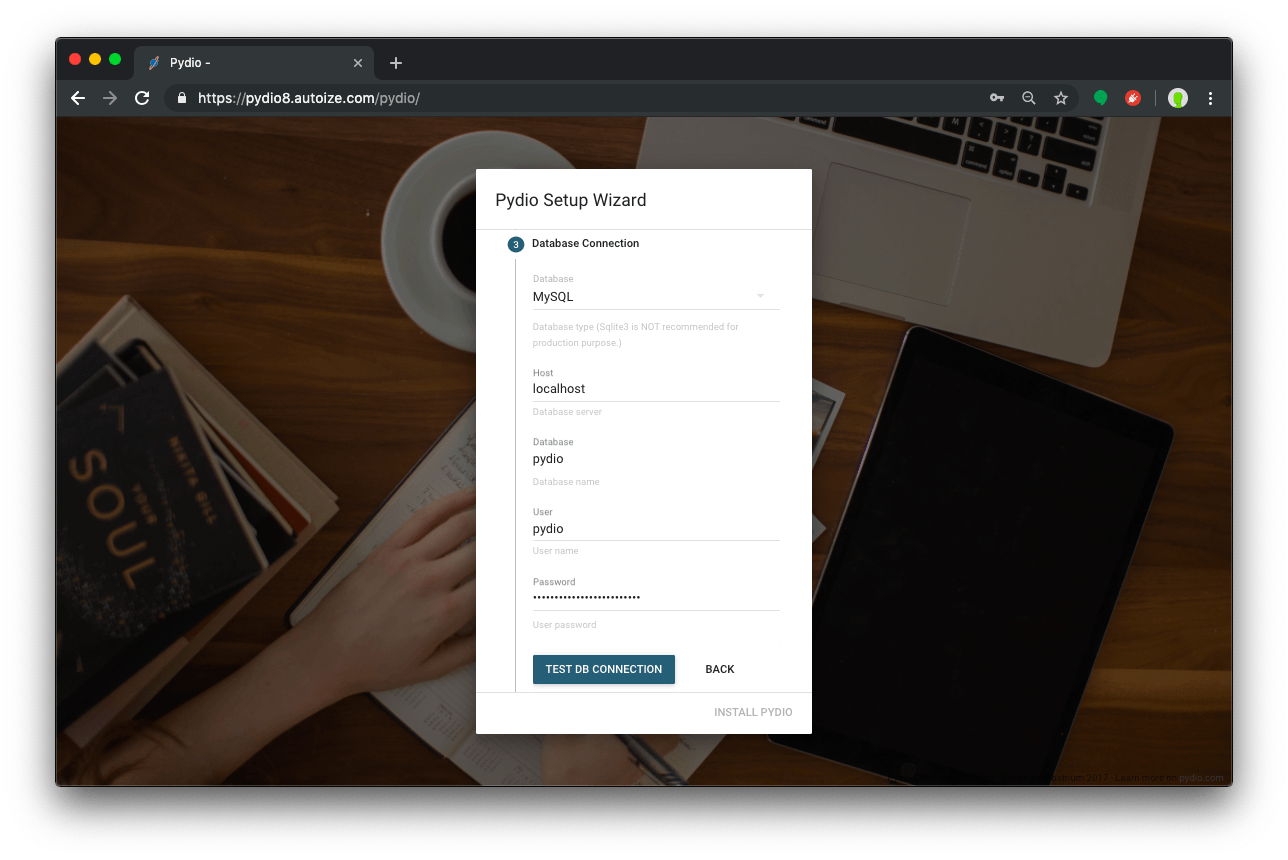
mysql -uroot -p
mysql> CREATE USER ‘pydio’@’localhost’ IDENTIFIED BY ‘changeth!s’;
mysql> CREATE DATABASE pydio;
mysql> GRANT ALL PRIVILEGES ON pydio.* to ‘pydio’@’localhost’;
mysql> FLUSH PRIVILEGES;
mysql> exit;
sudo setenforce 0
Edit from SELINUX=enforcing to SELINUX=disabled
sudo nano /etc/sysconfig/selinux
sudo yum install certbot -y
sudo certbot certonly --webroot -w /opt/rh/httpd24/root/var/www/html -d pydio.example.com --email webmaster@example.com --agree-tos
sudo certbot renew --dry-run
sudo nano /etc/crontab
15 2 * * * root certbot renew
sudo yum install httpd24-mod_ssl -y
sudo nano /opt/rh/httpd24/root/etc/httpd/conf.d/ssl.conf
Listen 443
<VirtualHost *:443>
ServerName pydio.example.com:443
SSLEngine on
SSLCertificateFile /etc/letsencrypt/live/pydio.example.com/cert.pem
SSLCertificateKeyFile /etc/letsencrypt/live/pydio.example.com/privkey.pem
SSLCertificateChainFile /etc/letsencrypt/live/pydio.example.com/fullchain.pem
# alias for backward compability of public links
Alias /pydio_public /usr/share/pydio
Alias /pydio /usr/share/pydio
<Directory /usr/share/pydio>
Options FollowSymLinks
AllowOverride Limit FileInfo
<IfVersion < 2.4>
Allow from all
</IfVersion>
<IfVersion >= 2.4>
Require all granted
</IfVersion>
# rewrite for backward compability of public links
RedirectMatch “^/pydio_public/(.*)” “/pydio/public/$1”
</Directory>
</VirtualHost>
sudo /opt/rh/httpd24/root/etc/httpd/conf.d/https-redirect.conf
<VirtualHost *:80>
ServerName pydio.example.com:80
Redirect permanent / https://pydio.example.com/
</VirtualHost>
sudo apachectl -t
sudo systemctl restart httpd24-httpd
Navigate to https://pydio.example.com/pydio to launch the browser-based setup wizard.